



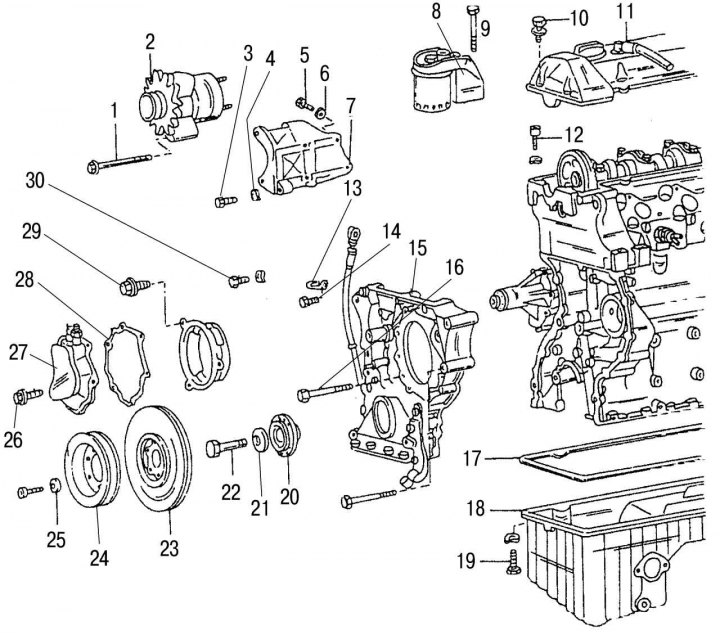
Figure 43. Camshaft drive mechanism cover and its attachments: 1 — generator mounting bolt, 45 Nm; 2 - alternating current generator; 3 — bolt, 25 Nm; 4 - washer; 5 — generator bracket mounting bolt, 45 Nm; 6 - washer; 7 — generator bracket; 8 - fuel filter; 9 — fuel filter mounting bolt, 10 Nm; 10 — cylinder head cover mounting bolt, 10 Nm; 11 — cylinder head cover; 12 — bolt, 25 Nm; 13 — bolt, 10 Nm; 14 — bolt, 10 Nm; 15 — camshaft drive mechanism cover; 16 — camshaft drive mechanism cover mounting bolt, 25 Nm; 17 — oil pan gasket; 18 — oil pan; 19 — oil pan mounting bolt, 25 Nm; 20 — vibration damper hub; 21 - elastic washer; 22 — bolt, 320 Nm; 23 - vibration damper; 24 — drive belt pulley; 25 - washer; 26 — vacuum pump mounting bolt, 10 Nm; 27 - vacuum pump; 28 - Vacuum pump gasket; 29 — bolt, 10 Nm; 30 — bolt, 10 Nm
The camshaft drive mechanism cover closes the engine crankcase from the front side. It is mounted on two cylindrical dowel pins and secured with 2 cap screws at the top, 5 bolts to the oil pan and 14 bolts to the cylinder block. A sealant is used to seal the connection between the camshaft drive mechanism cover and the engine crankcase. The following engine parts and assemblies are attached to the mechanism cover (figure 43):
- brake system vacuum pump;
- water pump;
- fuel filter;
- power steering pump;
- alternator drive belt tensioner support pin;
- front crankshaft oil seal;
- tDC indicator pin;
- oil dipstick guide tube.
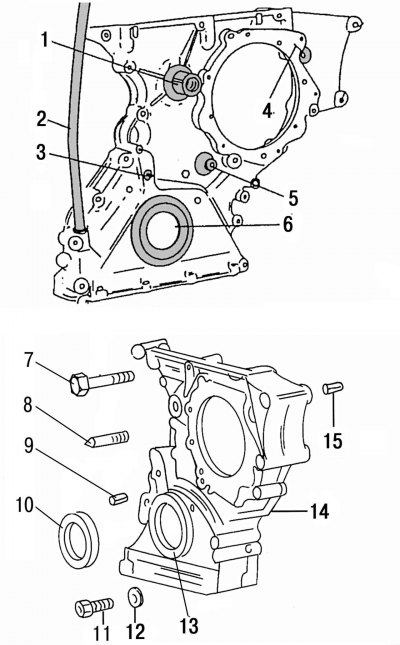
Figure 44. Camshaft drive mechanism cover with individual parts indicated (the details of the lid are shown below): 1 — support pin of the generator drive belt tensioning mechanism; 2 - oil dipstick guide tube; 3 — TDC position indicator pin; 4 - hole with flange for vacuum pump; 5 — TDC sensor mounting pin on four-cylinder engines; 6 — front crankshaft oil seal; 7 — bolt for fastening the camshaft drive mechanism cover to the cylinder block; 8 — TDC position indicator pin; 9 — seat bushing for mounting the TDC sensor; 10 — front crankshaft oil seal; 11 — bolt for fastening the camshaft drive mechanism cover to the cylinder block; 12 - elastic Grover washer; 13 — location of installation of the front crankshaft seal; 14 — camshaft drive mechanism cover; 15 — seat bushing of the power steering pump
The camshaft drive mechanism cover can be removed without removing the engine from the vehicle. The sequence of operations for dismantling the cover is described below. Work on dismantling individual units is described in the relevant chapters. There is a drawing on the top 44 shows all the parts that must be removed when removing the cover.
Removal of the camshaft drive mechanism cover must be performed as follows:
- remove the mudguard at the front of the car and drain the oil from the engine;
- disconnect the ground terminal from the battery;
- remove all parts from the front of the car to ensure good access to the engine;
- loosen the drive belt tensioner mechanism on the front end of the engine. The relevant chapter provides a detailed description of how to carry out this work;
- remove vacuum pump;
- unscrew the three bolts securing the power steering pump pulley and remove the pulley;
- remove the pump and, moving it to the side, leave it hanging on the hoses;
- remove the drive belt tensioner mechanism. First of all, you should unscrew the bolt at the top of the damper. Remove the cover from the tension arm, unscrew the bolt and remove the lock washer. Remove the tension lever together with the damper and tension spring from the support pin on the camshaft drive mechanism cover;
- unscrew the front of the two fuel filter mounting bolts;
- unscrew the fastening elements of the crankshaft vibration damper belt pulley;
- engage the gear to lock the crankshaft from turning. Loosen the crankshaft pulley hub fasteners and remove the hub from the shaft flange. Often the hub is easily removed, if necessary, use a puller;
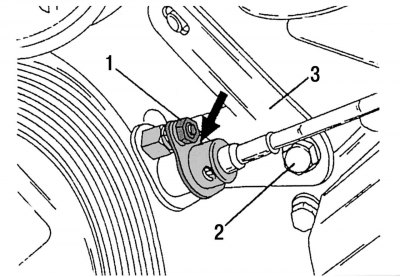
Figure 45. Fastening the first cylinder piston position sensor at TDC on the camshaft drive mechanism cover
- remove the piston position sensor of the first cylinder at TDC in the working stroke. To do this, you need to unscrew nut 1, shown in the figure 45, pull the sensor cable out of the mounting socket 3 and move it to the side. On five-cylinder engines, this sensor has been moved to the right side of the camshaft drive mechanism cover for reasons of available space;
- remove the alternator together with the mounting bracket;
- on vehicles with automatic transmission, it is necessary to disconnect the oil lines from the transmission oil cooler. Close the opened holes properly;
- unscrew the front oil pan mounting bolts located in the area of the camshaft drive mechanism cover, and then all the remaining oil pan mounting bolts;
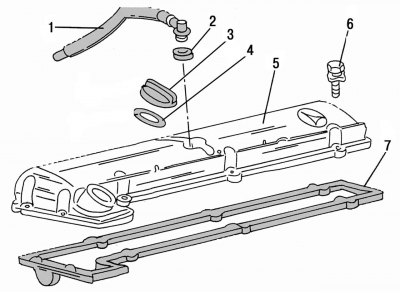
Figure 46. Cylinder head cover of a five-cylinder diesel engine (602): 1 — crankcase ventilation hose; 2 - round gasket on the cylinder head; 3 - oil filler cap; 4 - rubber gasket of the oil filler cap; 5 — cylinder head cover; 6 — cylinder head cover mounting bolt; 7 — cylinder head cover gasket
- remove the cylinder head cover. It is secured with 8 bolts. First, you should remove the crankcase ventilation hose, which is attached to the middle part of the cover. On vehicles with an automatic transmission, it is also necessary to disconnect the rods that pass over the cylinder head cover. Figure 46 shows the cylinder head cover of a 2.9L diesel engine;
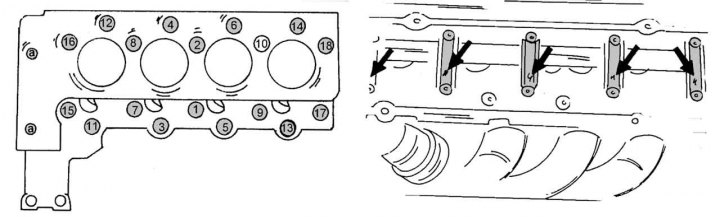
Figure 31. Cylinder head bolt tightening sequence for a 2.3L engine
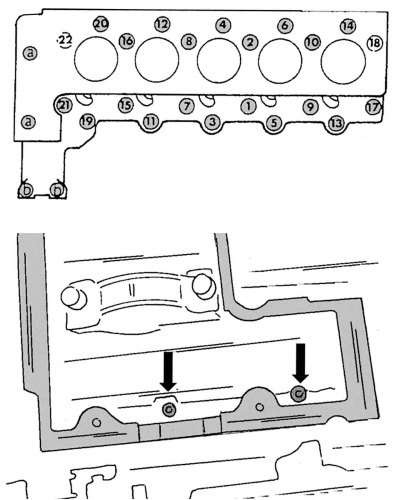
Figure 32. Cylinder head bolt tightening sequence for a 2.9L engine
- unscrew two M8 bolts with cylindrical heads for a 6 mm Allen key, using an extension of at least 440 mm, in the chain housing (see bolts a in the figure 31 and 32);
- loosen the fasteners and remove the retaining clamp of the oil dipstick guide tube from the camshaft drive mechanism cover;
- unscrew the fuel pump mounting bolts and the square nuts on the pump flange;
- unscrew the remaining camshaft drive mechanism cover mounting bolts and remove the cover. Since the mounting bolts are of different lengths, they must be marked before unscrewing. When doing this, you must be very careful not to damage the cylinder head gasket. Otherwise, it will also have to be changed.
The installation of the camshaft drive mechanism cover must be carried out in the following order:
- thoroughly clean the mating surfaces of the camshaft drive mechanism cover and cylinder block from any remaining old sealant. The surface of the camshaft drive mechanism cover should also be checked for damage that could cause oil leaks;
- apply sealant to the sealing surfaces of the camshaft drive mechanism cover. At specialized Mercedes-Benz service stations, Curil T sealant is used, which can be purchased by specifying the spare parts specification number: 001 989 47 20 (you can also use similar types of sealant, such as Hylomar);
- carefully place the camshaft drive mechanism cover onto the cylinder block, being careful not to damage the cylinder head gasket;
- install the camshaft drive mechanism cover mounting bolts one by one into their places and tighten them;
- if it is necessary to replace the crankshaft seal, it must be placed on the crankshaft flange and carefully inserted into the camshaft drive mechanism cover;
- install the fuel filter in its place.
All other work must be performed in the reverse order of removal. In addition, you must do the following:
- tighten the drive belt (see the corresponding subsection.);
- fill the engine with the required amount of motor oil of the required grade;
- fill the cooling system;
- start the engine and check the joints for oil leaks.