
Cars BMW Cars Volkswagen Cars Chevrolet Cars Land Rover Cars Lada Cars Honda Cars Peugeot
English Русский
Български
Беларускі
Український
Српски
Hrvatski
Română
Polski
Slovenský
Magyar
Bookmark News and articles Sitemap Feedback Site search
MercedesMan.ru


A-Class C-Class E-Class G-Class M-Class S-Class Others
Sprinter (1995-2000, diesel) Vito 1 (1996-2003) Vito 2 (2003-2014, diesel) Vario 814D (1996-2003, diesel)
  • Main
  • Mercedes-Benz
  • Sprinter (1995-2000)
  • Power unit
  • Engine repair
  • Installing pistons with connecting rods into cylinders

Installing pistons with connecting rods into cylinders (Mercedes-Benz Sprinter 903)

0
When installing pistons with connecting rods into engine cylinders, the following operations must be performed:
  • lubricate the inner surfaces of the cylinders;
  • place the connecting rods opposite the corresponding cylinders. The marks on the lower heads of the connecting rods and the connecting rod bearing caps must be located opposite each other. The arrows on the piston crowns must point towards the front of the engine;
  • turn the piston rings on the piston so that their locks do not coincide with each other (every 120°);
  • use a tension band to press the piston rings into their grooves, paying particular attention to the smooth entry of the rings into the grooves;
  • the crankshaft must be turned each time in such a way that the connecting rod journal of the piston being installed with the connecting rod stops at BDC;
  • push the connecting rod with the piston from above into the cylinder liner. Place the engine on its side so that the base of the connecting rod with the bearing insert installed in it can be brought to the crankshaft journal without scratching the cylinder liner and bearing insert;
  • without loosening the piston ring tension band, push the piston into the cylinder until the connecting rod base with the insert installed in it seats on the connecting rod journal of the crankshaft;
  • place the second insert into the bearing cap with the guide tab facing left and lubricate it generously. After this, place the cover on the base of the connecting rod and tap it lightly. The applied marks must be placed opposite each other;
  • lubricate the contact points of the nuts with the connecting rod bearing cap;
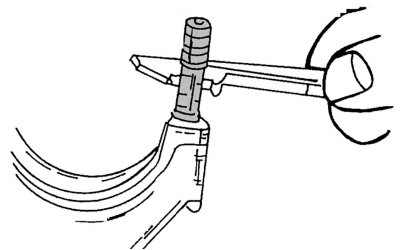
Figure 60. Measuring the diameters of the flexible part of the connecting rod bearing cap fastening…

Figure 60. Measuring the diameters of the flexible part of the connecting rod bearing cap fastening bolts


  • alternately tighten the connecting rod cover mounting bolts to a torque of 30 Nm and then tighten them another 90° by turning the wrench handle another quarter turn. It is worth reminding again about the need to measure before reusing the thin part of the connecting rod bolts, as shown in the figure 60;
  • after installing the connecting rods, turn the crankshaft several times to identify possible jamming points;
  • check the connecting rod markings again and the correct installation of the pistons, taking into account the direction of the arrows on the piston bottoms and their numbering by cylinders if old parts are reused;
  • check the side clearance between each connecting rod bearing and the corresponding crankshaft journal using a feeler gauge. When using new parts, this gap should be between 0.11 and 0.23 mm. The maximum permissible wear value is 0.50 mm.
This article is available at: russian, bulgarian, belarusian, ukrainian, serbian, croatian, romanian, polish, slovak, hungarian
The article has been verified: Levin Kirill Glebovich
Share with friends:
◀ Previous
Mercedes Sprinter / Engine repair
Next ▶

Assembly of pistons and connecting rods
Checking pistons and connecting rods
Measuring cylinder liners
Pistons and connecting rods — removal
Cylinder head repair
Camshaft Drive Mechanism Cover
General Description — Cylinder Block
Removal and installation cylinder block plugs
Measuring the working clearance in pistons
Changes in the design of the cylinder block introduced as a result of modernization
More similar articles for repairing other models

☛ Pistons and connecting rods — removal Mercedes 190 (W201) (1982-1993)
☛ Installing pistons with connecting rods Mercedes W124 (1984-1995)
☛ Lubrication of door stops and lock cylinders Mercedes W463 (1999-2019)
☛ Lubrication of door stops and lock cylinders Mercedes W163 (1997-2005)
☛ Installing pistons and connecting rods Mercedes W116 (1972-1980, petrol)
Link in different formats to this article
Comments and feedback from visitors
No comments yet


How much will 31 + 30 ?


Vario 814D (1996-2003, diesel) 
  • General information
  • Maintenance
  • Power unit
  • Engines 602.984/985
  • Engines 904.908/914/923/936
  • Transmission
  • Clutch
  • Manual gearbox 711.613
  • Manual gearbox 710.64/66
  • Manual gearbox 715.051
  • Automatic gearbox 723.345
  • Power take-off box
  • Chassis
  • Front suspension
  • Rear suspension
  • Steering
  • Brake system
  • Body and electrical equipment
  • Interior (internal elements)
  • Exterior (external elements)
  • Heater and air conditioner
  • Electrical diagrams
Vito 2 (2003-2014, diesel) 
  • General information
  • User manual
  • Maintenance
  • Diesel engine OM646
  • Engine repair
  • Cooling and lubrication system
  • Power and exhaust system
  • Transmission
  • Clutch
  • Car gearbox
  • Chassis
  • Front suspension
  • Rear suspension
  • Steering
  • Brake system
  • Body
  • Body elements
  • Electrical equipment
  • Equipment and devices
  • Security systems
  • Electrical circuits
Vito 1 (1996-2003) 
  • General information
  • User manual
  • Maintenance
  • Petrol engines 2.0 l
  • Engine repair
  • Lubrication system
  • Cooling system
  • Power and control system
  • Petrol engines 2.8 l
  • Engine repair
  • Lubrication system
  • Cooling system
  • Power and control system
  • Diesel engines 2.3 l
  • Engine repair
  • Cooling system
  • Lubrication system
  • Turbocharging and recycling
  • Power and control system
  • Diesel engines 2.2 l
  • Engine repair
  • Cooling system
  • Lubrication system
  • Turbocharging and recycling
  • Power and control system
  • Transmission
  • Clutch
  • Mechanical gearbox
  • Automatic gearbox
  • Chassis
  • Front suspension and wheels
  • Rear suspension
  • Steering
  • Brake system
  • Body
  • Exterior (external elements)
  • Interior (internal elements)
  • Electrical equipment
  • Equipment and devices
  • Heater and air conditioner
  • Electrical circuits
Sprinter (1995-2000, diesel) 
  • General information
  • Introduction to the guide
  • Maintenance
  • Power unit
  • Engine repair
  • Lubrication system
  • Cooling system
  • Power and exhaust system
  • Transmission
  • Clutch
  • Mechanical gearbox
  • Automatic gearbox
  • Front axle
  • Rear axle and cardan
  • Chassis
  • Car suspension
  • Steering
  • Brake system
  • Tires and wheels
  • Electrical equipment
  • Equipment and devices
  • Headlights and lighting
  • Power devices
  • Electrical circuits
 
MercedesMan.ru © 2017–2026 · Mobile version · Read about Mercedes · Sitemap: EN BG BY UA RS HR RO PL SK HU · Feedback · Site search · Bookmark A-Class (W168) · C-Class (W201) · C-Class (W202) · C-Class (W203) · E-Class (W123) · E-Class (W124) · E-Class (W210) · G-Class (W463) · M-Class (W163) · S-Class (W116, petrol) · S-Class (W126, petrol) · S-Class (W140) · S-Class (W220) · Sprinter · Vito 1 · Vito 2 · Vario 814D ·
 
We only use cookies without which some of the site's features may not be available.