
Cars BMW Cars Volkswagen Cars Chevrolet Cars Land Rover Cars Lada Cars Honda Cars Peugeot
English Русский
Български
Беларускі
Український
Српски
Hrvatski
Română
Polski
Slovenský
Magyar
Bookmark News and articles Sitemap Feedback Site search
MercedesMan.ru


A-Class C-Class E-Class G-Class M-Class S-Class Others
W123 (1976-1985) W124 (1984-1995) W210 (1996-2002)
  • Main
  • E-Class
  • W124 (1984-1995)
  • Power unit
  • Engine overhaul
  • Pistons and connecting rods — removal and installation

Pistons and connecting rods — removal and installation (Mercedes-Benz E-Class W124)

0

Removal piston rings
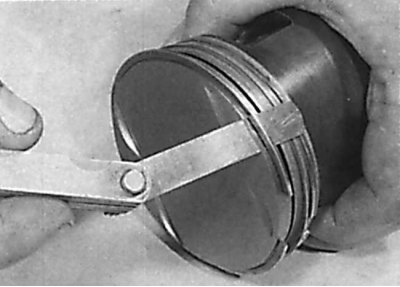


Removal piston rings


Removal the piston pin retaining ring
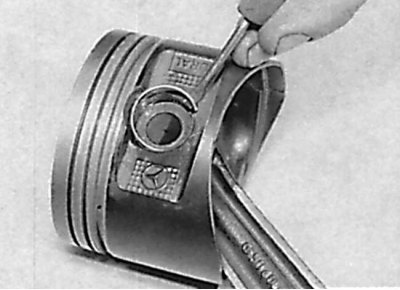


Removal the piston pin retaining ring
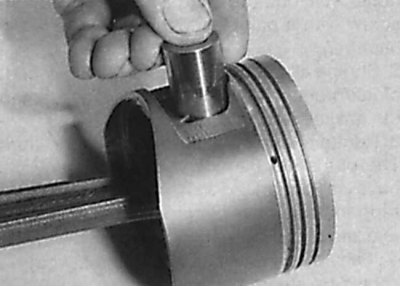

Removal the piston pin


Removal the piston pin


Oil hole in the connecting rod head
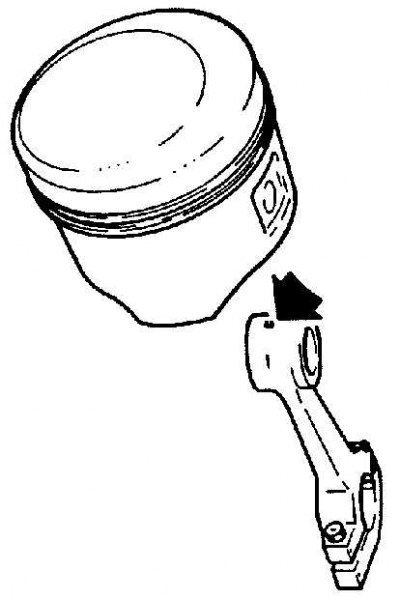


Oil hole in the connecting rod head


On 4-cylinder gasoline engines and 6-cylinder SOHC engines, the small oil hole in the connecting rod end should be located on the drive chain side.


Grooves for liners and protrusion under the piston bottom
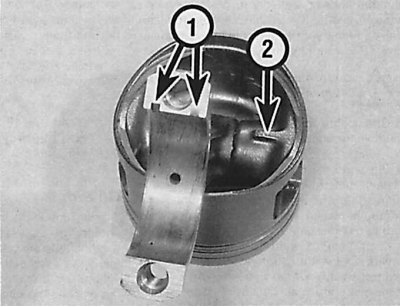


Grooves for liners and protrusion under the piston bottom


On 6-cylinder DOHC petrol engines, the bearing grooves (1) should be located on the intake manifold side and the protrusion (2) under the piston crown should be on the flywheel side.

1. Before checking the pistons with connecting rods, remove the piston rings from the pistons and thoroughly clean the pistons.

2. To remove piston rings from pistons, spread the ring and insert two or three old feeler gauge blades evenly around the circumference of the ring and slide the ring off the piston. Be careful not to scratch the piston with the ends of the ring. Rings are very fragile and can crack if spread too much. The working edges of piston rings are very sharp, so handle them very carefully to avoid cutting yourself. Keep each set of rings with the pistons for reinstallation.

3. Clean all traces of carbon from the top of the piston.

4. Remove carbon deposits from the piston ring grooves using an old piston ring.

5. After removing the deposits, clean the piston and connecting rod with a suitable solvent and wipe dry.

6. Carefully inspect each piston for cracks around the skirt and piston pin holes.


7. Check for wear on the piston skirt, bore in the piston head, and burn marks on the top of the piston.

8. Traces of pitting corrosion on the piston indicate that coolant has entered the combustion chamber. It is necessary to find the cause of the liquid entering the combustion chamber and eliminate it.

9. Measure the piston diameter.

10. Determine the piston clearance in the cylinder by subtracting the piston diameter from the cylinder diameter and dividing by two.

11. Check each connecting rod for wear, cracks, and distortion.

12. The piston pins are installed with a sliding fit and are fixed in the piston by two retaining rings. On these engines, the pistons and connecting rods can be separated as follows.

13. Using a thin screwdriver blade, remove the retaining ring from the piston and push out the piston pin by hand. When reinstalling the piston pin, use only new retaining rings.

14. Check the piston pin and big end bearing for wear.

15. Connecting rods usually do not require replacement unless the engine has seized up beforehand.

16. Assemble the pistons with the connecting rods as follows: (see fig. Oil hole in connecting rod head, Grooves for bearing shells and protrusion under piston bottom).

17. On 4-cylinder gasoline engines and 6-cylinder SOHC gasoline engines, the small oil hole on the top of the connecting rod and the arrows on the piston crown should point toward the timing chain.

18. On 6-cylinder DOHC gasoline engines, the connecting rod bearing grooves in the connecting rod and cover should be on the intake manifold side, and the arrow on the piston crown should point toward the drive chain. The protrusion under the piston crown should point toward the flywheel.


19. On diesel engines, the bearing shell grooves in the connecting rod and connecting rod cap should be on the high-pressure fuel pump side, and the arrow on the piston crown should point toward the drive chain.

20. Lubricate the piston pin and insert it into the piston and connecting rod upper head. Check that the piston rotates easily and freely on the piston pin, then secure the piston pin with new circlips.
This article is available at: russian, bulgarian, belarusian, ukrainian, serbian, croatian, romanian, polish, slovak, hungarian
The article has been verified: Levin Kirill Glebovich
Share with friends:
◀ Previous
E-Class W124 / Engine overhaul
Next ▶

Engine cylinder block
Removal the crankshaft
Removal pistons with connecting rods
Cylinder head assembly
Valves — Checking and grinding
Crankshaft — Check
Inspection of main and connecting rod bearings
Sequence of engine assembly during major repairs
Installing piston rings
Selection of crankshaft main bearings
More similar articles for repairing other models

☛ Pistons and connecting rods — removal Mercedes 190 (W201) (1982-1993)
☛ Disconnecting and connecting cardan shafts on the transfer case Mercedes W463 (1999-2019)
☛ Pistons and connecting rods — removal Mercedes W116 (1972-1980, petrol)
☛ Pistons and connecting rods — removal Mercedes Sprinter (1995-2000, diesel)
Link in different formats to this article
Comments and feedback from visitors
No comments yet


How much will 26 + 11 ?


W210 (1996-2002) 
  • General information
  • Vehicle description
  • Working conditions and tools
  • Car care
  • Diesel engines
  • Engine repair
  • Lubrication system
  • Cooling system
  • Injection system
  • Supply system
  • Exhaust system
  • Gasoline engines
  • Engine repair
  • Lubrication system
  • Cooling system
  • Control system
  • Power and exhaust system
  • Transmission
  • Clutch
  • Mechanical gearbox
  • Automatic gearbox
  • Drive shafts
  • Chassis
  • Car suspension
  • Steering
  • Tires and wheels
  • Brake system
  • Body
  • Exterior (external elements)
  • Interior (internal elements)
  • Doors and windows
  • Heating and ventilation
  • Electrical equipment
  • Equipment and devices
  • Power devices
  • Lighting and signaling
  • Electrical circuits
W124 (1984-1995) 
  • General information
  • Governing bodies
  • Driving and operation
  • Weekly care
  • Maintenance (gasoline)
  • Maintenance (diesel)
  • Troubleshooting
  • Power unit
  • I4 petrol engine
  • V6 petrol engine (SOHC)
  • V6 petrol engine (DOHC)
  • Diesel engines
  • Engine overhaul
  • Cooling system
  • Heating and ventilation
  • Fuel system (carburetor)
  • Injection system «Bosch CIS-E»
  • Injection system «Bosch HFM»
  • Diesel fuel system
  • Supply system
  • Starting and charging system
  • Ignition system (I4)
  • Ignition system (V6)
  • Preheating
  • Transmission
  • Clutch
  • Mechanical gearbox
  • Automatic gearbox
  • Drive shafts
  • Chassis
  • Brake system
  • Car suspension
  • Steering
  • Body
  • Exterior (external elements)
  • Interior (internal elements)
  • Doors, locks and windows
  • Electrical equipment
  • Equipment and devices
  • Switches
  • Headlights and lighting
  • Electrical circuits
W123 (1976-1985) 
  • General information
  • Introduction to the guide
  • Power unit
  • Engine device
  • Repair M102 engines
  • Repair M110 and M123 engines
  • Cooling and lubrication (M102)
  • Cooling (M110 and M123)
  • Ignition system
  • Power system «Stromberg»
  • Power system «Solex 4A1»
  • Fuel injection «K-Jetronic»
  • Fuel injection «L-Jetronic»
  • Transmission
  • Clutch
  • Mechanical gearbox
  • Automatic gearbox
  • Cardan and rear axle
  • Chassis
  • Front suspension
  • Rear suspension
  • Steering
  • Brake system
  • Body
  • Exterior (external elements)
  • Interior (internal elements)
  • Doors, locks and windows
  • Electrical equipment
  • Equipment and devices
  • Power devices
  • Electrical circuits
 
MercedesMan.ru © 2017–2026 · Mobile version · Read about Mercedes · Sitemap: EN BG BY UA RS HR RO PL SK HU · Feedback · Site search · Bookmark A-Class (W168) · C-Class (W201) · C-Class (W202) · C-Class (W203) · E-Class (W123) · E-Class (W124) · E-Class (W210) · G-Class (W463) · M-Class (W163) · S-Class (W116, petrol) · S-Class (W126, petrol) · S-Class (W140) · S-Class (W220) · Sprinter · Vito 1 · Vito 2 · Vario 814D ·
 
We only use cookies without which some of the site's features may not be available.