
Cars BMW Cars Volkswagen Cars Chevrolet Cars Land Rover Cars Lada Cars Honda Cars Peugeot
English Русский
Български
Беларускі
Український
Српски
Hrvatski
Română
Polski
Slovenský
Magyar
Bookmark News and articles Sitemap Feedback Site search
MercedesMan.ru


A-Class C-Class E-Class G-Class M-Class S-Class Others
W123 (1976-1985) W124 (1984-1995) W210 (1996-2002)
  • Main
  • E-Class
  • W124 (1984-1995)
  • Power unit
  • Engine overhaul
  • Crankshaft — Check

Crankshaft — Check (Mercedes-Benz E-Class W124)

0
Contents: Checking the axial play of the…↡ Examination ↡

Checking the crankshaft axial play using a dial indicator
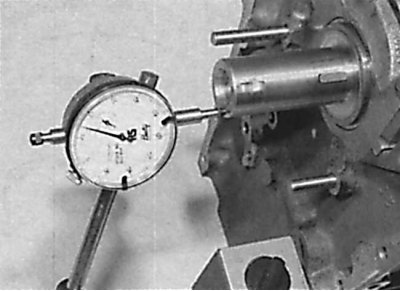


Checking the crankshaft axial play using a dial indicator


Checking the crankshaft axial play using a feeler gauge blade
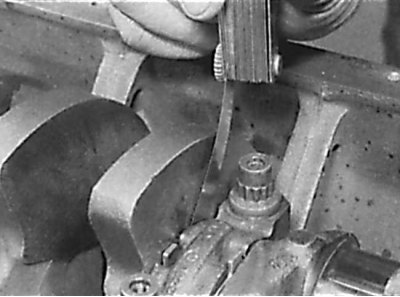


Checking the crankshaft axial play using a feeler gauge blade


Measuring the crankshaft journal with a micrometer
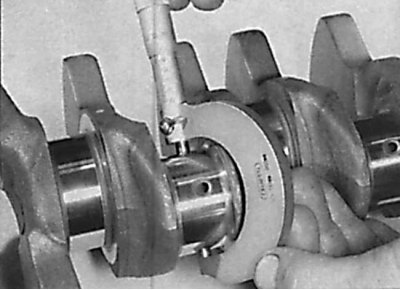


Measuring the crankshaft journal with a micrometer


Checking the axial play of the crankshaft


1. The crankshaft axial play is checked when it is installed in the engine cylinder block.


2. The axial clearance is checked using a dial indicator, the bracket of which is mounted on the engine cylinder block, and the measuring tip rests on the end of the crankshaft.

3. By moving the crankshaft from stop to stop along the axis, measure the axial clearance. The measurement result indicates the need to use new thrust half rings.

4. If a dial indicator is not available, the crankshaft axial play can be measured with a feeler gauge blade by moving the crankshaft to one side until it stops and measuring the gap between the thrust half ring and the crankshaft.

Examination


1. Clean the crankshaft using a suitable solvent and dry it with compressed air.

2. Check the crankshaft main and connecting rod journals for wear, corrosion and cracks.

3. Wear of the connecting rod journal is characterized by metallic knocks during engine operation, especially under load at low speeds and a decrease in oil pressure.

4. Wear of the crankshaft main journals is characterized by strong engine vibration and metallic knocking, which increases with increasing engine speed, as well as a decrease in oil pressure.

5. Check the crankshaft journals for roughness. Any noticeable roughness indicates that the crankshaft needs to be reground or replaced.

6. If the crankshaft has been reground, check for burrs around the oil holes. If there are any, remove them with a fine file or scraper and thoroughly clean the holes and passages of chips.

7. Using a micrometer, measure the diameter of the main and connecting rod journals of the crankshaft and compare the results with the technical requirements. Measure the journals at several points both along the diameter and along the length of the journal, which will allow you to identify ovality and taper, if they are present.


8. Inspect the oil seal contact surfaces at each end of the crankshaft for wear or other damage. If the journal wear from the seal is severe, the crankshaft may need to be replaced.

9. On some engines, if the crankshaft journals have been reground to the repair size, it is necessary to install larger size liners.
This article is available at: russian, bulgarian, belarusian, ukrainian, serbian, croatian, romanian, polish, slovak, hungarian
The article has been verified: Levin Kirill Glebovich
Share with friends:
◀ Previous
E-Class W124 / Engine overhaul
Next ▶

Pistons and connecting rods — removal and installation
Engine cylinder block
Removal the crankshaft
Removal pistons with connecting rods
Cylinder head assembly
Inspection of main and connecting rod bearings
Sequence of engine assembly during major repairs
Installing piston rings
Selection of crankshaft main bearings
Checking the main bearing clearance
More similar articles for repairing other models

☛ Steering Cuffs — Check Mercedes W168 (1997-2004)
☛ Incandescent lamp — check Mercedes W202 (1993-2000)
☛ General check of the petrol engine injection system Mercedes W463 (1999-2019)
☛ Removal and installation the end cover, replacing the rear crankshaft… Mercedes W163 (1997-2005)
☛ Crankshaft Sprocket — Installation Details Mercedes W140 (1991-1998)
☛ Crankshaft and Flywheel — General Information Mercedes Sprinter (1995-2000, diesel)
Link in different formats to this article
Comments and feedback from visitors
No comments yet


How much will 40 + 49 ?


W210 (1996-2002) 
  • General information
  • Vehicle description
  • Working conditions and tools
  • Car care
  • Diesel engines
  • Engine repair
  • Lubrication system
  • Cooling system
  • Injection system
  • Supply system
  • Exhaust system
  • Gasoline engines
  • Engine repair
  • Lubrication system
  • Cooling system
  • Control system
  • Power and exhaust system
  • Transmission
  • Clutch
  • Mechanical gearbox
  • Automatic gearbox
  • Drive shafts
  • Chassis
  • Car suspension
  • Steering
  • Tires and wheels
  • Brake system
  • Body
  • Exterior (external elements)
  • Interior (internal elements)
  • Doors and windows
  • Heating and ventilation
  • Electrical equipment
  • Equipment and devices
  • Power devices
  • Lighting and signaling
  • Electrical circuits
W124 (1984-1995) 
  • General information
  • Governing bodies
  • Driving and operation
  • Weekly care
  • Maintenance (gasoline)
  • Maintenance (diesel)
  • Troubleshooting
  • Power unit
  • I4 petrol engine
  • V6 petrol engine (SOHC)
  • V6 petrol engine (DOHC)
  • Diesel engines
  • Engine overhaul
  • Cooling system
  • Heating and ventilation
  • Fuel system (carburetor)
  • Injection system «Bosch CIS-E»
  • Injection system «Bosch HFM»
  • Diesel fuel system
  • Supply system
  • Starting and charging system
  • Ignition system (I4)
  • Ignition system (V6)
  • Preheating
  • Transmission
  • Clutch
  • Mechanical gearbox
  • Automatic gearbox
  • Drive shafts
  • Chassis
  • Brake system
  • Car suspension
  • Steering
  • Body
  • Exterior (external elements)
  • Interior (internal elements)
  • Doors, locks and windows
  • Electrical equipment
  • Equipment and devices
  • Switches
  • Headlights and lighting
  • Electrical circuits
W123 (1976-1985) 
  • General information
  • Introduction to the guide
  • Power unit
  • Engine device
  • Repair M102 engines
  • Repair M110 and M123 engines
  • Cooling and lubrication (M102)
  • Cooling (M110 and M123)
  • Ignition system
  • Power system «Stromberg»
  • Power system «Solex 4A1»
  • Fuel injection «K-Jetronic»
  • Fuel injection «L-Jetronic»
  • Transmission
  • Clutch
  • Mechanical gearbox
  • Automatic gearbox
  • Cardan and rear axle
  • Chassis
  • Front suspension
  • Rear suspension
  • Steering
  • Brake system
  • Body
  • Exterior (external elements)
  • Interior (internal elements)
  • Doors, locks and windows
  • Electrical equipment
  • Equipment and devices
  • Power devices
  • Electrical circuits
 
MercedesMan.ru © 2017–2026 · Mobile version · Read about Mercedes · Sitemap: EN BG BY UA RS HR RO PL SK HU · Feedback · Site search · Bookmark A-Class (W168) · C-Class (W201) · C-Class (W202) · C-Class (W203) · E-Class (W123) · E-Class (W124) · E-Class (W210) · G-Class (W463) · M-Class (W163) · S-Class (W116, petrol) · S-Class (W126, petrol) · S-Class (W140) · S-Class (W220) · Sprinter · Vito 1 · Vito 2 · Vario 814D ·
 
We only use cookies without which some of the site's features may not be available.