
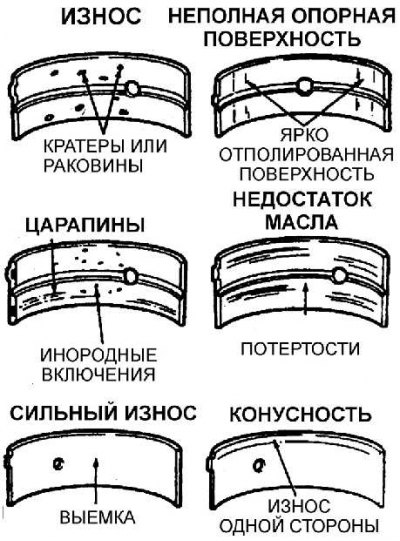
Typical bearing defects
Even though the main and connecting rod bearings should be replaced when the engine is overhauled, they must be carefully inspected as they can provide valuable information regarding the condition of the engine.
Bearing failure can be due to lack of lubrication, the presence of dirt or other foreign particles, motor overload or corrosion (see fig. Typical bearing defects). Regardless of the cause of the bearing failure, the cause that caused the bearing failure must be corrected before the engine is reassembled.
When inspecting the bearings, remove them and lay them out in the same order as they were installed on the engine. This will identify the appropriate crankshaft journal and facilitate troubleshooting.
Foreign particles can enter the engine in various ways. Metallic particles can be found in engine oil as a result of normal engine wear. Fine particles along with the engine oil can enter the bearings and are easily embedded in the soft bearing material. Large particles entering the bearing will scratch the bearing or the crankshaft journal. The best way to prevent bearing failure from this cause is to thoroughly clean all internal surfaces of the motor and keep them clean when assembling the motor. Frequent and regular oil and filter changes are also recommended.
Insufficient lubrication of the crankshaft journals can be caused by many different causes such as high oil temperatures, engine overload and oil leaks.
Driving style also has an impact on bearing life. A fully open throttle at low engine speeds creates a high load on the bearings and extrusion of the oil film from the contact zone. These loads lead to cracks in the working part of the bearing, which weakens the bearing and can lead to separation of the anti-friction layer from the steel base.
Short distance driving results in corrosion of the bearings as a result of the motor not reaching a stabilized operating temperature that removes water vapor and corrosive gases. These vapors and gases, condensing in engine oil, form acid and sediment. Acid, along with engine oil, gets to the bearings and begins to corrode the bearings.
Incorrect selection of bearings during engine assembly also leads to bearing failure. Preloaded bearings leave insufficient bearing operating clearance resulting in a reduced or no oil layer for lubrication.
Bolts of fastening of covers of radical bearings
Measuring the length of the main bearing cap bolt
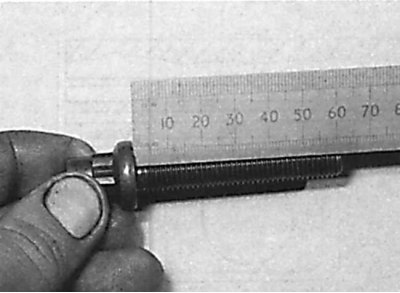
On 6-cylinder DOHC gasoline engines, measure the length of the main bearing cap bolts. On other engines, it is recommended to use new bolts for attaching the main bearing caps.
1. Measure the length of each bolt from the base of the head to the end of the threaded portion of the bolt (see fig. Measuring the length of the main bearing cap bolt). If the length of at least one bolt exceeds the allowable limits, it is necessary to replace all the bolts in the set.
Connecting rod bearing cap bolts
Measuring point for the minimum diameter of the connecting rod bearing cap bolt diameter of a 4-cylinder gasoline engine
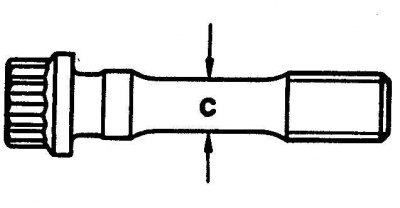
1. Measure the length of the connecting rod bearing cap bolts. However, when assembling the engine, it is advisable to always replace the bolts with new ones.
2. Press the bolts out of the connecting rods.
3. On 4-cylinder petrol engines, measure the diameter of the bolt at its narrowest point (see fig. Measuring point for the minimum diameter of the connecting rod bearing cap bolt diameter of a 4-cylinder gasoline engine). If the bolt diameter is less than the specified value, replace the bolts as a set.
4. On other engines, measure the length of the bolt from the base of the head to the end of the threaded section. If the bolt length exceeds the allowable limits, the bolts must be replaced as a set.