
Cars BMW Cars Volkswagen Cars Chevrolet Cars Land Rover Cars Lada Cars Honda Cars Peugeot
English Русский
Български
Беларускі
Український
Српски
Hrvatski
Română
Polski
Slovenský
Magyar
Bookmark News and articles Sitemap Feedback Site search
MercedesMan.ru


A-Class C-Class E-Class G-Class M-Class S-Class Others
W123 (1976-1985) W124 (1984-1995) W210 (1996-2002)
  • Main
  • E-Class
  • W124 (1984-1995)
  • Power unit
  • Engine overhaul
  • Disassembling the cylinder head

Disassembling the cylinder head (Mercedes-Benz E-Class W124)

0
Contents: 6-cylinder SOHC petrol engines ↡ 6-cylinder DOHC petrol engines ↡ Diesel engines ↡

Compressing the valve spring with a special device
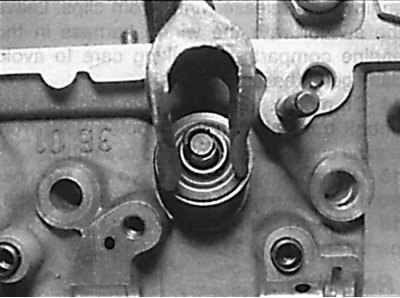


Compressing the valve spring with a special device


Removal crackers from the end of the valve
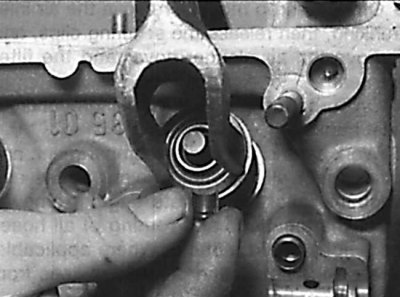


Removal crackers from the end of the valve


Removal the upper spring plate
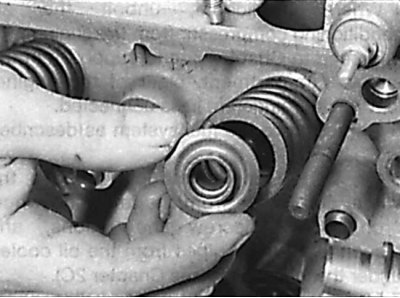


Removal the upper spring plate


Removal the valve spring
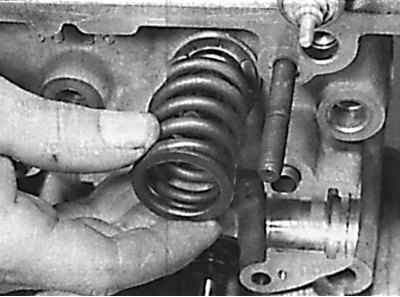


Removal the valve spring


Removal the oil seal
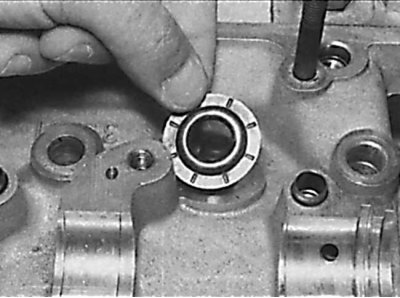


Removal the oil seal


Removal the lower spring seat


Removal the lower spring seat


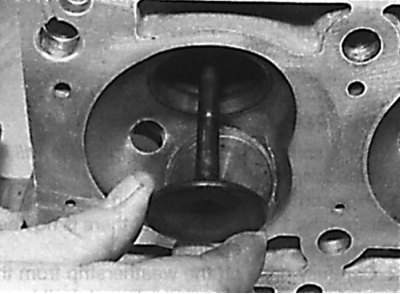
Extracting the valve through the combustion chamber


Extracting the valve through the combustion chamber


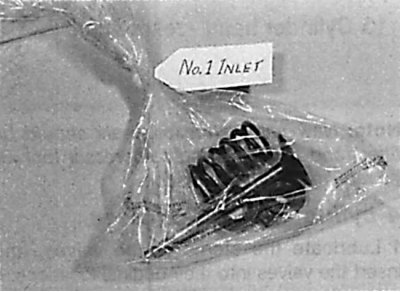
Storing the elements of one valve in a plastic bag


Storing the elements of one valve in a plastic bag


1. Remove the cylinder head.


2. Remove the intake and exhaust manifolds.

3. Remove the valve train, hydraulic lifters and camshaft.

4. Remove the spark plugs.

5. Unscrew the thermostat housing from the cylinder head.

6. Using a valve spring compressor, compress each spring and remove the keepers from the end of the valve. Remove the spring compressor and remove the spring retainer and spring (see fig. Compressing the valve spring with a special device, Removing the crackers from the end of the valve, Removing the upper spring plate, Removing the valve spring).

7. Using pliers, carefully remove the oil seal from the valve stem (see Fig. Removing the oil seal).

8. When the valve spring is compressed and the spring cup does not come off the crackers, it is necessary to hit the spring cup with a hammer through a wooden block, which will release the crackers.

9. Remove the valve through the combustion chamber. Store each valve in a separate plastic bag along with the spring plate, spring, spring seat and crackers for later installation in their places (see fig. Removing the valve through the combustion chamber, Storing the elements of one valve in a plastic bag).

6-cylinder SOHC petrol engines


1. Remove the cylinder head.

2. Remove the intake and exhaust manifolds.

3. Remove the valve train, hydraulic lifters and camshaft.

4. Remove the spark plugs.

5. Unscrew the thermostat housing from the cylinder head.

6. Using a valve spring compressor, compress each spring and remove the keepers from the valve end. Remove the spring compressor and remove the spring retainer and spring.


7. Using pliers, carefully remove the oil seal from the valve stem.

8. When the valve spring is compressed and the spring cup does not come off the crackers, it is necessary to hit the spring cup with a hammer through a wooden block, which will release the crackers.

9. Remove the valve through the combustion chamber. Store each valve in a separate plastic bag along with the spring plate, spring, spring seat and crackers for later installation in their places.

6-cylinder DOHC petrol engines


1. Remove the cylinder head.

2. Remove the intake and exhaust manifolds.

3. Remove the valve train, hydraulic lifters and camshaft.

4. Remove the spark plugs.

5. Unscrew the thermostat housing from the cylinder head.

6. Using a valve spring compressor, compress each spring and remove the keepers from the valve end. Remove the spring compressor and remove the spring retainer and spring. Early models had two springs per valve.

7. Using pliers, carefully remove the oil seal from the valve stem.

8. When the valve spring is compressed and the spring cup does not come off the crackers, it is necessary to hit the spring cup with a hammer through a wooden block, which will release the crackers.

9. Remove the valve through the combustion chamber. Store each valve in a separate plastic bag along with the spring plate, spring, spring seat and crackers for later installation in their places.

Diesel engines


1. Remove the cylinder head.

2. Remove the intake and exhaust manifolds.

3. Remove the valve train, hydraulic lifters and camshaft.


4. If necessary, remove the glow plugs.

5. Unscrew the thermostat housing from the cylinder head.

6. Using a valve spring compressor, compress each spring and remove the keepers from the valve end. Remove the spring compressor and remove the spring retainer and spring.

7. Using pliers, carefully remove the oil seal from the valve stem.

8. When the valve spring is compressed and the spring cup does not come off the crackers, it is necessary to hit the spring cup with a hammer through a wooden block, which will release the crackers.

9. Remove the valve through the combustion chamber. Store each valve in a separate plastic bag along with the spring plate, spring, spring seat and crackers for later installation in their places.
This article is available at: russian, bulgarian, belarusian, ukrainian, serbian, croatian, romanian, polish, slovak, hungarian
The article has been verified: Levin Kirill Glebovich
Share with friends:
◀ Previous
E-Class W124 / Engine overhaul
Next ▶

Engine disassembly sequence
Removal and installation of diesel engines
Removal and installation of 6-cylinder petrol engines
Removal and installation of 4-cylinder petrol engines
Recommendations for engine removal
Cleaning and inspection of the cylinder head
Valves — Checking and grinding
Cylinder head assembly
Removal pistons with connecting rods
Removal the crankshaft
More similar articles for repairing other models

☛ Cylinder head — removal and installation Mercedes W168 (1997-2004)
☛ Cylinder Head Cover (4-cylinder engine) Mercedes W202 (1993-2000)
☛ Removal and installation the slave cylinder of the interaxle… Mercedes W463 (1999-2019)
☛ Removal and installation the cylinder head Mercedes W163 (1997-2005)
☛ Disassembling the cylinder head Mercedes W116 (1972-1980, petrol)
☛ Disassembling the cylinder head Mercedes Sprinter (1995-2000, diesel)
Link in different formats to this article
Comments and feedback from visitors
No comments yet


How much will 12 + 28 ?


W210 (1996-2002) 
  • General information
  • Vehicle description
  • Working conditions and tools
  • Car care
  • Diesel engines
  • Engine repair
  • Lubrication system
  • Cooling system
  • Injection system
  • Supply system
  • Exhaust system
  • Gasoline engines
  • Engine repair
  • Lubrication system
  • Cooling system
  • Control system
  • Power and exhaust system
  • Transmission
  • Clutch
  • Mechanical gearbox
  • Automatic gearbox
  • Drive shafts
  • Chassis
  • Car suspension
  • Steering
  • Tires and wheels
  • Brake system
  • Body
  • Exterior (external elements)
  • Interior (internal elements)
  • Doors and windows
  • Heating and ventilation
  • Electrical equipment
  • Equipment and devices
  • Power devices
  • Lighting and signaling
  • Electrical circuits
W124 (1984-1995) 
  • General information
  • Governing bodies
  • Driving and operation
  • Weekly care
  • Maintenance (gasoline)
  • Maintenance (diesel)
  • Troubleshooting
  • Power unit
  • I4 petrol engine
  • V6 petrol engine (SOHC)
  • V6 petrol engine (DOHC)
  • Diesel engines
  • Engine overhaul
  • Cooling system
  • Heating and ventilation
  • Fuel system (carburetor)
  • Injection system «Bosch CIS-E»
  • Injection system «Bosch HFM»
  • Diesel fuel system
  • Supply system
  • Starting and charging system
  • Ignition system (I4)
  • Ignition system (V6)
  • Preheating
  • Transmission
  • Clutch
  • Mechanical gearbox
  • Automatic gearbox
  • Drive shafts
  • Chassis
  • Brake system
  • Car suspension
  • Steering
  • Body
  • Exterior (external elements)
  • Interior (internal elements)
  • Doors, locks and windows
  • Electrical equipment
  • Equipment and devices
  • Switches
  • Headlights and lighting
  • Electrical circuits
W123 (1976-1985) 
  • General information
  • Introduction to the guide
  • Power unit
  • Engine device
  • Repair M102 engines
  • Repair M110 and M123 engines
  • Cooling and lubrication (M102)
  • Cooling (M110 and M123)
  • Ignition system
  • Power system «Stromberg»
  • Power system «Solex 4A1»
  • Fuel injection «K-Jetronic»
  • Fuel injection «L-Jetronic»
  • Transmission
  • Clutch
  • Mechanical gearbox
  • Automatic gearbox
  • Cardan and rear axle
  • Chassis
  • Front suspension
  • Rear suspension
  • Steering
  • Brake system
  • Body
  • Exterior (external elements)
  • Interior (internal elements)
  • Doors, locks and windows
  • Electrical equipment
  • Equipment and devices
  • Power devices
  • Electrical circuits
 
MercedesMan.ru © 2017–2026 · Mobile version · Read about Mercedes · Sitemap: EN BG BY UA RS HR RO PL SK HU · Feedback · Site search · Bookmark A-Class (W168) · C-Class (W201) · C-Class (W202) · C-Class (W203) · E-Class (W123) · E-Class (W124) · E-Class (W210) · G-Class (W463) · M-Class (W163) · S-Class (W116, petrol) · S-Class (W126, petrol) · S-Class (W140) · S-Class (W220) · Sprinter · Vito 1 · Vito 2 · Vario 814D ·
 
We only use cookies without which some of the site's features may not be available.