
Removing
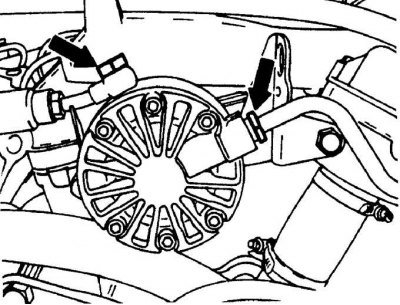
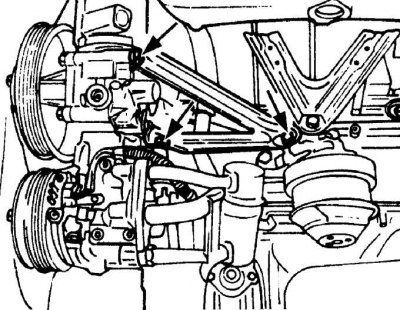
Attachment points of pipelines to the pump of the self-leveling rear suspension system
Removing the auxiliary drive belt tensioner
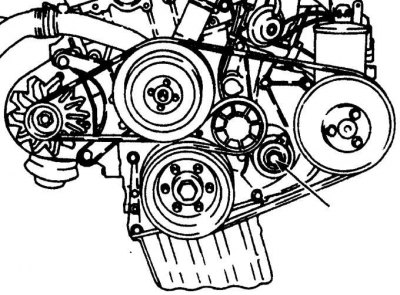
On models without a shock absorber strut, unscrew the bolt and remove the auxiliary drive belt tensioner.
The location of the elements of the auxiliary drive belt tensioner on models with a shock absorber strut installed under the tensioner
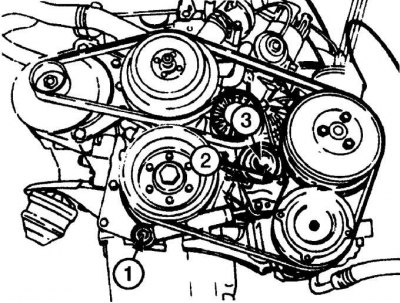
1 – the lower bolt of fastening of a rack of the shock-absorber;
2 – bolts of fastening of an arm of the mechanism of a tension;
3 - the central bolt of the tension mechanism
The location of the elements of the auxiliary drive belt tensioner on models with a shock absorber strut mounted above the tensioner
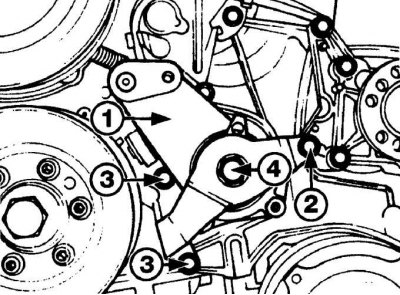
1 - knot of the tension mechanism; 2 – a bolt of fastening of the mechanism of a tension to an arm of the pump of the amplifier of a steering; 3 - bolts for fastening the bracket of the tension mechanism to the cover of the drive chain; 4 - the central bolt of the tension mechanism
Arrangement of bolts of fastening of a back arm of the pump of the amplifier of a steering and the compressor of an air conditioning system
Nut location (1) and staples (2), securing the wiring harness cover

The location of the protective sheet between the rear of the cylinder head and the bulkhead of the engine compartment
1. Remove the gearbox.
2. Remove the lower engine mudguard.
3. Drain the engine oil from the engine.
4. Drain the coolant from the cooling system.
5. Remove the air filter.
6. Remove the radiator and radiator fan.
7. To prevent damage to the air conditioning condenser, cover the condenser with a sheet of cardboard.
8. On the front side of the cylinder head, unscrew the nuts and disconnect the pipes from the hydraulic pump of the self-leveling rear suspension system (see fig. Attachment points of pipelines to the pump of the self-leveling rear suspension system).
9. On models with an air conditioning system, remove the auxiliary drive belt and disconnect the wires from the air conditioning compressor.
10. Mark the location and unscrew the elements of the drive belt tensioner and remove them from the engine (see fig. Removing the auxiliary drive belt tensioner, Location of the auxiliary drive belt tensioner on models with the shock absorber strut installed under the tensioner, Location of the auxiliary drive belt tensioner on the models with the shock absorber strut installed above the tensioner).
11. On models without shock absorber strut, unscrew the bolt and remove the tensioner.
12. On models with the shock strut mounted under the tensioner, unscrew the shock strut bottom end bolt and the two tensioner bolts. Then unscrew the central bolt of the tension mechanism and remove the elements of the tension mechanism.
13. On models with shock strut mounted above tensioner, unscrew power steering pump pulley and tensioner pulley.
14. Unscrew the shock absorber strut from the tensioner bracket.
15. Unscrew the shock absorber from the alternator bracket.
16. Remove the nut behind the bracket, then remove the two bolts securing the tensioner bracket to the timing chain cover.
17. Unscrew the central bolt of the tensioner, then remove the tensioner with bracket.
18. Unscrew the pulley from the power steering pump.
19. Unscrew the rear mounting bracket for the power steering pump, air conditioning compressor and cylinder block and remove the bracket (see fig. Arrangement of bolts of fastening of a back arm of the pump of the amplifier of a steering and the compressor of an air conditioning system).
20. Unscrew the power steering pump and move it to the side without disconnecting the hoses from it.
21. On models with an air conditioning system, unscrew the compressor mounting bolts and move it to the side without disconnecting the hoses from it.
22. If equipped, unscrew the pipe-to-hose connection support bracket from the front left corner of the cylinder head.
23. Disconnect the electrical wires from the generator.
24. Above the partition of the engine compartment, unscrew the nuts, loosen the brackets and remove the wiring harness cover (see fig. The location of the nuts and brackets that secure the wiring harness cover).
25. Disconnect the electrical connector of the main wiring harness, which is located on the bulkhead of the engine compartment, unscrew the screws and remove the connector.
26. Disconnect the wire from the positive battery terminal, then disconnect the wires from the terminals in the battery compartment, then remove the wires through the body panel into the engine compartment.
27. Label and disconnect all electrical connectors from engine components. Unscrew or disconnect all wires or wiring harnesses from the mounting brackets or brackets on the engine.
28. Mark and disconnect from the engine all vacuum hoses.
29. Disconnect the accelerator link from the throttle lever.
30. Relieve the pressure in the fuel system.
31. Remove the union nuts, then disconnect the fuel supply and return lines from the carburetor/fuel distributor/fuel pressure regulator.
32. Loosen the clamp and remove the coolant supply hose to the heater from the left rear of the cylinder head.
33. Unscrew the union nut and remove the brake booster vacuum hose from the intake manifold.
34. Hook the engine with the hoist straps and raise it just enough so that the weight of the engine can be supported by the hoist.
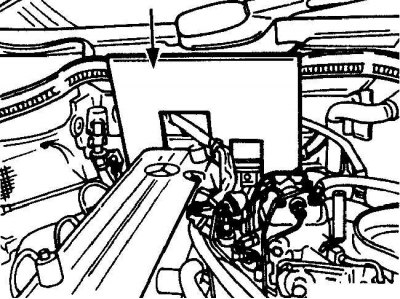
35. Place a sheet of steel or cardboard between the rear of the cylinder head and the engine bulkhead to prevent damage when lifting the engine (see fig. The location of the protective sheet between the rear of the cylinder head and the bulkhead of the engine compartment).
36. Finally, check that all hoses, pipes and electrical connectors are disconnected from the engine.
37. Working under the vehicle, on both sides of the engine, unscrew the lower power unit mounting bolts.
38. Carefully remove the engine from the engine compartment. When removing the engine, if necessary, tilt and turn it so that it does not damage the engine compartment.
Installation
1. Installation is carried out in the reverse order of removal, taking into account the following points.
2. When installing the motor, tilt and turn it as necessary so that it is seated without injury.
3. Tighten all fastening bolts and nuts to the required torque.
4. Connect all hoses and electrical connectors to the engine as marked previously.
5. Connect and, if necessary, adjust the accelerator cable.
6. Install the auxiliary drive belt.
7. Install the radiator and radiator fan.
8. Install the gearbox.
9. Fill the engine with engine oil and the cooling system with coolant.