



Overhaul of car engines Mercedes E-Class (W124)

Specifications and repair dimensions of engines
Cylinder head Maximum non-flatness of the lower surface: – 4-cylinder petrol engines: • parallel to the axis 0.15 mm • perpendicular to the axis 0.05 mm – other engines:...
Cylinder head Maximum non-flatness of the lower surface: – 4-cylinder petrol engines: • parallel to the axis 0.15 mm • perpendicular to the axis 0.05 mm – other engines:...
General techniques for disassembling the cylinder head
This part of the chapter includes general techniques for disassembling the cylinder head and other engine components. The information concerns the sequence of...
This part of the chapter includes general techniques for disassembling the cylinder head and other engine components. The information concerns the sequence of...
Recommendations for engine removal
On all models, the power unit, consisting of the engine and gearbox, is removed upward from the engine compartment. If you decide to remove the engine for repair, some...
On all models, the power unit, consisting of the engine and gearbox, is removed upward from the engine compartment. If you decide to remove the engine for repair, some...

Removal and installation of 4-cylinder petrol engines
Removal Locations for attaching pipes to the self-leveling rear suspension system pump Removal the auxiliary drive belt tensioner mechanism On models without a shock...
Removal Locations for attaching pipes to the self-leveling rear suspension system pump Removal the auxiliary drive belt tensioner mechanism On models without a shock...
Removal and installation of 6-cylinder petrol engines
Removal 1. Remove the gearbox. 2. Remove the lower engine splash shield. 3. Drain the engine oil from the engine. 4. Drain the coolant from the cooling system. 5. Remove...
Removal 1. Remove the gearbox. 2. Remove the lower engine splash shield. 3. Drain the engine oil from the engine. 4. Drain the coolant from the cooling system. 5. Remove...
Removal and installation of diesel engines
Removal 1. Remove the gearbox. 2. Remove the lower engine splash shield. 3. Drain the engine oil from the engine. 4. Drain the coolant from the cooling system. 5. Remove...
Removal 1. Remove the gearbox. 2. Remove the lower engine splash shield. 3. Drain the engine oil from the engine. 4. Drain the coolant from the cooling system. 5. Remove...

Engine disassembly sequence
Removal the oil filter housing Removal the breather casing Installing the engine on a special stand significantly simplifies the assembly and disassembly processes....
Removal the oil filter housing Removal the breather casing Installing the engine on a special stand significantly simplifies the assembly and disassembly processes....

Disassembling the cylinder head
Compressing the valve spring with a special device Removal crackers from the end of the valve Removal the upper spring plate Removal the valve spring Removal the oil...
Compressing the valve spring with a special device Removal crackers from the end of the valve Removal the upper spring plate Removal the valve spring Removal the oil...

Cleaning and inspection of the cylinder head
Checking the flatness of the cylinder head Measuring the protrusion of the swirl chamber from the cylinder head Carefully inspect the cylinder head for cracks and other...
Checking the flatness of the cylinder head Measuring the protrusion of the swirl chamber from the cylinder head Carefully inspect the cylinder head for cracks and other...

Valves — Checking and grinding
Measuring the valve stem diameter Lapping valves 1. Check each valve head for localized corrosion, burns, cracks, and general wear. Check the valve stem for wear and...
Measuring the valve stem diameter Lapping valves 1. Check each valve head for localized corrosion, burns, cracks, and general wear. Check the valve stem for wear and...

Cylinder head assembly
Installing the valve in the cylinder head Installing the lower spring seat 1. Lubricate the valve stems with clean engine oil and insert them into their places. Install...
Installing the valve in the cylinder head Installing the lower spring seat 1. Lubricate the valve stems with clean engine oil and insert them into their places. Install...

Removal pistons with connecting rods
Crank mechanism of a 4-cylinder gasoline engine 1 – crankshaft; 2 – flywheel (manual transmission); 3 – drive plate (automatic transmission); 4 – connecting rod; 5 –...
Crank mechanism of a 4-cylinder gasoline engine 1 – crankshaft; 2 – flywheel (manual transmission); 3 – drive plate (automatic transmission); 4 – connecting rod; 5 –...

Removal the crankshaft
Location of the crankshaft rear cover mounting bolts on a 4-cylinder petrol engine Location of identification mark on main bearing cap Removal the crankshaft main...
Location of the crankshaft rear cover mounting bolts on a 4-cylinder petrol engine Location of identification mark on main bearing cap Removal the crankshaft main...

Engine cylinder block
Cylinder block of a 4-cylinder petrol engine 1 – cylinder block; 2 – rear cover of the crankshaft; 3 – front crankshaft cover; 4 – engine support bracket; 5 – front...
Cylinder block of a 4-cylinder petrol engine 1 – cylinder block; 2 – rear cover of the crankshaft; 3 – front crankshaft cover; 4 – engine support bracket; 5 – front...

Pistons and connecting rods — removal and installation
Removal piston rings Removal the piston pin retaining ring Removal the piston pin Oil hole in the connecting rod head On 4-cylinder gasoline engines and 6-cylinder SOHC...
Removal piston rings Removal the piston pin retaining ring Removal the piston pin Oil hole in the connecting rod head On 4-cylinder gasoline engines and 6-cylinder SOHC...

Crankshaft — Check
Checking the crankshaft axial play using a dial indicator Checking the crankshaft axial play using a feeler gauge blade Measuring the crankshaft journal with a...
Checking the crankshaft axial play using a dial indicator Checking the crankshaft axial play using a feeler gauge blade Measuring the crankshaft journal with a...
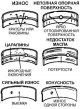
Inspection of main and connecting rod bearings
Typical bearing defects Even though the main and connecting rod bearings are subject to replacement during an engine overhaul, they should be carefully inspected as they...
Typical bearing defects Even though the main and connecting rod bearings are subject to replacement during an engine overhaul, they should be carefully inspected as they...

Sequence of engine assembly during major repairs
Installing the oil filter housing When installing the oil filter housing, a new gasket must be used. Installing a water pump When installing the water pump, a new O-ring...
Installing the oil filter housing When installing the oil filter housing, a new gasket must be used. Installing a water pump When installing the water pump, a new O-ring...

Installing piston rings
Measuring the gap in the piston ring lock Installing an oil scraper ring expander on the piston The arrangement of piston rings on the piston 1 – upper sealing ring; 2 –...
Measuring the gap in the piston ring lock Installing an oil scraper ring expander on the piston The arrangement of piston rings on the piston 1 – upper sealing ring; 2 –...
Selection of crankshaft main bearings
Four-cylinder petrol engines To determine the required thickness of new main bearings, it is necessary to measure the inner diameter of the main bearing, the diameter of...
Four-cylinder petrol engines To determine the required thickness of new main bearings, it is necessary to measure the inner diameter of the main bearing, the diameter of...

Checking the main bearing clearance
Installing main bearing shells When installing the main bearing shells into the cover, align the protrusion on the shell with the groove in the cover. Plastigage rod for...
Installing main bearing shells When installing the main bearing shells into the cover, align the protrusion on the shell with the groove in the cover. Plastigage rod for...

Installing the crankshaft
Tightening the main bearing cap mounting bolt to the required torque Tightening the main bearing cap mounting bolt by turning it to a certain angle Applying a thin layer...
Tightening the main bearing cap mounting bolt to the required torque Tightening the main bearing cap mounting bolt by turning it to a certain angle Applying a thin layer...

Installing pistons with connecting rods
Four-cylinder petrol engines To determine the required thickness of new connecting rod bearings, it is necessary to measure the inner diameter of the connecting rod...
Four-cylinder petrol engines To determine the required thickness of new connecting rod bearings, it is necessary to measure the inner diameter of the connecting rod...
Starting the engine after major repairs
With the engine installed in the engine compartment of the vehicle, check the engine oil and coolant levels. Check that all previously removed wires and hoses are...
With the engine installed in the engine compartment of the vehicle, check the engine oil and coolant levels. Check that all previously removed wires and hoses are...
This section is available on: russian, bulgarian, belarusian, ukrainian, serbian, croatian, romanian, polish, slovak, hungarian
More similar sections for repairing other models
☛ Power unit: Engine overhaul car Mercedes 190 (W201) (1982-1993)
☛ Power unit: Engine repair car Mercedes W220 (1998-2005)
☛ Power unit: Engines 602.984/985 car Mercedes Vario 814D (1996-2003, diesel)
Link in different formats to this section
TEXTHTMLBB Code
- General information
- Vehicle description
- Working conditions and tools
- Car care
- Diesel engines
- Engine repair
- Lubrication system
- Cooling system
- Injection system
- Supply system
- Exhaust system
- Gasoline engines
- Engine repair
- Lubrication system
- Cooling system
- Control system
- Power and exhaust system
- Transmission
- Clutch
- Mechanical gearbox
- Automatic gearbox
- Drive shafts
- Chassis
- Car suspension
- Steering
- Tires and wheels
- Brake system
- Body
- Exterior (external elements)
- Interior (internal elements)
- Doors and windows
- Heating and ventilation
- Electrical equipment
- Equipment and devices
- Power devices
- Lighting and signaling
- Electrical circuits
- General information
- Governing bodies
- Driving and operation
- Weekly care
- Maintenance (gasoline)
- Maintenance (diesel)
- Troubleshooting
- Power unit
- I4 petrol engine
- V6 petrol engine (SOHC)
- V6 petrol engine (DOHC)
- Diesel engines
- Engine overhaul
- Cooling system
- Heating and ventilation
- Fuel system (carburetor)
- Injection system «Bosch CIS-E»
- Injection system «Bosch HFM»
- Diesel fuel system
- Supply system
- Starting and charging system
- Ignition system (I4)
- Ignition system (V6)
- Preheating
- Transmission
- Clutch
- Mechanical gearbox
- Automatic gearbox
- Drive shafts
- Chassis
- Brake system
- Car suspension
- Steering
- Body
- Exterior (external elements)
- Interior (internal elements)
- Doors, locks and windows
- Electrical equipment
- Equipment and devices
- Switches
- Headlights and lighting
- Electrical circuits
- General information
- Introduction to the guide
- Power unit
- Engine device
- Repair M102 engines
- Repair M110 and M123 engines
- Cooling and lubrication (M102)
- Cooling (M110 and M123)
- Ignition system
- Power system «Stromberg»
- Power system «Solex 4A1»
- Fuel injection «K-Jetronic»
- Fuel injection «L-Jetronic»
- Transmission
- Clutch
- Mechanical gearbox
- Automatic gearbox
- Cardan and rear axle
- Chassis
- Front suspension
- Rear suspension
- Steering
- Brake system
- Body
- Exterior (external elements)
- Interior (internal elements)
- Doors, locks and windows
- Electrical equipment
- Equipment and devices
- Power devices
- Electrical circuits