
Examination
1. Even if you decide to replace the main and connecting rod bearing shells, you need to inspect them very carefully, since they can tell a lot about the general condition of the engine.
2. Bearing failure occurs due to insufficient lubrication, dirt ingress, motor overload and corrosion (see fig. 16.2). Causes of bearing failure must be identified and corrected prior to motor assembly to prevent recurrence.
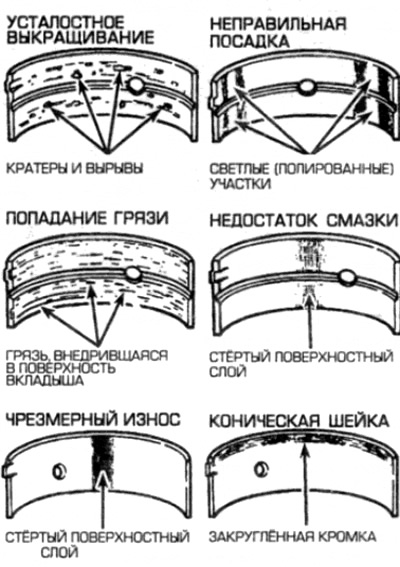
Pic. 16.2. Typical bearing defects
3. To inspect the bearing shells, they must be removed from the cylinder block sockets and the lower heads of the connecting rods, then laid out on a clean surface in the order in which they are installed in the engine. This will match the bearing defects to the corresponding necks. Do not touch the working surfaces of the earbuds with your hands during the test - they can be easily scratched.
4. Dirt and other foreign matter can enter the engine in various ways. They may have been left in the engine from a previous assembly, they may have entered through a filter or through the crankcase ventilation system. They can get into the oil, and with it - into the bearings. The oil may contain metal particles from the mechanical processing of the engine, as well as from the natural wear of the engine during its operation. Sometimes the oil may contain abrasive left after repair, especially if the engine has not been thoroughly flushed after that. Regardless of origin, such particles can be embedded in the soft surface of the liner and can be easily detected. Large particles do not penetrate the bearing, but may scratch the bearing and the shaft journal. The best way to avoid these troubles is to thoroughly flush all engine parts before reassembly and keep clean during reassembly. It is also recommended to change the oil filter regularly and frequently.
5. Insufficient lubrication or oil supply failure also has several causes. Engine overheating (it leads to a decrease in the thickness of the oil film), overload (which squeezes oil out of the gap in the bearing) and oil leaks (due to excessive clearances, worn oil pump or high engine speed) - all this leads to a deterioration in lubrication. Blocking the oil holes when the bearings are not correctly positioned during assembly can also leave the bearing without lubrication and lead to its destruction. With insufficient lubrication, the liner material may be worn or smeared off the surface of the steel base. The temperature in the bearing can rise to a point where the color of the steel base of the bushing turns blue.
6. The life of the bearings is also influenced by the driving characteristics of the car. Fully opening the throttle at low engine speeds creates heavy loads on the bearings, from which the oil film is squeezed out. Such loads can cause the surface layer of the liner to flow with the formation of small cracks (fatigue failure). Gradually, the liner material may fall apart and break away from the steel base.
7. Short distance driving can lead to bearing corrosion due to the fact that the engine does not warm up enough to evaporate water condensation and expel corrosive gases. These products collect in the oil, forming acid and precipitates. The acid, along with the oil, then enters the bearings and causes them to corrode.
8. Incorrect installation of liners when assembling the engine also leads to the destruction of bearings. Bearing tightening leads to a decrease in clearance and oil starvation. Dirt and foreign particles are caught by the oil wedge of the bearing, accumulate on its surface in the form of large spots, which eventually lead to damage.
9. Do not touch the working surfaces of the liners during assembly, you may scratch the surfaces or leave dirt on them.
10. As noted at the beginning of this paragraph, liners should definitely be replaced when the engine is overhauled. Not changing them is bad economy. Talk to paragraph 19 for information on insert selection.
Main bearing cap bolts
11. Manufacturers did not give clear recommendations on how to check the bolts of the main bearings. However, as a precautionary measure, we recommend replacing bolts on all engines, although the final decision rests with the individual owner.
Connecting rod bearing cap bolts
12. The manufacturer recommends measuring the connecting rod bearing cap bolts to determine if the bolts need to be replaced. However, some owners will want to replace the bolts regardless of their condition. It is highly recommended to replace all bolts as a set.
13. Squeeze out or beat out bolts from rods.
14. On 4-cylinder engines, measure the diameter of the bolts at the narrowest part (see fig. 16.14). If the diameter is less than required by the technical data, replace the bolts.
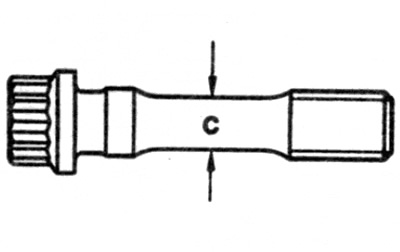
Pic. 16.14. Measure the diameter of the connecting rod bearing cap bolt at its narrowest point (With) – 4-cylinder engines
15. On all engines except 4-cylinder gasoline, measure the length of each bolt from the base of the head to the end of the rod. If the bolt length is greater than the maximum allowable, the bolts must be replaced.