
Cars BMW Cars Volkswagen Cars Chevrolet Cars Land Rover Cars Lada Cars Honda Cars Peugeot
English Русский
Български
Беларускі
Український
Српски
Hrvatski
Română
Polski
Slovenský
Magyar
Bookmark News and articles Sitemap Feedback Site search
MercedesMan.ru


A-Class C-Class E-Class G-Class M-Class S-Class Others
Sprinter (1995-2000, diesel) Vito 1 (1996-2003) Vito 2 (2003-2014, diesel) Vario 814D (1996-2003, diesel)
  • Main
  • Mercedes-Benz
  • Sprinter (1995-2000)
  • Power unit
  • Engine repair
  • Assembly of pistons and connecting rods

Assembly of pistons and connecting rods (Mercedes-Benz Sprinter 903)

0
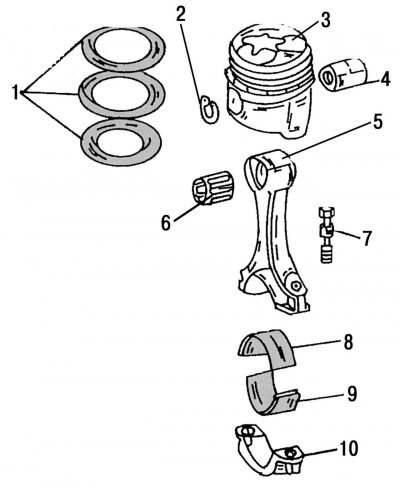
Figure 54. Piston and connecting rod after disassembly: 1 - piston rings; 2 - piston pin retaining…

Figure 54. Piston and connecting rod after disassembly: 1 - piston rings; 2 - piston pin retaining rings; 3 — piston; 4 - piston pin; 5 — connecting rod; 6 - bearing sleeve in the upper head of the connecting rod; 7 — connecting rod bearing cap mounting bolts; 8 — upper connecting rod bearing shell; 9 — lower connecting rod bearing shell; 10 — connecting rod bearing cap


Figure 54 shows individual parts of the piston with the connecting rod. When assembling and installing them, the following operations must be performed:
  • before assembly, carefully inspect the piston surfaces (in case new pistons are installed). Check the diameters, size groups and the last two digits of the spare parts catalogue, which must be indicated on the pistons and comply with the installation requirements;
  • when replacing connecting rods, pay attention to the lower parts of the bearing caps, where one or two dot marks may be punched, which determine the size group of the bearing liners;
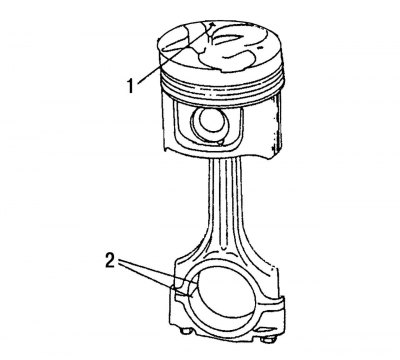
Figure 63. Piston with connecting rod assembly

Figure 63. Piston with connecting rod assembly


[Publication taken from an online resource www.mercedesman.ru]
  • lubricate the piston pin and press it into the holes of the piston bosses and connecting rod bushing using a mandrel of suitable diameter. Install the piston pin retaining rings on both sides, making sure they are seated properly in their grooves. The piston with the connecting rod should be installed in the engine in such a way that arrow 1 (figure 63) on the piston bottom pointed to the front of the engine, and the guide petals of the 2 connecting rod bearing shells were located on the left side of the engine;
  • make sure that after assembly the piston rotates freely in both directions on the piston pin;
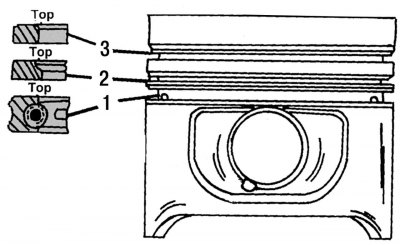
Figure 64. Piston rings in section: 1 - composite oil scraper ring with expander (the working…

Figure 64. Piston rings in section: 1 - composite oil scraper ring with expander (the working surface is chrome plated); 2 - lower compression ring with a trapezoidal cross-section; 3 - upper compression ring of square section (the contact surface is asymmetrically ground and chromed)

  • using piston ring pliers, install the rings on the piston, paying particular attention to the correct sequence of their installation. Compression rings can be easily mixed up, so pay attention to their cross-sections and location on the piston. Figure 64 shows the sections of the rings and the order of their arrangement.
This article is available at: russian, bulgarian, belarusian, ukrainian, serbian, croatian, romanian, polish, slovak, hungarian
The article has been verified: Levin Kirill Glebovich
Share with friends:
◀ Previous
Mercedes Sprinter / Engine repair
Next ▶

Checking pistons and connecting rods
Measuring cylinder liners
Pistons and connecting rods — removal
Cylinder head repair
Disassembling the cylinder head
Installing pistons with connecting rods into cylinders
Camshaft Drive Mechanism Cover
General Description — Cylinder Block
Removal and installation cylinder block plugs
Measuring the working clearance in pistons
More similar articles for repairing other models

☛ Pistons and connecting rods — removal Mercedes 190 (W201) (1982-1993)
☛ Removal connecting rods and pistons Mercedes W123 (1976-1985)
☛ Disconnecting and connecting cardan shafts on the transfer case Mercedes W463 (1999-2019)
☛ Pistons and connecting rods — removal Mercedes W116 (1972-1980, petrol)
Link in different formats to this article
Comments and feedback from visitors
No comments yet


How much will 48 + 27 ?


Vario 814D (1996-2003, diesel) 
  • General information
  • Maintenance
  • Power unit
  • Engines 602.984/985
  • Engines 904.908/914/923/936
  • Transmission
  • Clutch
  • Manual gearbox 711.613
  • Manual gearbox 710.64/66
  • Manual gearbox 715.051
  • Automatic gearbox 723.345
  • Power take-off box
  • Chassis
  • Front suspension
  • Rear suspension
  • Steering
  • Brake system
  • Body and electrical equipment
  • Interior (internal elements)
  • Exterior (external elements)
  • Heater and air conditioner
  • Electrical diagrams
Vito 2 (2003-2014, diesel) 
  • General information
  • User manual
  • Maintenance
  • Diesel engine OM646
  • Engine repair
  • Cooling and lubrication system
  • Power and exhaust system
  • Transmission
  • Clutch
  • Car gearbox
  • Chassis
  • Front suspension
  • Rear suspension
  • Steering
  • Brake system
  • Body
  • Body elements
  • Electrical equipment
  • Equipment and devices
  • Security systems
  • Electrical circuits
Vito 1 (1996-2003) 
  • General information
  • User manual
  • Maintenance
  • Petrol engines 2.0 l
  • Engine repair
  • Lubrication system
  • Cooling system
  • Power and control system
  • Petrol engines 2.8 l
  • Engine repair
  • Lubrication system
  • Cooling system
  • Power and control system
  • Diesel engines 2.3 l
  • Engine repair
  • Cooling system
  • Lubrication system
  • Turbocharging and recycling
  • Power and control system
  • Diesel engines 2.2 l
  • Engine repair
  • Cooling system
  • Lubrication system
  • Turbocharging and recycling
  • Power and control system
  • Transmission
  • Clutch
  • Mechanical gearbox
  • Automatic gearbox
  • Chassis
  • Front suspension and wheels
  • Rear suspension
  • Steering
  • Brake system
  • Body
  • Exterior (external elements)
  • Interior (internal elements)
  • Electrical equipment
  • Equipment and devices
  • Heater and air conditioner
  • Electrical circuits
Sprinter (1995-2000, diesel) 
  • General information
  • Introduction to the guide
  • Maintenance
  • Power unit
  • Engine repair
  • Lubrication system
  • Cooling system
  • Power and exhaust system
  • Transmission
  • Clutch
  • Mechanical gearbox
  • Automatic gearbox
  • Front axle
  • Rear axle and cardan
  • Chassis
  • Car suspension
  • Steering
  • Brake system
  • Tires and wheels
  • Electrical equipment
  • Equipment and devices
  • Headlights and lighting
  • Power devices
  • Electrical circuits
 
MercedesMan.ru © 2017–2026 · Mobile version · Read about Mercedes · Sitemap: EN BG BY UA RS HR RO PL SK HU · Feedback · Site search · Bookmark A-Class (W168) · C-Class (W201) · C-Class (W202) · C-Class (W203) · E-Class (W123) · E-Class (W124) · E-Class (W210) · G-Class (W463) · M-Class (W163) · S-Class (W116, petrol) · S-Class (W126, petrol) · S-Class (W140) · S-Class (W220) · Sprinter · Vito 1 · Vito 2 · Vario 814D ·
 
We only use cookies without which some of the site's features may not be available.