
Cars BMW Cars Volkswagen Cars Chevrolet Cars Land Rover Cars Lada Cars Honda Cars Peugeot
English Русский
Български
Беларускі
Український
Српски
Hrvatski
Română
Polski
Slovenský
Magyar
Bookmark News and articles Sitemap Feedback Site search
MercedesMan.ru


A-Class C-Class E-Class G-Class M-Class S-Class Others
Sprinter (1995-2000, diesel) Vito 1 (1996-2003) Vito 2 (2003-2014, diesel) Vario 814D (1996-2003, diesel)
  • Main
  • Mercedes-Benz
  • Sprinter (1995-2000)
  • Power unit
  • Engine repair
  • Belt pulley and torsional vibration damper of the crankshaft

Belt pulley and torsional vibration damper of the crankshaft (Mercedes-Benz Sprinter 903)

0
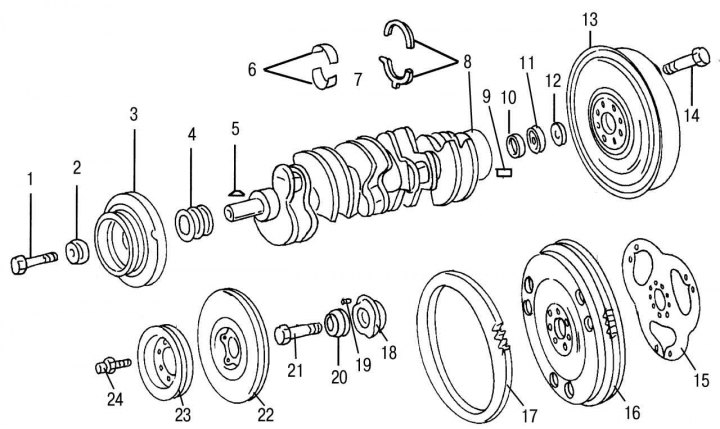
Figure 76. Crankshaft and its mating parts using the example of engine 602 (similar parts are used…

Figure 76. Crankshaft and its mating parts using the example of engine 602 (similar parts are used on the 601 engine): 1 - bolt for fastening the chain drive sprocket to the crankshaft; 2 — washer of the chain drive sprocket mounting bolt; 3 - torsional vibration damper (if it is installed); 4 - twin drive sprocket; 5 — key; 6 — crankshaft bearing shells; 7 — crankshaft; 8 - adjusting thrust half rings, 5 size groups; 9 — landing pin; 10 - spacer washer; 11 - radial ball bearing; 12 - washer; 13 - combined dual mass flywheel; 14 — flywheel mounting bolt; 15 - locking plate; 16 - flywheel, standard version; 17 — flywheel ring gear; 18 — vibration damper hub (if it is installed); 19 - mounting pin; 20 - washer; 21 — bolt securing vibration damper/belt pulley to hub (if it is installed); 22 — vibration damper hub (if it is installed); 23 - Belt pulley (if it is installed); 24 — bolt for fastening vibration damper and belt pulley
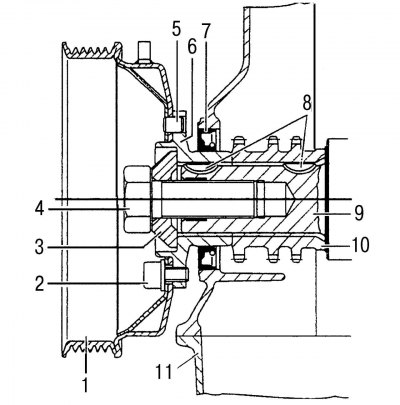

Figure 90. Front flange of the crankshaft (without torsional vibration damper): 1 - belt pulley; 2…

Figure 90. Front flange of the crankshaft (without torsional vibration damper): 1 - belt pulley; 2 - Allen head bolt, 23 Nm; 3 — washer of the belt pulley mounting bolt; 4 — belt pulley mounting bolt, 200 Nm + 90°; 5 - landing pin; 6 — hub; 7 — front crankshaft oil seal; 8 - keys (2 pieces); 9 — crankshaft; 10 — camshaft drive sprocket; 11 — camshaft drive mechanism cover
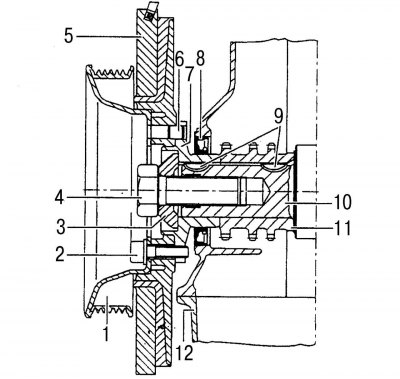


Figure 91. Front flange of the crankshaft (with torsional vibration damper): 1 - belt pulley; 2 -…

Figure 91. Front flange of the crankshaft (with torsional vibration damper): 1 - belt pulley; 2 - Allen head bolt, 23 Nm; 3 — washer of the bolt for fastening the belt pulley and torsional vibration damper; 4 — bolt for fastening the belt pulley and vibration damper, 200 Nm + 90°; 5 — torsional vibration damper; 6 - landing pin; 7 — hub; 8 — front crankshaft oil seal; 9 - keys (2 pieces); 10 — crankshaft; 11 — camshaft drive sprocket; 12 — camshaft drive mechanism cover


The engine is equipped with one belt pulley and one torsional vibration damper. As you can see in the picture 76, Not all belt pulleys are created equal. The mounting holes of the torsional vibration damper are engaged with the belt pulley through a mounting pin that enters the corresponding hole in the belt pulley. The method of mounting individual components of torsional vibration damping systems on both types of engines is shown in the figure 90 and 91. On old engines of similar design, three elastic washers were placed under the central bolt. Now these washers have been abandoned and only one bolt holds the parts on the crankshaft. If the belt pulley and the torsional vibration damper are made as separate parts, then the belt pulley is bolted to the torsional vibration damper. The TDC scale and indicator are located on the vibration damper.


To remove and install parts, the following operations must be performed:
  • remove the soundproofing upholstery in the lower part of the car, as well as the units and parts of the front of the car in order to provide free access to the belt pulley;
  • loosen the tension and remove the poly V-belt as described above in the relevant chapter;
  • secure the crankshaft from turning. To do this, you can engage any gear and apply the parking brake. Otherwise, you can remove the starter and lock the flywheel ring gear (or the drive disk, if you have an automatic transmission) accordingly;
  • remove the crankshaft pulley together with the vibration damper if they are mounted on the same hub (see the lower left part of the figure76). After unscrewing the bolts in the inner cavity of the belt pulley, you can remove the parts;
  • remove the belt pulley mounting bolt if the engine is equipped with the parts shown in the lower left part of the figure 76, or unscrew the bolt in the center of the vibration damper if the engine is equipped with the parts shown in the same figure above. If the hub cannot be removed using a regular tool, use a suitable puller.

Each belt pulley has a specific diameter matched to a specific engine type. This should be kept in mind if the pulley needs to be replaced. When installing the crankshaft hub and belt pulley or when installing the torsional vibration damper, proceed as follows:
  • turn the crankshaft until the keyways on the crankshaft and hub align, insert the key into the groove and fit the hub or combined pulley/vibration damper onto the shaft;
  • place a special washer on the belt pulley or combined pulley/vibration damper mounting bolt, generously lubricate its threaded part, tighten to 200 Nm, and then tighten it by another 1/4 turn. The crankshaft must be secured against turning;
  • install the vibration damper and pulley if the engine is equipped as shown in the lower left part of the figure 76. Tighten the bolts inside the pulley to a torque of 25 Nm;
  • install and tension the poly V-belt as described in in the relevant subsection;
  • perform the remaining work in the reverse order of removal.
This article is available at: russian, bulgarian, belarusian, ukrainian, serbian, croatian, romanian, polish, slovak, hungarian
The article has been verified: Levin Kirill Glebovich
Share with friends:
◀ Previous
Mercedes Sprinter / Engine repair
Next ▶

Flywheel or drive disc (automatic transmission models)
Installing the crankshaft
Checking the crankshaft
Removal the crankshaft
Crankshaft and Flywheel — General Information
Rear crankshaft oil seal and its holder
Front crankshaft oil seal
Camshaft Drive Mechanism — General Description
Removal and installation the camshaft drive chain tensioner
Dismantling and installation of the camshaft drive chain
More similar articles for repairing other models

☛ V-belt — checking condition Mercedes W168 (1997-2004)
☛ Crankshaft Pulley/Vibration Damper and Hub — Removal and Installation Mercedes 190 (W201) (1982-1993)
☛ Crankshaft Pulley/Vibration Damper and Hubs Mercedes W124 (1984-1995)
☛ Replacement of the auxiliary drive belt and elements of its… Mercedes W463 (1999-2019)
☛ Removal and installation the torsional vibration damper / drive belt… Mercedes W163 (1997-2005)
☛ Damper and crankshaft pulley Mercedes W116 (1972-1980, petrol)
Link in different formats to this article
Comments and feedback from visitors
No comments yet


How much will 29 + 43 ?


Vario 814D (1996-2003, diesel) 
  • General information
  • Maintenance
  • Power unit
  • Engines 602.984/985
  • Engines 904.908/914/923/936
  • Transmission
  • Clutch
  • Manual gearbox 711.613
  • Manual gearbox 710.64/66
  • Manual gearbox 715.051
  • Automatic gearbox 723.345
  • Power take-off box
  • Chassis
  • Front suspension
  • Rear suspension
  • Steering
  • Brake system
  • Body and electrical equipment
  • Interior (internal elements)
  • Exterior (external elements)
  • Heater and air conditioner
  • Electrical diagrams
Vito 2 (2003-2014, diesel) 
  • General information
  • User manual
  • Maintenance
  • Diesel engine OM646
  • Engine repair
  • Cooling and lubrication system
  • Power and exhaust system
  • Transmission
  • Clutch
  • Car gearbox
  • Chassis
  • Front suspension
  • Rear suspension
  • Steering
  • Brake system
  • Body
  • Body elements
  • Electrical equipment
  • Equipment and devices
  • Security systems
  • Electrical circuits
Vito 1 (1996-2003) 
  • General information
  • User manual
  • Maintenance
  • Petrol engines 2.0 l
  • Engine repair
  • Lubrication system
  • Cooling system
  • Power and control system
  • Petrol engines 2.8 l
  • Engine repair
  • Lubrication system
  • Cooling system
  • Power and control system
  • Diesel engines 2.3 l
  • Engine repair
  • Cooling system
  • Lubrication system
  • Turbocharging and recycling
  • Power and control system
  • Diesel engines 2.2 l
  • Engine repair
  • Cooling system
  • Lubrication system
  • Turbocharging and recycling
  • Power and control system
  • Transmission
  • Clutch
  • Mechanical gearbox
  • Automatic gearbox
  • Chassis
  • Front suspension and wheels
  • Rear suspension
  • Steering
  • Brake system
  • Body
  • Exterior (external elements)
  • Interior (internal elements)
  • Electrical equipment
  • Equipment and devices
  • Heater and air conditioner
  • Electrical circuits
Sprinter (1995-2000, diesel) 
  • General information
  • Introduction to the guide
  • Maintenance
  • Power unit
  • Engine repair
  • Lubrication system
  • Cooling system
  • Power and exhaust system
  • Transmission
  • Clutch
  • Mechanical gearbox
  • Automatic gearbox
  • Front axle
  • Rear axle and cardan
  • Chassis
  • Car suspension
  • Steering
  • Brake system
  • Tires and wheels
  • Electrical equipment
  • Equipment and devices
  • Headlights and lighting
  • Power devices
  • Electrical circuits
 
MercedesMan.ru © 2017–2026 · Mobile version · Read about Mercedes · Sitemap: EN BG BY UA RS HR RO PL SK HU · Feedback · Site search · Bookmark A-Class (W168) · C-Class (W201) · C-Class (W202) · C-Class (W203) · E-Class (W123) · E-Class (W124) · E-Class (W210) · G-Class (W463) · M-Class (W163) · S-Class (W116, petrol) · S-Class (W126, petrol) · S-Class (W140) · S-Class (W220) · Sprinter · Vito 1 · Vito 2 · Vario 814D ·
 
We only use cookies without which some of the site's features may not be available.