
Cars BMW Cars Volkswagen Cars Chevrolet Cars Land Rover Cars Lada Cars Honda Cars Peugeot
English Русский
Български
Беларускі
Український
Српски
Hrvatski
Română
Polski
Slovenský
Magyar
Bookmark News and articles Sitemap Feedback Site search
MercedesMan.ru


A-Class C-Class E-Class G-Class M-Class S-Class Others
Sprinter (1995-2000, diesel) Vito 1 (1996-2003) Vito 2 (2003-2014, diesel) Vario 814D (1996-2003, diesel)
  • Main
  • Mercedes-Benz
  • Sprinter (1995-2000)
  • Power unit
  • Engine repair
  • Front crankshaft oil seal

Front crankshaft oil seal (Mercedes-Benz Sprinter 903)

0
Figure 44. Camshaft drive mechanism cover with individual parts indicated (the details of the lid…

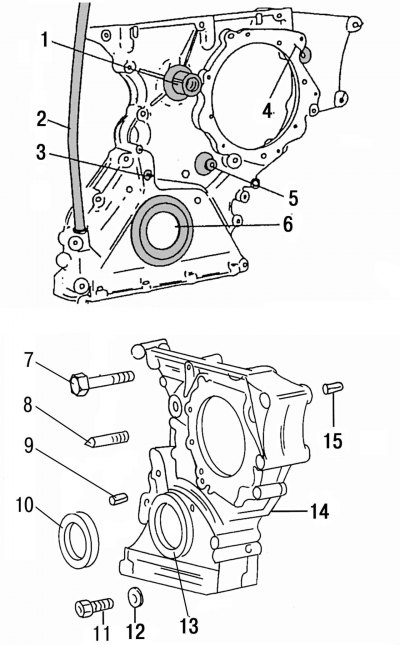
Figure 44. Camshaft drive mechanism cover with individual parts indicated (the details of the lid are shown below): 1 — support pin of the generator drive belt tensioning mechanism; 2 - oil dipstick guide tube; 3 — TDC position indicator pin; 4 - hole with flange for vacuum pump; 5 — TDC sensor mounting pin on four-cylinder engines; 6 — front crankshaft oil seal; 7 — bolt for fastening the camshaft drive mechanism cover to the cylinder block; 8 — TDC position indicator pin; 9 — seat bushing for mounting the TDC sensor; 10 — front crankshaft oil seal; 11 — bolt for fastening the camshaft drive mechanism cover to the cylinder block; 12 - elastic Grover washer; 13 — location of installation of the front crankshaft seal; 14 — camshaft drive mechanism cover; 15 — seat bushing of the power steering pump


The front crankshaft oil seal in the camshaft drive mechanism cover can be replaced on the engine installed in the vehicle if oil leaks are detected. First, you should make sure that the oil is leaking through the front crankshaft seal, and not at the sealing point of the camshaft drive mechanism cover. If the leaks are caused by a leak in the lid, it should be resealed (see subsection 2.4 and the right part of the drawing 44).


The front crankshaft oil seal must be replaced as follows:
  • remove the belt pulley, vibration damper and hub following the instructions described in subsection 2.9;
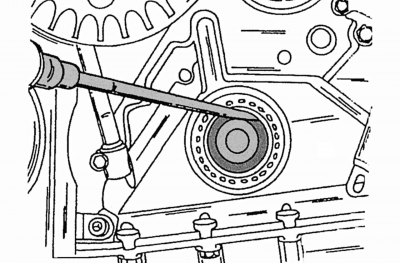
Figure 94. Removing the front crankshaft oil seal

Figure 94. Removing the front crankshaft oil seal

  • using a screwdriver, remove the seal from the camshaft drive mechanism cover. In this case, you should place a piece of thick cloth under the screwdriver to avoid accidentally damaging the cover or crankshaft (figure 94);
  • clean all parts thoroughly, remove burrs from the edges of the hole in the camshaft drive mechanism cover if necessary;
  • if necessary, remove the cuff from the cover using a screwdriver. You have to be very careful not to damage the lid;
  • carefully clean the sealing surfaces on the cylinder block and the camshaft drive mechanism cover;
  • install a new crankshaft oil seal into the cover if the old one has been removed and needs to be replaced. The sealing lip of the new ring is offset by 3mm, so it will not sit on the crankshaft flange at the same point as the old ring. The space between the sealing lip and the dust-catching lip should be filled with approximately 1 g of plastic grease;
  • apply sealant to the sealing surface of the cover and attach it to the cylinder block so that the mounting pins fit into the holes provided for them. Tap the lid gently from above to make it fit more tightly. At the Mercedes-Benz service station, a special clamping tool is used for these purposes;
  • first tighten the two lower bolts, and then all the others with a torque of 10 Nm;
  • then carry out the work in the reverse order of removal.
This article is available at: russian, bulgarian, belarusian, ukrainian, serbian, croatian, romanian, polish, slovak, hungarian
The article has been verified: Levin Kirill Glebovich
Share with friends:
◀ Previous
Mercedes Sprinter / Engine repair
Next ▶

Rear crankshaft oil seal and its holder
Belt pulley and torsional vibration damper of the crankshaft
Flywheel or drive disc (automatic transmission models)
Installing the crankshaft
Checking the crankshaft
Camshaft Drive Mechanism — General Description
Removal and installation the camshaft drive chain tensioner
Dismantling and installation of the camshaft drive chain
Removal and installation the chain tension shoe
Dismantling and installation of drive chain dampers
More similar articles for repairing other models

☛ Crankshaft Position Sensor — Removal and Installation Mercedes W168 (1997-2004)
☛ Front axle / steering Mercedes W202 (1993-2000)
☛ Replacing the front crankshaft oil seal Mercedes W123 (1976-1985)
☛ Removal and installation the crankshaft position sensor (CKP) Mercedes W463 (1999-2019)
☛ Replacing the front crankshaft oil seal Mercedes W163 (1997-2005)
☛ Front crankshaft oil seal Mercedes W116 (1972-1980, petrol)
Link in different formats to this article
Comments and feedback from visitors
No comments yet


How much will 12 + 43 ?


Vario 814D (1996-2003, diesel) 
  • General information
  • Maintenance
  • Power unit
  • Engines 602.984/985
  • Engines 904.908/914/923/936
  • Transmission
  • Clutch
  • Manual gearbox 711.613
  • Manual gearbox 710.64/66
  • Manual gearbox 715.051
  • Automatic gearbox 723.345
  • Power take-off box
  • Chassis
  • Front suspension
  • Rear suspension
  • Steering
  • Brake system
  • Body and electrical equipment
  • Interior (internal elements)
  • Exterior (external elements)
  • Heater and air conditioner
  • Electrical diagrams
Vito 2 (2003-2014, diesel) 
  • General information
  • User manual
  • Maintenance
  • Diesel engine OM646
  • Engine repair
  • Cooling and lubrication system
  • Power and exhaust system
  • Transmission
  • Clutch
  • Car gearbox
  • Chassis
  • Front suspension
  • Rear suspension
  • Steering
  • Brake system
  • Body
  • Body elements
  • Electrical equipment
  • Equipment and devices
  • Security systems
  • Electrical circuits
Vito 1 (1996-2003) 
  • General information
  • User manual
  • Maintenance
  • Petrol engines 2.0 l
  • Engine repair
  • Lubrication system
  • Cooling system
  • Power and control system
  • Petrol engines 2.8 l
  • Engine repair
  • Lubrication system
  • Cooling system
  • Power and control system
  • Diesel engines 2.3 l
  • Engine repair
  • Cooling system
  • Lubrication system
  • Turbocharging and recycling
  • Power and control system
  • Diesel engines 2.2 l
  • Engine repair
  • Cooling system
  • Lubrication system
  • Turbocharging and recycling
  • Power and control system
  • Transmission
  • Clutch
  • Mechanical gearbox
  • Automatic gearbox
  • Chassis
  • Front suspension and wheels
  • Rear suspension
  • Steering
  • Brake system
  • Body
  • Exterior (external elements)
  • Interior (internal elements)
  • Electrical equipment
  • Equipment and devices
  • Heater and air conditioner
  • Electrical circuits
Sprinter (1995-2000, diesel) 
  • General information
  • Introduction to the guide
  • Maintenance
  • Power unit
  • Engine repair
  • Lubrication system
  • Cooling system
  • Power and exhaust system
  • Transmission
  • Clutch
  • Mechanical gearbox
  • Automatic gearbox
  • Front axle
  • Rear axle and cardan
  • Chassis
  • Car suspension
  • Steering
  • Brake system
  • Tires and wheels
  • Electrical equipment
  • Equipment and devices
  • Headlights and lighting
  • Power devices
  • Electrical circuits
 
MercedesMan.ru © 2017–2026 · Mobile version · Read about Mercedes · Sitemap: EN BG BY UA RS HR RO PL SK HU · Feedback · Site search · Bookmark A-Class (W168) · C-Class (W201) · C-Class (W202) · C-Class (W203) · E-Class (W123) · E-Class (W124) · E-Class (W210) · G-Class (W463) · M-Class (W163) · S-Class (W116, petrol) · S-Class (W126, petrol) · S-Class (W140) · S-Class (W220) · Sprinter · Vito 1 · Vito 2 · Vario 814D ·
 
We only use cookies without which some of the site's features may not be available.