
Vehicles with a gasoline engine. Withdrawal
1. Disconnect the intake manifold.
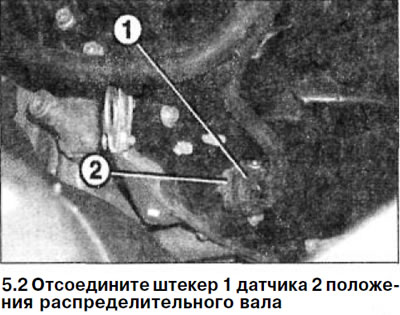
2. Disconnect the plug 1 of the camshaft position sensor 2 (see illustration).
3. Disconnect the crankcase ventilation hose from the cylinder head cover.
4. Air pump engines: Disconnect the air pump changeover valve from the cylinder head cover.
5. Unscrew bolts of fastening of a cover to a head of the block of cylinders.
6. Remove the cover together with the rubber gasket of the cylinder head cover.
Installation of a cover of a head of the block of cylinders is carried out to sequences, return to removal.
7. Inspect the rubber sealing gasket of the cylinder head cover and, if it is porous, replace it with a new one.
8. Clean sealing surfaces.
9. Install cover 1 of the cylinder head together with the cover gasket (see illustration).
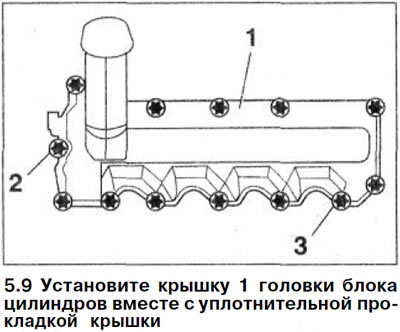
10. Screw in bolt 2 until it touches the cover, then bolt 3 and all the rest.
Tighten the cover bolts on the cylinder head with a force of 8 Nm, acting in a crosswise manner (see illustration 5.9).
Vehicles with a diesel engine. Withdrawal
11. Remove the nozzles, see relevant chapter.
12. Vehicles produced before 8/2000. Disconnect the oil filler pipe together with the crankcase ventilation hose. For this:
13. Remove the coolant expansion tank and set it aside from the work area.
14. Remove the intake manifold.
15. Disconnect the two plug connections and the ventilation hose.
16. Pulling up, remove the oil filler pipe from the cylinder head cover.
17. Vehicles manufactured since 9/2000. Disconnect the oil filler pipe together with the crankcase ventilation hose. For this:
18. Remove the coolant expansion tank and, without disconnecting the hoses from it, set it aside from the work site.
19. Disconnect the inlet pipeline together with the connected coolant hoses and put them aside.
20. Unscrew the bolts securing the oil filler pipe and, pulling up, pull the pipe out of the cylinder head cover.
21. Remove the fuel shutoff solenoid valve.
22. Disconnect the main fuel line from the cylinder head cover and, without disconnecting the fuel lines, set them aside from the place of work.
23. Disconnect the camshaft position sensor plug.
24. Disconnect the oil supply line from the turbocharger.
25. Disconnect wires from glow plugs on a cover of a head of the block of cylinders.
26. Unscrew bolts of fastening and remove an arm of fastening of a turbocharger.
27. Unscrew bolts and disconnect the pipeline recirculation OG.
28. Disconnect the high pressure pipe from the cylinder head cover.
29. Unscrew bolts of fastening and remove a cover of a head of the block of cylinders together with a rubber lining.
Installation of a cover of a head of the block of cylinders is carried out to sequences, return to removal.
30. Inspect the rubber sealing gasket of the cylinder head cover and, if it is porous, replace it with a new one.
31. Clean sealing surfaces.
32. Establish a cover of a head of the block of cylinders together with a sealing lining.
33. Screw in the cover bolts until their heads touch the cover, and then tighten them, acting in a cross order with a force of 8 Nm.
34. Install the oil filler pipe, replacing the old gasket with a new one.
Tightening torques for threaded connections:
- union nut of the pressure pipe to the high pressure fuel pump, fuel distribution line, injector - 22 Nm
- fuel distribution line to cylinder head cover - 9 Nm