
Cars BMW Cars Volkswagen Cars Chevrolet Cars Land Rover Cars Lada Cars Honda Cars Peugeot
English Русский
Български
Беларускі
Український
Српски
Hrvatski
Română
Polski
Slovenský
Magyar
Bookmark News and articles Sitemap Feedback Site search
MercedesMan.ru


A-Class C-Class E-Class G-Class M-Class S-Class Others
Sprinter (1995-2000, diesel) Vito 1 (1996-2003) Vito 2 (2003-2014, diesel) Vario 814D (1996-2003, diesel)
  • Main
  • Mercedes-Benz
  • Vito 2 (2003-2014)
  • Diesel engine OM646
  • Engine repair
  • Removal and installation of the cylinder head (CH)

Removal and installation of the cylinder head (CH) (Mercedes-Benz Vito W639)

0
1. Disconnect the negative battery cable.

2. Remove the air filter housing.

3. Drain the coolant.

4. Loosen the screw (1) securing the turbocharger to the lower part of the exhaust manifold.

5. Remove the EGR mount. (Only for engines with code MS3. Engine version: Euro 3.)

6. Remove the air manifold.

7. Remove the decorative cylinder head panel.

8. Disconnect the clamps (2).

9. Disconnect the coolant hose (3) from the radiator.

10. Disconnect the ventilation hose (4) from the expansion tank.

11. Remove the catalytic converter temperature sensor (Only for engines with code KA 1: presence of a diesel particulate filter, starting from 25.9.06.)

12. Remove the hose (5) connecting the engine to the intake air duct, together with the ventilation hose (6). To do this, remove the clamp from the turbocharger pipe and disconnect the connector of the pressure sensor (14) at the outlet of the air filter. Disconnect the ventilation hose (6) from the oil separator.

13. Disconnect the wiring harness, marking the connection points of the connectors.

(Material created based on the website: MERCEDESMAN.ru)

14. Disconnect the return fuel line from the injectors.

15. Remove the vacuum pump (17) by unscrewing the screws (16).

16. Remove the vacuum accumulator (7). (Only for engines 646.982/983.)

17. Move the vacuum tubes (8) with the vacuum accumulator (7) to the side as far as possible.

18. Remove the high pressure fuel pump (hereinafter referred to as high pressure fuel pump) (see figure VN 2.041).

19. Unscrew the screw (11).


20. Remove the bracket (12).

21. Remove the clamp and disconnect the fuel return line.
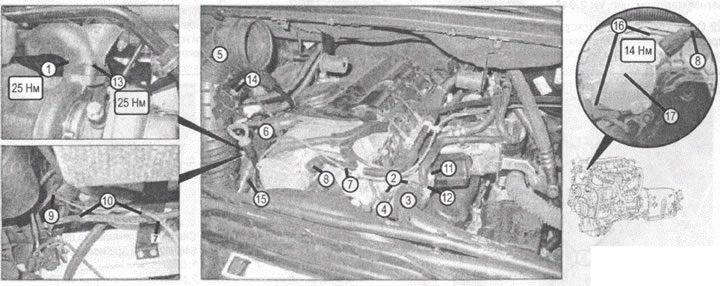
VN 2.040

VN 2.040
Removing the cylinder head
1. Screw
2. Clamps
3. Cooling system hose
4. Ventilation hose
5. Air duct
6. Crankcase ventilation hose
7. Vacuum accumulator
8. Main vacuum tube
9. Hose
10. Brackets
11. Screw
12. Brackets
13. Screw
14. Air filter outlet pressure sensor (B28/5)
15. Ventilation line heater (R39/1)
Removing the vacuum pump
16. Screw
17. Vacuum pump
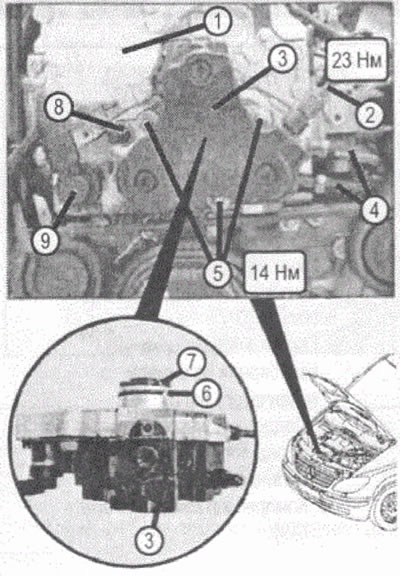

VN 2.041

VN 2.041
Removing the fuel injection pump
1. Vacuum pump
2. High pressure fuel line
3. Fuel injection pump
4. Fuel lines
5. Screws
6. Sealing ring
7. Fuel injection pump drive shaft
8. Fuel temperature sensor (B50 or B50/3)
9. Fuel supply control valve (Y94 bkb Y94/3)
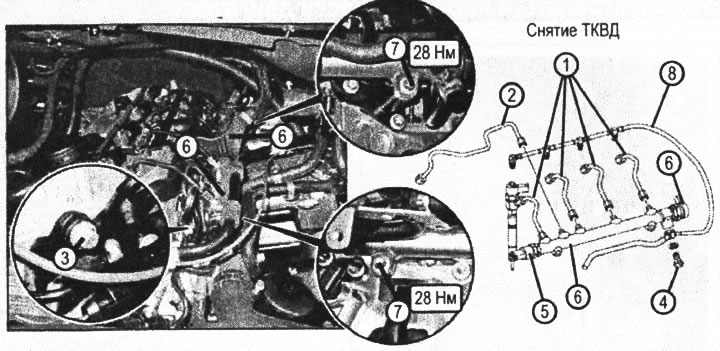

VN 2.042

VN 2.042
1. High pressure fuel lines supplying fuel to the injectors
2. High pressure fuel line for supplying fuel to the high pressure fuel pump
3. Screw
4. Banjo bolt type connector
5. Pressure sensor in the high-pressure fuel pump (B4/6)
6. Fuel pressure regulating valve (Y74)
7. Screw for fastening the high pressure fuel pump
8. Return fuel line
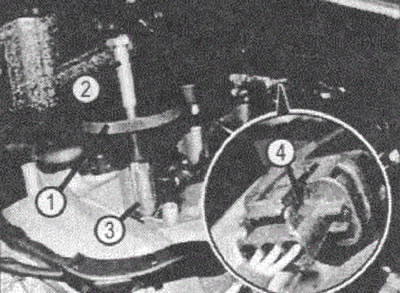


VN 2.043

VN 2.043
Removing injectors
1. Impact puller
2. Impact puller screw rod
3. Threaded adapter
4. Camshaft position sensor (B6/17)


23. Move the cylinder head wiring harness to the side.

24. Remove the injectors (see figure VN 2.043).

When installing, the clamp screw should be tightened according to the scheme 7 Nm + 90° + 90°.

25. Remove the oil filler pipe (2) of the automatic transmission (only with automatic transmission) (see figure VN 2.044).

26. Disconnect the coolant hose (1) from the cylinder head by loosening the clamp (4) and moving the hose to the side.

27. Unscrew the screw (5) of the clamp securing the oil dipstick guide tube (6).

28. Remove the oil supply pipe to the turbocharger (see figure VN 2.045).

29. Unscrew the screws (13) (see fig, VN 2.040) fastening the turbocharger to the exhaust manifold.

30. Check the correct initial settings of the camshafts (see, figure VN 2.046) To do this, you need to check the relative position of the camshafts and the relative position of the crankshaft and camshaft system.
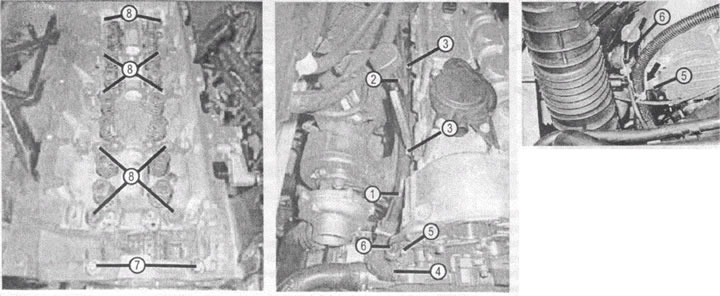
VN 2.044

VN 2.044
Removing the cylinder head (shown on engine 646.982 starting with number 007338)
1 Coolant hose
2. Automatic transmission oil filler pipe
4. Clamp
5. Screw
6. Oil dipstick guide tube
7. Screws
8. Cylinder head mounting screws
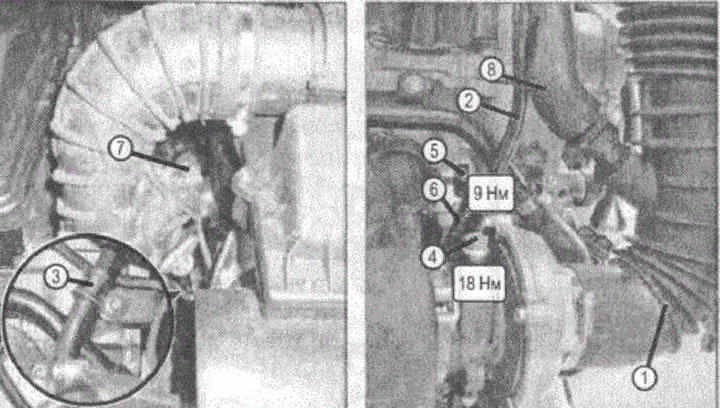


VN 2.045

VN 2.045
Removing the oil supply pipe to the turbocharger
1. Engine air inlet duct
2. Oil supply line
3. Clamp
4, 5. Screws
6. Branch pipe
7. Air filter outlet pressure sensor (828/5)
8. Ventilation line heater (R39/1)
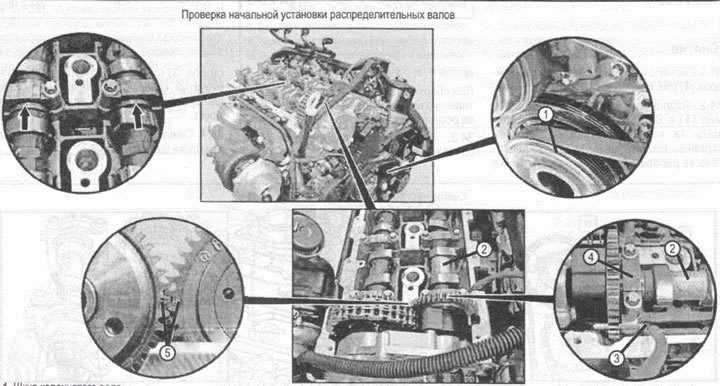

VN 2.046

VN 2.046
1. Crankshaft pulley
2. Intake valve camshaft
3. Pin fixing the position of the inlet camshaft gear
4. Camshaft bearing
5. Marks on gears
This article is available at: russian, bulgarian, belarusian, ukrainian, serbian, croatian, romanian, polish, slovak, hungarian
The article has been verified: Lukyanov Nikita Ilyich
Share with friends:
◀ Previous
Mercedes Vito 2 / Engine repair
Next ▶

Units and assemblies in the front part of the engine
Removal and installation of the power unit
Engine specifications
Vehicle option codes
General information
Checking the relative position of the camshafts
Checking the relative position of the crankshaft and camshaft system
Cylinder head repair
Removal and installation valves
Valve seats
More similar articles for repairing other models

☛ Cylinder head — removal and installation Mercedes W168 (1997-2004)
☛ Cylinder Head Cover (4-cylinder engine) Mercedes W202 (1993-2000)
☛ Cylinder head design and specification Mercedes W123 (1976-1985)
☛ Removal and installation the slave cylinder of the interaxle… Mercedes W463 (1999-2019)
☛ Removal and installation the cylinder head Mercedes W163 (1997-2005)
☛ Cylinder Head Cover — Installation Details Mercedes W140 (1991-1998)
Link in different formats to this article
Comments and feedback from visitors
No comments yet


How much will 27 + 35 ?


Vario 814D (1996-2003, diesel) 
  • General information
  • Maintenance
  • Power unit
  • Engines 602.984/985
  • Engines 904.908/914/923/936
  • Transmission
  • Clutch
  • Manual gearbox 711.613
  • Manual gearbox 710.64/66
  • Manual gearbox 715.051
  • Automatic gearbox 723.345
  • Power take-off box
  • Chassis
  • Front suspension
  • Rear suspension
  • Steering
  • Brake system
  • Body and electrical equipment
  • Interior (internal elements)
  • Exterior (external elements)
  • Heater and air conditioner
  • Electrical diagrams
Vito 2 (2003-2014, diesel) 
  • General information
  • User manual
  • Maintenance
  • Diesel engine OM646
  • Engine repair
  • Cooling and lubrication system
  • Power and exhaust system
  • Transmission
  • Clutch
  • Car gearbox
  • Chassis
  • Front suspension
  • Rear suspension
  • Steering
  • Brake system
  • Body
  • Body elements
  • Electrical equipment
  • Equipment and devices
  • Security systems
  • Electrical circuits
Vito 1 (1996-2003) 
  • General information
  • User manual
  • Maintenance
  • Petrol engines 2.0 l
  • Engine repair
  • Lubrication system
  • Cooling system
  • Power and control system
  • Petrol engines 2.8 l
  • Engine repair
  • Lubrication system
  • Cooling system
  • Power and control system
  • Diesel engines 2.3 l
  • Engine repair
  • Cooling system
  • Lubrication system
  • Turbocharging and recycling
  • Power and control system
  • Diesel engines 2.2 l
  • Engine repair
  • Cooling system
  • Lubrication system
  • Turbocharging and recycling
  • Power and control system
  • Transmission
  • Clutch
  • Mechanical gearbox
  • Automatic gearbox
  • Chassis
  • Front suspension and wheels
  • Rear suspension
  • Steering
  • Brake system
  • Body
  • Exterior (external elements)
  • Interior (internal elements)
  • Electrical equipment
  • Equipment and devices
  • Heater and air conditioner
  • Electrical circuits
Sprinter (1995-2000, diesel) 
  • General information
  • Introduction to the guide
  • Maintenance
  • Power unit
  • Engine repair
  • Lubrication system
  • Cooling system
  • Power and exhaust system
  • Transmission
  • Clutch
  • Mechanical gearbox
  • Automatic gearbox
  • Front axle
  • Rear axle and cardan
  • Chassis
  • Car suspension
  • Steering
  • Brake system
  • Tires and wheels
  • Electrical equipment
  • Equipment and devices
  • Headlights and lighting
  • Power devices
  • Electrical circuits
 
MercedesMan.ru © 2017–2026 · Mobile version · Read about Mercedes · Sitemap: EN BG BY UA RS HR RO PL SK HU · Feedback · Site search · Bookmark A-Class (W168) · C-Class (W201) · C-Class (W202) · C-Class (W203) · E-Class (W123) · E-Class (W124) · E-Class (W210) · G-Class (W463) · M-Class (W163) · S-Class (W116, petrol) · S-Class (W126, petrol) · S-Class (W140) · S-Class (W220) · Sprinter · Vito 1 · Vito 2 · Vario 814D ·
 
We only use cookies without which some of the site's features may not be available.