



2. Remove the main bearing caps.
3. Remove the crankshaft from the bed.
4. Remove the pistons with connecting rods as an assembly from the cylinder block.
5. Remove the retaining rings securing the piston pins to the pistons.
6. Remove the piston pins and separate the pistons and connecting rods.
Attention: connecting rods and connecting rod bearing caps must be installed correctly during assembly. Therefore, when disassembling the crank mechanism, apply marks to the connecting rods and connecting rod bearing caps. Also mark the correct position of the connecting rods in the 8 cylinder block.
Note: new pistons have an arrow on top that should point towards the timing belt when the piston is correctly installed in the cylinder block. If old pistons are used for repairs, mark the correct piston installation before disassembling, as the arrow may not be visible on old pistons (see figure VN 2.087).
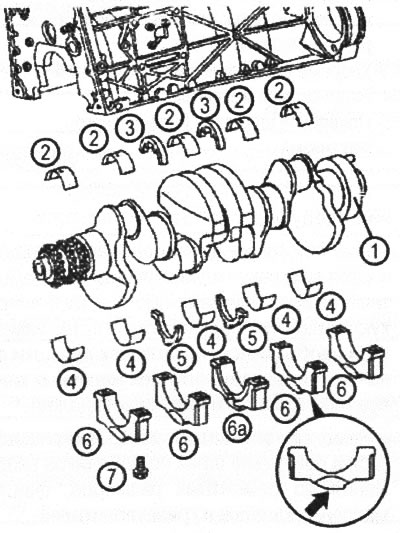
VN 2.067
1. Crankshaft
2. Upper main bearing shell
3, Upper thrust bearing, adjusting the axial run-out of the crankshaft
4. Lower main bearing shell
5. Lower thrust bearing adjusting the axial runout of the crankshaft
6. Main bearing cap
6a. Bearing cover No. 3, designed for installing thrust bearings that regulate the axial runout of the crankshaft
7. Main bearing cap fastening screw