
Cars BMW Cars Volkswagen Cars Chevrolet Cars Land Rover Cars Lada Cars Honda Cars Peugeot
English Русский
Български
Беларускі
Український
Српски
Hrvatski
Română
Polski
Slovenský
Magyar
Bookmark News and articles Sitemap Feedback Site search
MercedesMan.ru


A-Class C-Class E-Class G-Class M-Class S-Class Others
Sprinter (1995-2000, diesel) Vito 1 (1996-2003) Vito 2 (2003-2014, diesel) Vario 814D (1996-2003, diesel)
  • Main
  • Mercedes-Benz
  • Vito 2 (2003-2014)
  • Diesel engine OM646
  • Engine repair
  • Connecting pistons to connecting rods and installing them in the cylinder block

Connecting pistons to connecting rods and installing them in the cylinder block (Mercedes-Benz Vito W639)

0
Contents: Installing connecting rod bearing…↡ Checking the connecting rod bearing…↡ Tightening the connecting rod…↡
The connection of the pistons to the connecting rods is made using piston pins.

The piston pins (6), installed in place, are secured with spring retaining rings measuring 30x2 mm. In this case, the connector of the retaining ring must be directed upwards.

When assembling, the arrow marked on the piston (4) at the top must point towards the timing belt.

You should also pay attention to the relative orientation of the piston and connecting rod (for this purpose, marks must be applied during disassembly).

Installing connecting rod bearing shells


Before installing the liners, clean the seating areas and blow out the lubrication channels with compressed air.

When installing, pay attention to the alignment of the lubrication holes of the liners and the holes of the oil channels (shown in the figure VN arrows).

Crankshaft connecting rod bearing shells. Comparison with the dimensions of the crankshaft connecting rod bearing journals
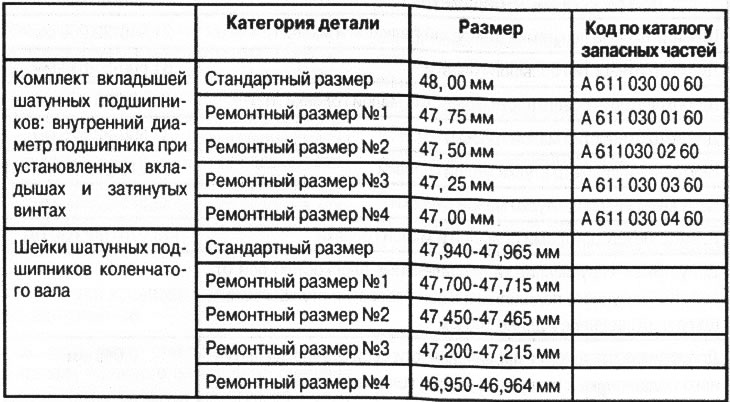


Crankshaft connecting rod bearing shells. Comparison with the dimensions of the crankshaft…

Note: The number 611 in the part number means that the engine uses a part designed for the QM611 engine.


Checking the connecting rod bearing cap fastening screws


Before installation, screws securing the connecting rod bearing caps (thread M8 x 1) should be checked for excessive elongation. Screws that are longer than the maximum permissible length must be replaced with new ones.

Length of new screw: 47±0.3 mm.

Maximum length allowed: 48 mm.
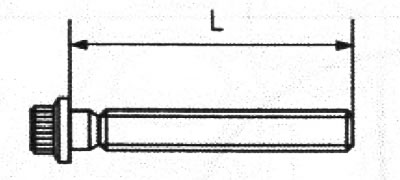
VN 2.088

VN 2.088
Length (L) of new 47±0.3 mm
Maximum length: 48 mm
Thread M8x1


Tightening the connecting rod bearing cap screws


Article was borrowed from the website Mercedesman.ru

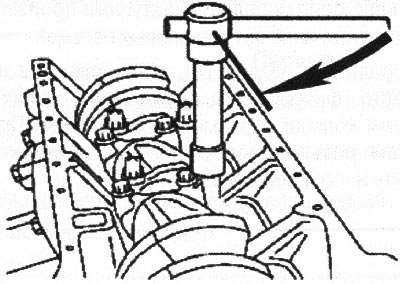
Before installation, apply a thin layer of motor oil to the threads and contact surfaces of the screw heads.

Initial tightening after breaking off (in the original; At initial tightening torque after cracking): 5 Nm + 25 Nm + 180°.

Subsequent cases of tightening (in the original: For subsequent tightening): 5 Nm + 25 Nm + 90°.

Note: Initial tightening torque information is provided in the manufacturer's materials, which may mean that connecting rods manufactured using the technology described below can be used.


The initial tightening of the screws after breaking off the cover from the connecting rod blank is carried out with an increased tightening torque. Most likely, we are talking about a modern method of manufacturing connecting rods, in which the connecting rod and cover are made and processed as one piece. Then, using a special technology, the cover is broken off from the connecting rod. This creates a unique fracture surface that is specific to only this pair of parts (note, ed.).


VN 2.089

VN 2.089
This article is available at: russian, bulgarian, belarusian, ukrainian, serbian, croatian, romanian, polish, slovak, hungarian
The article has been verified: Lukyanov Nikita Ilyich
Share with friends:
◀ Previous
Mercedes Vito 2 / Engine repair
Next ▶

Checking and repairing connecting rods
Crank mechanism (CRM) — composition
Connecting rod and piston group of parts (CRP) — composition
Removal and installation the crankshaft
Disassembly and repair of the lower part of the engine
Measuring the piston protrusion above the parting plane of a new cylinder block
Front cylinder block cover
Installing the rear cylinder block cover
Installing an oil pump
Installing the flywheel
More similar articles for repairing other models

☛ Cylinder head — removal and installation Mercedes W168 (1997-2004)
☛ Pistons and connecting rods — removal Mercedes 190 (W201) (1982-1993)
☛ Installing pistons with connecting rods Mercedes W124 (1984-1995)
☛ Disconnecting and connecting cardan shafts on the transfer case Mercedes W463 (1999-2019)
☛ Removal and installation the cylinder head Mercedes W163 (1997-2005)
☛ Pistons and Connecting Rods — Cylinder Measurements Mercedes W116 (1972-1980, petrol)
Link in different formats to this article
Comments and feedback from visitors
No comments yet


How much will 26 + 20 ?


Vario 814D (1996-2003, diesel) 
  • General information
  • Maintenance
  • Power unit
  • Engines 602.984/985
  • Engines 904.908/914/923/936
  • Transmission
  • Clutch
  • Manual gearbox 711.613
  • Manual gearbox 710.64/66
  • Manual gearbox 715.051
  • Automatic gearbox 723.345
  • Power take-off box
  • Chassis
  • Front suspension
  • Rear suspension
  • Steering
  • Brake system
  • Body and electrical equipment
  • Interior (internal elements)
  • Exterior (external elements)
  • Heater and air conditioner
  • Electrical diagrams
Vito 2 (2003-2014, diesel) 
  • General information
  • User manual
  • Maintenance
  • Diesel engine OM646
  • Engine repair
  • Cooling and lubrication system
  • Power and exhaust system
  • Transmission
  • Clutch
  • Car gearbox
  • Chassis
  • Front suspension
  • Rear suspension
  • Steering
  • Brake system
  • Body
  • Body elements
  • Electrical equipment
  • Equipment and devices
  • Security systems
  • Electrical circuits
Vito 1 (1996-2003) 
  • General information
  • User manual
  • Maintenance
  • Petrol engines 2.0 l
  • Engine repair
  • Lubrication system
  • Cooling system
  • Power and control system
  • Petrol engines 2.8 l
  • Engine repair
  • Lubrication system
  • Cooling system
  • Power and control system
  • Diesel engines 2.3 l
  • Engine repair
  • Cooling system
  • Lubrication system
  • Turbocharging and recycling
  • Power and control system
  • Diesel engines 2.2 l
  • Engine repair
  • Cooling system
  • Lubrication system
  • Turbocharging and recycling
  • Power and control system
  • Transmission
  • Clutch
  • Mechanical gearbox
  • Automatic gearbox
  • Chassis
  • Front suspension and wheels
  • Rear suspension
  • Steering
  • Brake system
  • Body
  • Exterior (external elements)
  • Interior (internal elements)
  • Electrical equipment
  • Equipment and devices
  • Heater and air conditioner
  • Electrical circuits
Sprinter (1995-2000, diesel) 
  • General information
  • Introduction to the guide
  • Maintenance
  • Power unit
  • Engine repair
  • Lubrication system
  • Cooling system
  • Power and exhaust system
  • Transmission
  • Clutch
  • Mechanical gearbox
  • Automatic gearbox
  • Front axle
  • Rear axle and cardan
  • Chassis
  • Car suspension
  • Steering
  • Brake system
  • Tires and wheels
  • Electrical equipment
  • Equipment and devices
  • Headlights and lighting
  • Power devices
  • Electrical circuits
 
MercedesMan.ru © 2017–2026 · Mobile version · Read about Mercedes · Sitemap: EN BG BY UA RS HR RO PL SK HU · Feedback · Site search · Bookmark A-Class (W168) · C-Class (W201) · C-Class (W202) · C-Class (W203) · E-Class (W123) · E-Class (W124) · E-Class (W210) · G-Class (W463) · M-Class (W163) · S-Class (W116, petrol) · S-Class (W126, petrol) · S-Class (W140) · S-Class (W220) · Sprinter · Vito 1 · Vito 2 · Vario 814D ·
 
We only use cookies without which some of the site's features may not be available.