
1. Replace all four pads on the same axle to keep braking performance even.
2. Check the wear and condition of the brake discs. They should not have scratches or deep scratches (see «Replacement of brake discs»).
3. It is necessary to check the condition of the protective boot, as well as how freely the piston moves in the brake cylinder.
4. When the brake pads are removed, in no case do not press the brake pedal, otherwise the pistons of the brake cylinders will come out of their holes.
Sequence of work
1. Place the car on supports and fix it. Remove the front wheel.
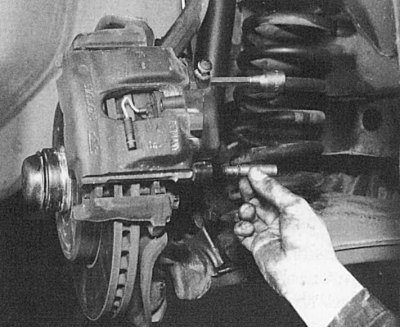
2. Pull the caliper bracket out by hand by pushing the brake piston slightly into the hole.
3. Using a screwdriver, pry off the plastic cover of the pad wear sensor connector. Remove the cover and remove the connector.
4. Press the retaining bracket from the caliper with a screwdriver.
5. Remove the protective caps from the guide pins with a screwdriver.
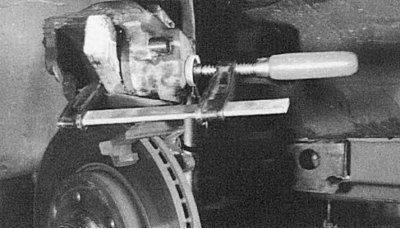
Pic. 8.13. Using an internal hex wrench to loosen and unscrew the guide pins from the supports
6. Turn out the guide pins (pic. 8.13) from the upper and lower supports of the caliper, holding the hex slot near the rubber boot with an open-end wrench.
7. Remove the caliper and hang it on a wire so that the brake hose does not stretch out.
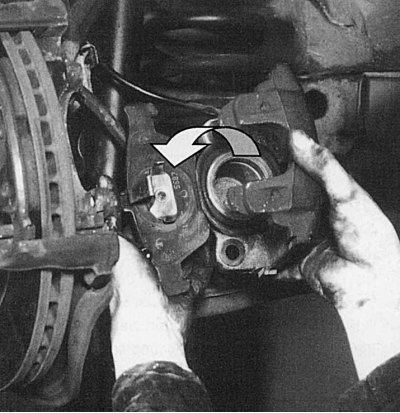
Pic. 8.14. Inner pad mounted on caliper piston (arrow) through a return spring. Thus, when the brake pedal is released, the brake disc gets free play again
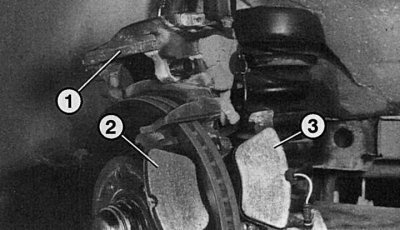
Pic. 8.15. Replacing the front brake pads: 1 - caliper bracket (removed and hung on a wire); 2 - external brake shoe; 3 - internal brake shoe (brake pads are removed from the bracket, a wear sensor is installed on the inner pad)
8. Remove the inner pad from the brake piston (pic. 8.14). It is secured with a retaining clip (pic. 8.15).
9. Remove the wear sensor from the inner pad.
10. Remove the outer shoe from the bracket.
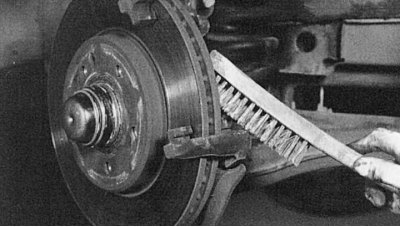
Pic. 8.16. After a long operation, the caliper parts and guide pads are covered with brake dust. For proper operation, before installing new pads, clean the bracket and caliper with a wire brush
11. Before assembly, clean the parts of the caliper with a brush with soft metal bristles (pic. 8.16) or a cloth dampened with alcohol. Do not use mineral solvents or sharp-edged tools. Brake dust deposits and corrosion on caliper parts can cause uneven pad wear.
12. Check up a condition of a dirt-protective cover of the brake piston. If damage is found, replace it, as dirt intrusion will quickly cause the piston to seize.
Pic. 8.17. Pressing the brake piston into the cylinder with a clamp. To protect the piston from damage, it is necessary to lay wooden blocks. You can also use an old block
13. Press the piston into the cylinder (pic. 8.17). To do this, use a wooden mallet or a special clamp. Take care not to damage the piston surface or the dirt cover.
14. When the piston is pressed in, the brake fluid from the cylinder will be forced into the reservoir. Pump out excess fluid if necessary.
15. Install the brake pads.
16. Install the wear sensor.
17. Establish a support and fasten new self-locking directing fingers the moment of 35 Нм.
18. Put the protective caps on the guide pins.
19. Connect the sensor connector. Pay attention to the wire routing and close the protective cover of the connector.
20. Install the caliper retaining bracket. After installing the bracket in both holes, secure it by pressing under the caliper bracket. If installed incorrectly, the brake pedal travel will increase.
21. Install the front wheel, lower the vehicle and tighten the wheel bolts to 110 Nm.
22. Replace the brake pads on the other side of the car.
23. With the vehicle stationary, press the brake pedal several times so that the pads are in the correct position.
24. Check the brake fluid level.