
Attention! If the brake pads are to be used again, they must be marked when removed. Swapping the brake pads from the outside to the inside and vice versa or from the right wheel to the left is not allowed. Be sure to replace all brake pads on one axle at the same time, even if only one of them has reached the wear limit.
Removing
1. Mark with paint the position of the front wheels relative to the hubs. This will allow the assembly to install the balanced wheel in its original position. Loosen the wheel bolts before jacking up the vehicle. Raise the front of the car, put it on stands and remove the front wheels.
Attention! The operation of lifting and placing the vehicle on stands is dangerous! Therefore, before carrying out the operation, read Section Jacking and towing Introduction to leadership.
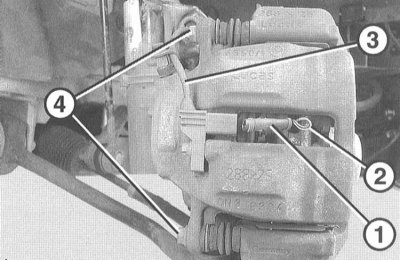
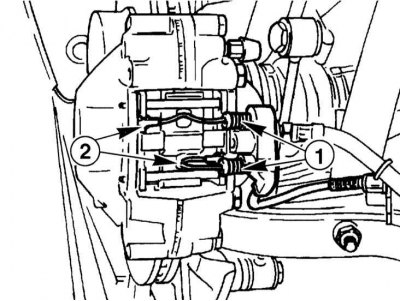
2. Right brake: Pull out the plug (1) wear sensor from the connector. Do not pull on the cable (2). Disconnect the wire (3) holder wear sensor.
3. Turn out bolts of fastening (4) above and below.
4. Remove the caliper (1) from the guide blocks.
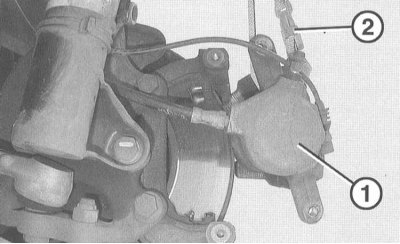
5. Secure the caliper with tape (2) or wire on the suspension strut. Do not disconnect the brake hose while doing this. Otherwise, after installation, you will have to remove air from the brake system. Make sure the hose is not under tension.
Attention! Do not press the brake pedal with the caliper removed. Otherwise, the piston of the brake cylinder will be squeezed out of the housing. If the piston was accidentally squeezed out, remove the caliper and take it to a service station for assembly.

6. Protect the piston of the brake cylinder from being squeezed out by a block of wood (1).
7. Take out the brake pads (2) from the guide.
8. If removed brake pads are used, mark them («internal», «outdoor»). Thus, they can be installed in their original place.
Examination
1. Clean the sliding surfaces and the seat of the brake pads on the guide with a light metal wire brush, and also wipe the brake disc with a cloth soaked in alcohol. Do not use mineral solvents or sharp-edged tools for this purpose.
Attention! Use only alcohol to clean the brake.
2. Before installing the brake pads, check the brake disc for grooves with your fingers. In the presence of grooves, the disc can be machined (service station work), if the disc is still thick enough. Otherwise, replace the disk.
3. Measure the thickness of the brake disc, as described in Section Checking the brake disc.
4. Check the retaining clips, replace with new ones if necessary.
5. Check the piston dust cover for damage. Replace the damaged cover immediately, because. the penetration of dirt can lead to a violation of the tightness of the caliper. To do this, you need to disassemble the caliper (service station work).
6. Check up, whether brake liquid follows from under the piston. If necessary, repair the caliper at the service station or replace it with a new one.
7. Check up also a protective cover of directing fingers of a support and in the presence of damages replace.
Attention! If the brake pads are heavily worn, check the ease of movement of the piston. To do this, insert a wooden block into the caliper and ask the assistant to slowly press the brake pedal. The piston should easily push in and out. Another brake pad and opposite caliper must be inserted to check. If the piston stroke is heavy, replace the caliper.
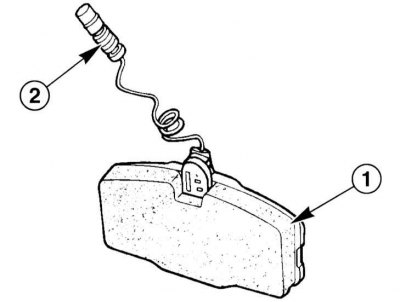
8. Right brake: Remove the wear sensor from the connector on the brake shoe (1). Replace the damaged wear sensor with a new one. (2) – wear sensor plug.
Installation
1. Push in the brake piston using the tool. This can also be done with a hardwood block (hammer handle). When doing this, pay particular attention to ensure that the piston is not distorted and that the protective cover is not damaged.
Attention! When the piston is pressed, brake fluid is forced out of the brake cylinder into the reservoir. Monitor the liquid level in the tank, if necessary, suck the liquid out of the tank.
To suck off the fluid, use a special bottle for brake fluid or a plastic bottle that is intended only for storing brake fluid. Do not use a bottle intended for drinking water for this purpose! Brake fluid is poisonous and must never be sucked out by mouth. Use a special suction device for this. After replacing the brake pads, the level of brake fluid in the reservoir must not exceed the MAX mark, because. liquid expands when heated. The leaking liquid gets on the brake master cylinder, destroys its paint and varnish coating and leads to corrosion.
2. Insert the brake pads from the side at an angle into the retaining clips onto the pad guide. If previously used pads are installed, make sure that they are installed in their original places.
Attention! The friction surfaces of the brake disc and brake pads must be free of any grease or oil.
3. Insert the caliper into place in the shoe guide.
4. Screw in new self-locking bolts at the top and bottom of the caliper and tighten them to a torque of 25Nm.
5. Right brake: Insert the plug of the wear sensor into the socket. Insert the wear sensor wire into the holders.
6. Reinstall the front wheels so that the marks made during removal match. Pre-lubricate with a thin layer of bearing grease the centering belt of the wheel disk on the hub. Do not grease wheel bolts. Replace rusty bolts. Wrap bolts. Lower the car onto the wheels and tighten the bolts crosswise to 110Nm.
Attention! Several times, firmly press the brake pedal until a noticeable resistance is felt. Thus, the brake pads are adjacent to the disc and occupy their working position.
7. Check the level of the brake fluid in the reservoir, if necessary add fluid to the MAX mark.
8. Carefully run in new brake pads. To do this, brake the car several times from a speed of 80 km/h to a speed of 9. km/h, lightly pressing the brake pedal. Let the brake cool down between braking. For the first 200 km of driving, do not apply heavy braking of the car unnecessarily.
Note. In some regions, brake pads must be disposed of in a special way. Local authorities provide information on the possibility of disposal of special waste.
Check reliability:
- Are the brake lines secured?
- Is the brake hose fixed in the holder?
- Are the bleed fittings tight?
- Has sufficient brake fluid been added?
- With the engine running, check for leaks. To do this, press the brake pedal with a force of 200-300 N (20 - 30 kg) within 10 s. The pedal must not loosen. Check all connections for tightness.
Fixed caliper brakes
Some models have 4-piston fixed caliper brakes up front. This section only describes the difference in fitting and removing brakes of this design. Security measures and notes on verification are similar to those previously given.
Note. The illustrations are informative and may not fully correspond to the model in question.
Removing
1. Mark with paint the position of the front wheels relative to the hubs. This will allow the assembly to install the balanced wheels in their original position. Loosen the wheel bolts before jacking up the vehicle. Raise the front of the car, put it on stands and remove the front wheels.
Attention! The operation of lifting and placing the vehicle on stands is dangerous! Therefore, before carrying out the operation, read Section Jacking and towing Introduction to leadership.
2. Disconnect the connector (1) wear sensor (2). Do not pull on the cable while doing this.
Note. When assembling, the wire must be routed as shown in the illustration.
3. Knock out with a suitable punch (∅ 3 mm) two pins from the outside to the inside of the caliper. Remove the shaped spring (1).
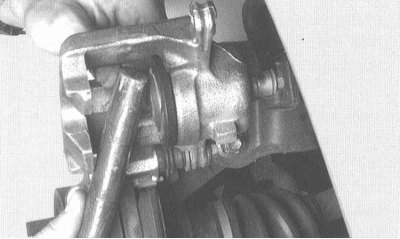
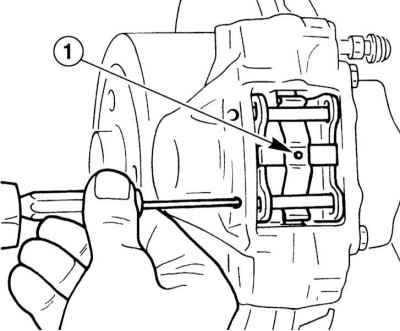
4. Remove the brake pads with pliers or a screwdriver. If they are rusted, a special tool is required (e.g. HAZET No. 1966-2).
5. If old brake pads are used, mark them («internal», «outdoor»). Thus, they can be installed in their original places.
Attention! Do not press the brake pedal with the caliper removed. Otherwise, the piston of the brake cylinder will be squeezed out of the housing. If the piston was accidentally squeezed out, remove the caliper and take it to a service station for assembly.
Installation
1. Use the tool to push out both pistons. This can also be done with a hammer handle.
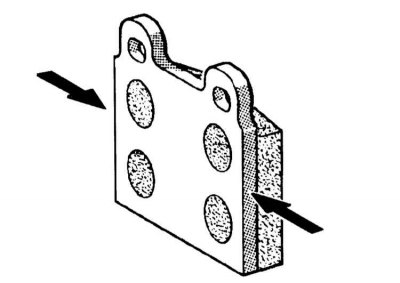
2. To eliminate disc brake screeching, the back sides of the brake pads, as well as the sides of the back plate (arrows in the illustration) can be lubricated with a thin layer of brake paste (e.g. high temperature copper paste, Plastilube, Liqui Moly LM-36 or LM-508-ASC). In no case should the paste get on the brake pads themselves or the brake disc. If necessary, the paste should be removed immediately and washed with alcohol.
3. Remove wear sensor from old brake pads and insert into new pads. If the sensor is damaged, it must be replaced.
4. Insert the brake pads into the caliper. If used pads are installed, check that they are in their original places.
5. Plug the wear sensor cable into the connector on the caliper. Lay the cable according to its route.
6. Install new shaped spring and install new pins with punch. Drive the punch in until it stops.
Attention! Be sure to replace the shaped spring and pins with new ones.
7. Reinstall the front wheels so that the marks made during removal match. Pre-lubricate with a thin layer of bearing grease the centering belt of the wheel disk on the hub. Do not grease wheel bolts. Replace rusty bolts. Wrap bolts. Lower the car onto the wheels and tighten the bolts crosswise to 110Nm.
Check reliability:
- Are the brake lines secured?
- Is the brake hose fixed in the holder?
- Are the bleed fittings tight?
- Has sufficient brake fluid been added?
- With the engine running, check for leaks. To do this, press the brake pedal with a force of 200-300 N (20 - 30 kg) within 10 s. The pedal must not loosen. Check all connections for tightness.