
Cars BMW Cars Volkswagen Cars Chevrolet Cars Land Rover Cars Lada Cars Honda Cars Peugeot
English Русский
Български
Беларускі
Український
Српски
Hrvatski
Română
Polski
Slovenský
Magyar
Bookmark News and articles Sitemap Feedback Site search
MercedesMan.ru


A-Class C-Class E-Class G-Class M-Class S-Class Others
190 (W201) (1982-1993) W202 (1993-2000) W203 (2000-2007)
  • Main
  • C-Class
  • W203 (2000-2007)
  • Chassis
  • Brake system
  • Replacing rear brake pads

Replacing rear brake pads (Mercedes-Benz C-Class W203)

0
Contents: Removal ↡ Installation ↡
Brake pads are subject to control by technical supervision authorities. In addition, they are intended for use in a specific car model. Use brake pads recommended by the manufacturer. Such brake pads are marked accordingly.

Attention! If the brake pads are to be used again, they must be marked when removed. Switching the brake pads from the outer side to the inner side and vice versa, or from the right wheel to the left, is not allowed. Be sure to replace all the brake pads on one axle at the same time, even if only one of them has reached the wear limit.


Removal


1. Mark the position of the rear wheels relative to the hubs with paint. This will allow you to install the balanced wheels in their original position during assembly. Loosen the wheel mounting bolts before jacking up the car. Raise the rear of the car, place it on stands and remove the rear wheels.

Attention! The operation of lifting and installing the car on stands is associated with danger! Therefore, before carrying out the operation, read the Section Jacking and towing Introduction to the manual.
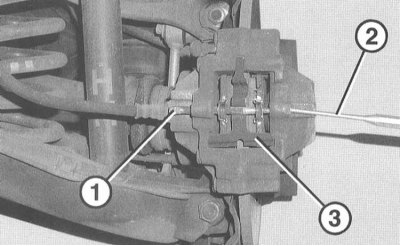

2. Knock out the pin (1) with a suitable punch (2) from the outside inwards from the caliper.


2. Knock out the pin (1) with a suitable punch (2) from the outside inwards from the caliper.


Attention! The pressure spring (3) will pop out.


3. Remove the brake pads back from the caliper.

4. If used brake pads are to be reinstalled, mark them (inner, outer). This way they can be installed in their original positions.

Caution! When the caliper is removed, do not press the brake pedal, otherwise the piston will be pushed out of the housing. If the piston was accidentally pushed out of the housing, remove the caliper and send it to a service station for assembly.


Installation


Note: Before installing the brake pads, check the brake as described in Section Removal and installation the front caliper.


(Read more on the website: «MercedesMan.ru»)

1. Press the piston with a tool or a hammer. When you press on the piston, the brake fluid is squeezed out of the brake cylinder into the reservoir.
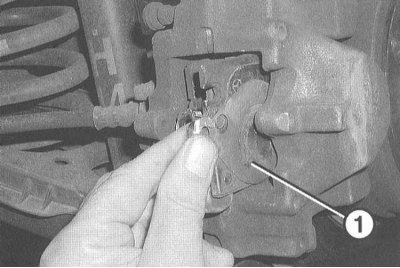
2. Insert the brake pads into the caliper. Pay attention to the position of the damper bar (1).…


2. Insert the brake pads into the caliper. Pay attention to the position of the damper bar (1). When using used pads, make sure that they are installed in their original positions.

Caution! Do not allow grease or oil to come into contact with the friction surfaces of the brake disc and pads.


3. Insert the retaining springs behind the brake pads into the caliper.


4. Using an assistant, press the retaining spring against the brake pads and insert the pin into the hole in the caliper.

5. Drive the pin into the caliper until it stops.

6. Install the rear wheels so that the marks made during removal match. Pre-lubricate the centering belt of the wheel disk on the hub with a thin layer of bearing grease. Do not lubricate the wheel mounting bolts. Replace rusty bolts. Tighten the bolts. Lower the car onto the wheels and tighten the bolts crosswise to 110 Nm.

Attention! Press the brake pedal hard several times until you feel a noticeable resistance. This way the brake pads fit the disc and take their working position.


7. Check the fluid level in the reservoir, if necessary, add fluid to the MAX mark.

8. Carefully break in the new brake pads. To do this, brake the car several times from 80 km/h to 40 km/h, pressing the brake pedal lightly. Let the brake cool between braking. Do not brake the car hard for the first 200 km of driving unless necessary.

Conduct a reliability check:
  • Are the brake hoses secured?
  • Is the brake hose secured in the holder?
  • Are the air bleed nipples tightened?
  • Is there enough brake fluid?
  • With the engine running, check for leaks. To do this, press the brake pedal with a force of 200-300 N (20-30 kg) for 10 s. The pedal should not weaken. Check all connections for leaks.
This article is available at: russian, bulgarian, belarusian, ukrainian, serbian, croatian, romanian, polish, slovak, hungarian
The article has been verified: Rodionov Artyom Semyonovich
Share with friends:
◀ Previous
C-Class W203 / Brake system
Next ▶

Removal and installation the front caliper
Replacing the front disc brake pads
Brake system specifications
Design and description of the brake system
Removal and installation the rear caliper
Removal and installation the brake disc
Checking the brake disc
Dual master cylinder
Replacing the parking brake pads
More similar articles for repairing other models

☛ Disc brake pads — removal, inspection and installation Mercedes W168 (1997-2004)
☛ Replacing rear brake pads Mercedes W124 (1984-1995)
☛ Checking the condition and replacing brake pads Mercedes W463 (1999-2019)
☛ Assessing the degree of wear and replacing brake pads Mercedes W163 (1997-2005)
☛ Replacing rear brake pads Mercedes W116 (1972-1980, petrol)
☛ Replacing rear brake pads Mercedes Sprinter (1995-2000, diesel)
Link in different formats to this article
Comments and feedback from visitors
No comments yet


How much will 29 + 25 ?


W203 (2000-2007) 
  • General information
  • Introduction to guide
  • User manual
  • Maintenance
  • Power unit
  • Gasoline engines
  • Diesel engines
  • Cooling system
  • Ventilation and heating
  • Supply system
  • Injection system (gasoline)
  • Injection system (diesel)
  • Exhaust system
  • Ignition and control system
  • Charge and launch systems
  • Transmission
  • Mechanical gearbox
  • Automatic gearbox
  • Clutch and drive shafts
  • Differential
  • Chassis
  • Brake system
  • Car suspension
  • Steering
  • Body
  • Exterior (external elements)
  • Interior (internal elements)
  • Electrical equipment
  • Equipment and devices
  • Lighting system
  • Electrical diagrams (2000)
  • Electrical diagrams (since 2001)
W202 (1993-2000) 
  • General information
  • User manual
  • Driving a car
  • Car care
  • Maintenance
  • Power unit
  • Gasoline engines
  • Diesel engines
  • Lubrication system
  • Cooling system
  • Heating and ventilation
  • Ignition system
  • Fuel system
  • Injection system (gasoline)
  • Injection system (diesel)
  • Exhaust system
  • Transmission
  • Clutch
  • Car gearbox
  • Chassis
  • Suspension, wheels and tires
  • Steering
  • Brake system
  • Body
  • Exterior (external elements)
  • Interior (internal elements)
  • Doors and windows
  • Electrical equipment
  • Equipment and devices
  • Power devices
  • Lighting system
  • Electrical circuits
190 (W201) (1982-1993) 
  • General information
  • Introduction to the guide
  • Operation and care
  • Maintenance (gasoline)
  • Maintenance (diesel)
  • Troubleshooting
  • Power unit
  • Petrol engine I4
  • Petrol engine V6
  • Diesel engines
  • Engine overhaul
  • Cooling and heating
  • Power system (carburetor)
  • Injection system (gasoline)
  • Injection system (diesel)
  • Exhaust system
  • Charge and start system
  • Ignition system (I4)
  • Ignition system (V6)
  • Diesel heating system
  • Transmission
  • Clutch
  • Mechanical gearbox
  • Automatic gearbox
  • Cardan shaft and axle shafts
  • Chassis
  • Brake system
  • Car suspension
  • Steering
  • Body
  • Exterior (external elements)
  • Interior (internal elements)
  • Doors, locks and windows
  • Electrical equipment
  • Equipment and devices
  • Electrical circuits
 
MercedesMan.ru © 2017–2026 · Mobile version · Read about Mercedes · Sitemap: EN BG BY UA RS HR RO PL SK HU · Feedback · Site search · Bookmark A-Class (W168) · C-Class (W201) · C-Class (W202) · C-Class (W203) · E-Class (W123) · E-Class (W124) · E-Class (W210) · G-Class (W463) · M-Class (W163) · S-Class (W116, petrol) · S-Class (W126, petrol) · S-Class (W140) · S-Class (W220) · Sprinter · Vito 1 · Vito 2 · Vario 814D ·
 
We only use cookies without which some of the site's features may not be available.