
Removing
1. Mark with paint the position of the front wheels relative to the hubs. This will allow the assembly to install the balanced wheels in their original position. Loosen the wheel bolts before jacking up the vehicle. Raise the front of the car, put it on stands and remove the front wheels.
Attention! The operation of lifting and placing the vehicle on stands is dangerous! Therefore, before carrying out the operation, read Section Jacking and towing Introduction to leadership.
Note. If the caliper is removed only to remove the brake pads or brake disc, it is not necessary to unscrew the brake line from the caliper. In this case, secure the caliper with wire to the hanger so that the hose is not twisted or stretched.
2. Turn out a brake hose from a support, as it is described in Section Removal and installation of a brake hose.
Note. When the brake circuit is opened, brake fluid flows out. Drain it into a bottle, which should be designed exclusively for this purpose. You can first suck out the liquid from the reservoir using a special device. Observe safety precautions regarding brake fluid, refer to Section Removal of air from the brake system.
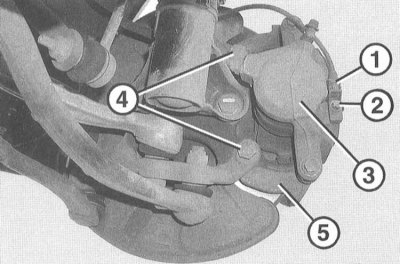
3. Right brake: Unplug the wear sensor from the connector (1). Do not pull on the cable while doing this. Remove the screw (2) and unplug (1) from the support.
4. Remove the brake pads, refer to the appropriate section.
Note. If the caliper is to be installed again, care must be taken to ensure that the piston does not come out of the cylinder.
5. Turn out bolts (4) top and bottom and remove the shoe guide (5) from the swivel.
Attention! Big turning point! Make sure the car is securely supported on stands and the wrench is level. These bolts can be removed when the vehicle is still on its wheels.
Installation
1. Install the shoe guide and secure with two new self-locking bolts to 115Nm.
Attention! Big torque! Make sure the vehicle is securely jacked up and the torque wrench is level. Bolts can be tightened completely when the car is on wheels.
2. Install the brake pads, refer to the appropriate section.
Attention! Keep the friction surfaces of the brake disc and pads free from grease or oil.
3. Right brake: Mate the wear sensor connector on the caliper. Insert the sensor plug into the socket.
4. Install the brake hose, refer to the relevant section.
Attention! The brake hose must not be twisted.
5. Remove air from the brake system, refer to the appropriate section.
6. Reinstall the front wheel so that the marks made during removal match. Pre-lubricate with a thin layer of bearing grease the centering belt of the wheel disk on the hub. Do not grease wheel bolts. Replace rusty bolts. Wrap bolts.
Attention! Check that at maximum steering angle the brake hose does not touch the wheel.
7. Lower the car onto the wheels and tighten the bolts crosswise to 110Nm.
Attention! Several times, firmly press the brake pedal until a noticeable resistance is felt. Thus, the brake pads are adjacent to the disc and occupy their working position.
8. Check the fluid level in the reservoir, top up if necessary up to the MAX mark.
Check reliability:
- Are the brake lines secured?
- Is the brake hose fixed in the holder?
- Are the bleed fittings tight?
- Has sufficient brake fluid been added?
- With the engine running, check for leaks. To do this, press the brake pedal with a force of 200–300 N (20-30 kg) within 10 s. The pedal must not loosen. Check all connections for tightness.