
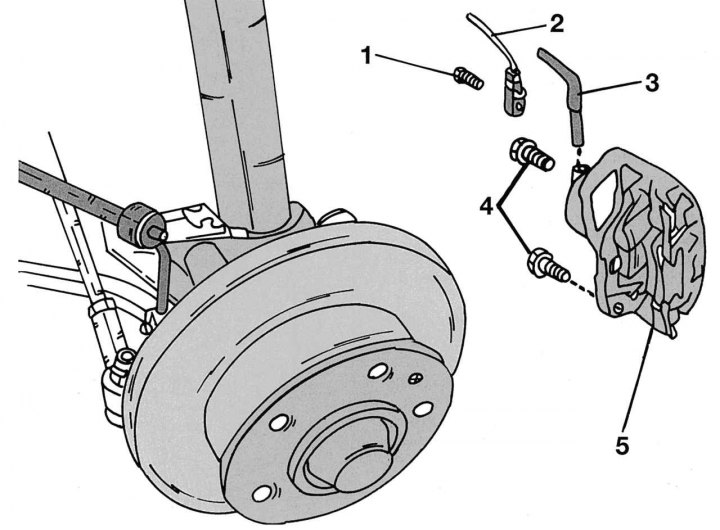
Pic. 278. Installing and removing the brake caliper: 1 - bolt, 10 Nm; 2 - wire of the pad wear sensor; 3 - brake hose, 12–16 Nm; 4 - bolts, 175–205 Nm; 5 - brake cylinder
Work must be carried out as follows (pic. 278):
- press the brake pedal several times to remove the vacuum in the system. Place the car on stands and remove the wheels;
- put one end of the hose on the bleeder fitting, lower the other end into the prepared container;
- unscrew the fitting bolt and press the brake pedal until the fluid comes out;
- loosen the hex nut of the brake hose from the caliper so that it can then be easily unscrewed. Disconnect hose from brake line. To do this, unscrew the union nut of the pipeline, remove the hose clamp and pull out the hose. The hose connection to the cylinder must also be loosened. Protect the open ends of the hoses from dirt;
- unscrew bolt 1 (see fig. 278) fastening the plug of the wear sensor of the pads and remove the wire;
- Loosen both caliper mounting bolts as described above and raise the caliper. Remove the brake pad from the side of the disc;
- turning, unscrew the caliper from the brake hose connection;
- if necessary, remove the brake caliper bracket after unscrewing the bolts 4.
Installation must be carried out in reverse order, taking into account the following:
- When screwing on the brackets, use new self-locking bolts. They are made specifically for the mounting frame. Wrap the bolts with a torque of 175-205 Nm;
- screw the caliper onto the brake hose almost to the stop. The final tightening is carried out with the caliper installed;
- install the pads and brake cylinder as described above;
- tighten the brake hose to 12–18 Nm. When doing this, make sure that the hose is not kinked. Otherwise, remove the caliper again and wrap the hose on it more tightly. Check that the pipeline and hose do not rub against other parts of the front suspension;
- bleed the brakes.