



Contents: Removal ↡ Installation ↡
To ensure uniform braking of the front wheels, both brake discs must have equally ground surfaces with the same degree of roughness. Therefore, be sure to replace or grind both brake discs of one axle at the same time.
Attention! If the brake discs are being modified, then the brake pads must also be replaced with new ones.
Removal
1. Mark the position of the wheels relative to the hub with paint. This will allow you to install the balanced wheel in its original position during assembly.
2. Loosen the wheel mounting bolts. The car must stand on its wheels when performing this operation.
3. Place the vehicle on jack stands and remove the wheels.
Warning! Jacking up the vehicle and placing it on stands may pose a risk of injury. Read the safety precautions in Chapter "Jacking up a car".
4. Remove the brake pads, see the relevant chapter.
5. Remove the brake caliper, see the relevant chapter.
Caution! The brake hose does not need to be disconnected from the caliper.
6. Secure the caliper together with the connected brake hose to the body so that the hose is not twisted and is not stretched.
7. Secure the brake cylinder piston in the caliper with a wooden block to prevent it from slipping out during work.
8. Unscrew bolt 1 securing brake disc 2 to the hub and remove the disc from the hub (see illustration).
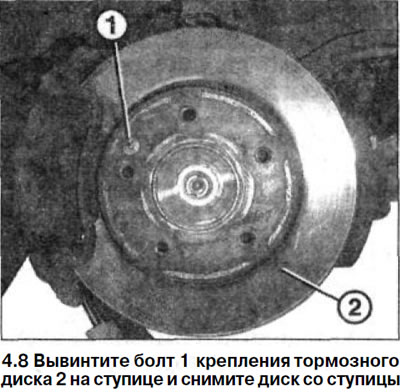
Attention! If the brake disc is tightly seated on the hub, it can be knocked off by lightly tapping with a plastic hammer or removed using a regular puller available in spare parts stores.
Installation
9. Remove any rust, if any, from the brake disc flange and hub using a wire brush or sandpaper.
10. New brake disc. Remove the protective varnish coating with a rag soaked in solvent.
11. Install the brake disc onto the hub and secure it with a new self-locking bolt, tightening it to a torque of 10 Nm.
12. Install the caliper, see the relevant chapter.
13. Install the brake pads, see the relevant chapter.
14. Install the wheels in accordance with the marks made during removal. Before doing this, lubricate the centering seat of the wheel disk on the hub with a thin layer of bearing grease. Do not lubricate the wheel mounting bolts. Replace rusted bolts with new ones.
15. Screw in the wheel mounting bolts and lower the vehicle.
Caution! Make sure that the brake hoses of the front wheel brake mechanisms are not pinched or rubbed when turning the steering wheel.
16. Tighten the wheel mounting bolts in a cross pattern to a torque of 110 Nm.
Attention! Press the brake pedal several times until you feel a strong resistance to pressing. When you do this, the brake pads are centered and they automatically set themselves to the working position.
17. Carefully break in the new brake pads. To do this, brake several times, bringing the speed from about 80 km/h to 40 km/h, and pressing the brake pedal lightly. Let the brakes cool down in between.
Attention! During the first 200 km of driving with new brake pads, avoid unnecessary braking until the car comes to a complete stop. Run in new brake pads carefully, taking into account the road situation.
Attention! Brake linings must not be thrown away with regular garbage, as the dust that forms on them is hazardous to health. They must be disposed of only at special points.
Attention! Make sure that:
- a) the brake hoses are securely connected;
- b) the brake hose is secured in the holder;
- c) the brake drive bleed nipples are screwed in;
- d) there is a sufficient volume of brake fluid in the expansion tank.
18. Perform a leak test of the brake system with the engine running.
To do this, press the brake pedal with a force of 200-300 N (20-30 kg) for about 10 seconds. The pressure in the system and, accordingly, the resistance of the brake pedal, should not decrease.
Check all connections for leaks.