
Cars BMW Cars Volkswagen Cars Chevrolet Cars Land Rover Cars Lada Cars Honda Cars Peugeot
English Русский
Български
Беларускі
Український
Српски
Hrvatski
Română
Polski
Slovenský
Magyar
Bookmark News and articles Sitemap Feedback Site search
MercedesMan.ru


A-Class C-Class E-Class G-Class M-Class S-Class Others
W168 (1997-2004)
  • Main
  • A-Class
  • W168 (1997-2004)
  • Chassis
  • Brake system
  • Parking brake — adjustment

Parking brake — adjustment (Mercedes-Benz A-Class W168)

0
The parking brake must be adjusted in cases where the proper holding effect is not achieved when the parking brake lever is tightened more than 3 teeth of the sector.

1. Place the vehicle on jack stands.

Warning! Jacking up the vehicle and placing it on stands may pose a risk of injury. Read the provisions of Chapter "Jacking up a car".


2. Remove the lower protection of the car, see the relevant chapter.

3. Release the parking brake completely.

4. Loosen lock nut 1 and unscrew equalizer 2 on leash 3 of parking brake drive cables (see illustration).
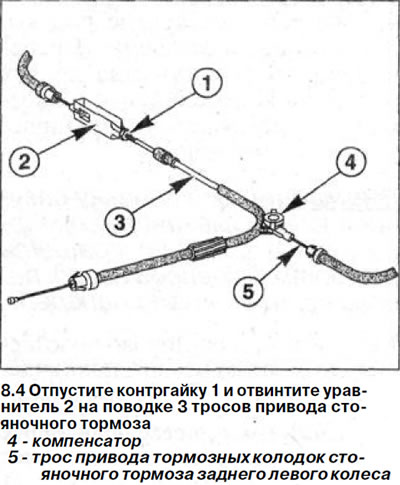
4. Loosen lock nut 1 and unscrew equalizer 2 on leash 3 of parking brake drive cables (see…


Cars with rear disc brakes


5. Unscrew one wheel mounting bolt on both rear wheels.

Attention! If the wheel rims are made of light metals, the wheels must be removed.


6 Mark the position of the rear wheels on the hubs with paint. This will allow you to install the balanced wheel in its original position during assembly.

7. Loosen the wheel mounting bolts. The car must stand on its wheels when performing this operation.

8. Place the car on jack stands, unscrew the wheel bolts and remove the rear wheels.

9. Rotate the wheel so that the bolt hole is at an angle of approximately 45° relative to the rear of the vehicle (see illustration).
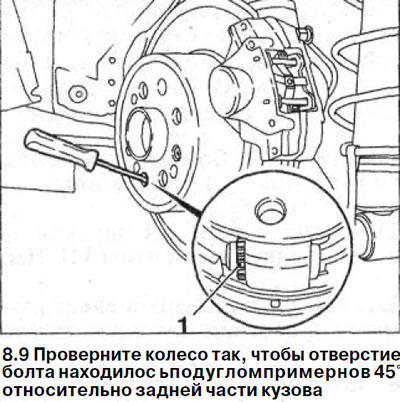


9. Rotate the wheel so that the bolt hole is at an angle of approximately 45° relative to the rear…


10. Using a 4.5 mm wide screwdriver, turn gear 1 of the adjuster through the hole for the wheel bolt until the wheel can no longer be turned manually, (see illustration).

Attention! The gear of the adjustment mechanism of the right wheel should be rotated with a screwdriver from front to back, the left wheel - from back to front.


11. Turn the adjusting gear back until the wheel rotates freely.

Remember that the adjusting gears of the right and left wheels should be turned by the same number of teeth, i.e. 5-6.

12. Adjust the parking brake on the second wheel in the same way by turning gear 1.

13. Screw equalizer 2 onto the end of the parking brake cables so that the wheels cannot be turned manually (see illustration 8.4).

14. After this, unscrew the equalizer 2 on the end of the parking brake drive cables so that both rear wheels can turn freely (see illustration 8.4).

15. Tighten and release the parking brake lever several times.

The parking brake is adjusted correctly if the force applied to the parking brake lever when moving it to the first tooth of the sector is approximately 110-150 N (11-15 kg).


16. Tighten lock nut 1 and secure equalizer 2 to the end of the cable rods (see illustration 8.4).

17. Check whether the wheels rotate freely with the parking brake released. If not, the parking brake adjustment must be repeated.

18. Install the lower underbody protection, see the relevant chapter.

19. Wheels with light metal rims. Install the wheels in accordance with the marks made during removal.

Before doing this, lubricate the centering seat of the wheel disc on the hub with a thin layer of grease.

Do not lubricate the wheel mounting bolts. Replace rusty bolts with new ones.

20. Screw in the wheel mounting bolts and lower the vehicle.

21. Tighten the bolts in a crisscross pattern to 110 Nm.
This article is available at: russian, bulgarian, belarusian, ukrainian, serbian, croatian, romanian, polish, slovak, hungarian
The article has been verified: Lukyanov Nikita Ilyich
Share with friends:
◀ Previous
A-Class W168 / Brake system
Next ▶

Parking brake pads — removal and installation
Brake disc — check
Rear Brake Disc — Removal and Installation
Front Brake Disc — Removal and Installation
Support — removal and installation
Front Parking Brake Cable — Removal and Installation
Rear Parking Brake Cable — Removal and Installation
Brake shoes of drum brake mechanism — removal and installation
Brake fluid — safety precautions
Brake system — bleeding
More similar articles for repairing other models

☛ Parking brake — adjustment Mercedes 190 (W201) (1982-1993)
☛ Parking brake — general description Mercedes W123 (1976-1985)
☛ Adjusting the parking brake drive Mercedes W463 (1999-2019)
☛ Replacing the parking brake shoes Mercedes W163 (1997-2005)
☛ Removal and installation the front parking brake cable Mercedes W140 (1991-1998)
☛ Parking brake — general information Mercedes Sprinter (1995-2000, diesel)
Link in different formats to this article
Comments and feedback from visitors
No comments yet


How much will 11 + 14 ?


W168 (1997-2004) 
  • General information
  • User manual
  • Maintenance
  • Troubleshooting
  • Power unit
  • Engine repair
  • Cooling and heating
  • Injection system (gasoline)
  • Fuel system (diesel)
  • Fuel system
  • Exhaust system
  • Ignition system
  • Transmission
  • Clutch
  • Transmission
  • Chassis
  • Brake system
  • Suspension
  • Steering
  • Body
  • Interior (all models)
  • Interior (since 1997)
  • Interior (since 2001)
  • Exterior
  • Doors and windows
  • Electrical equipment
  • Equipment and devices
  • Power devices
  • Windshield wipers and washers
  • Headlights and lighting
  • Electrical circuits
 
MercedesMan.ru © 2017–2026 · Mobile version · Read about Mercedes · Sitemap: EN BG BY UA RS HR RO PL SK HU · Feedback · Site search · Bookmark A-Class (W168) · C-Class (W201) · C-Class (W202) · C-Class (W203) · E-Class (W123) · E-Class (W124) · E-Class (W210) · G-Class (W463) · M-Class (W163) · S-Class (W116, petrol) · S-Class (W126, petrol) · S-Class (W140) · S-Class (W220) · Sprinter · Vito 1 · Vito 2 · Vario 814D ·
 
We only use cookies without which some of the site's features may not be available.