
Attention! If the brake discs are being finalized, then it is necessary to change to new and brake linings.
Removing
1. Mark the position of the rear wheels on the hub with paint. This will allow the assembly to set the balanced wheel in its original position.
2. Loosen the wheel bolts. The vehicle must be on wheels during this operation.
3. Place the rear of the vehicle on jack stands and remove the rear wheels.
Attention! There is a risk of injury when jacking up the vehicle and placing it on jackstands. Read the precautions in chapter «car jacking».
4. Remove the brake caliper, see relevant chapter.
Attention! The brake hose from the caliper can not be disconnected, and the brake pads do not need to be removed.
5. Secure the caliper with the connected brake hose to the body so that the hose is not twisted or under tension.
6. Secure the brake cylinder piston to the caliper with a block of wood so that it does not slip out during work.
7. Fully release the parking brake.
8. Set the parking brake adjustment mechanism to its original position by unscrewing gear 1 of the mechanism with a screwdriver. A screwdriver for this operation is inserted into the wheel bolt hole (see illustration).
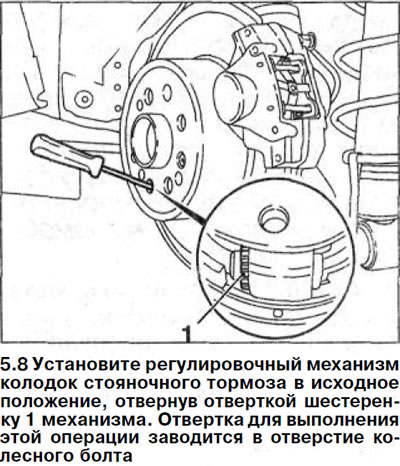
Attention! To set the adjusting mechanism of the parking brake pads of the rear right wheel to its original position, gear 1 should be turned with a screwdriver from the bottom up, and the left wheel - from top to bottom (see illustration 5.8).
9. Unscrew a bolt of fastening of a brake disk on a nave and remove a disk from a nave.
Installation
10. Remove rust, if any, from the brake disc flange and hub with a wire brush or sandpaper.
11 New brake disc. Remove the protective lacquer coating with a rag soaked in solvent.
12 Install the brake disc on the hub and secure it with a new self-locking bolt with a tightening torque of 10 Nm.
13 Adjust the parking brake shoe adjuster by turning gear 1 with a screwdriver to the desired position. A screwdriver for this operation is inserted into the wheel bolt hole (see illustration 5.8).
Attention! To set the adjusting mechanism of the parking brake pads of the right wheel to its original position, the gear of the mechanism should be turned with a screwdriver from top to bottom, and the left wheel - from bottom to top. The gear should be rotated in this way until the brake shoes are completely seated on the brake drum and the wheel cannot be turned. After that, the gear should be gradually turned back until the wheel can be rotated freely.
Attention! The gears of the adjusting mechanisms of the right and left brakes should be unscrewed by the same number of teeth.
14 Install the caliper, see relevant chapter.
15 Fit the brake pads, see relevant chapter.
16 Install the wheels according to the marks made during removal. Before doing this, lubricate the centering seat of the wheel disc on the hub with a thin layer of bearing grease. Do not grease wheel bolts. Replace rusted bolts with new ones.
17 Screw in the wheel bolts and lower the vehicle.
Attention! Make sure that the brake hoses of the brake mechanisms of the front wheels will not be pinched and frayed when the steering wheel is turned.
18 Tighten the wheel bolts in a cross pattern to 110 Nm.
19 Apply the parking brake several times and check its operation. Adjust the parking brake if necessary see relevant chapter.
Attention! Squeeze out a few times a brake pedal against the stop, the strong resistance to pressing is not felt yet. When this action is performed, the brake pads are centered and they self-adjust to the working position.
20 Carefully run in the new brake pads. To do this, slow down several times, bringing the speed from about 80 km / h to 40 km / h, and slightly pressing the brake pedal. Let the brakes cool down in between.
Attention! During the first 200 km of driving with new brake pads, avoid unnecessary braking until the car comes to a complete stop. Run in new brake pads carefully, taking into account the traffic situation.
Attention! Brake linings must not be disposed of with normal waste, as the dust that forms on them is hazardous to health. They need to be disposed of only at special points.
Attention! Make sure that:
- A) brake hoses are securely connected;
- b) the brake hose is fixed in the holder;
- V) fittings for bleeding the brake actuator are wrapped;
- G) there is enough brake fluid in the expansion tank.
21. Carry out a leak test of the brake system with the engine running.
To do this, depress the brake pedal with a force of 200-300 N (20-30 kg) for approximately 10 seconds. The pressure in the system and, accordingly, the resistance of the brake pedal, should not decrease. Check all connections for tightness.