



Attention! The installation of metal pipes of the brake system should be entrusted to a specialized workshop, because this operation requires a certain amount of experience.
Brake hoses, designed for a certain pressure, serve as flexible connections between rigidly fixed and moving parts of the car, such as calipers. If damage appears on the hoses, visible to the naked eye, the hoses are subject to replacement.
Attention! Protect brake hoses from contact with oil and kerosene, do not varnish them or coat them with anti-corrosion protection for the underbody.
Cars with ABS
Attention! If one of the chambers of the brake fluid expansion tank has been completely emptied, for example due to a leak or carelessness when bleeding the brake system, then air also gets into the ABS hydraulic booster pump. In this case, bleeding the brake system should be done in a workshop using a special device.
Attention! Observe safety precautions and rules for using brake fluid.
Removal
1. Mark the position of the wheels on the hubs with paint. This will allow you to install the balanced wheel in its original position during assembly.
2. Loosen the wheel mounting bolts. The car must stand on its wheels when performing this operation.
3. Place the car on jack stands, unscrew the wheel bolts and remove the wheels.
Warning! Jacking up the vehicle and placing it on stands may pose a risk of injury. Read the provisions of Chapter "Jacking up a car".
4. Disconnect the brake hose from the pipeline.
Please note: On vehicles with rear drum brakes, the brake hose is located between the two pipes and serves as a flexible connection.
5. Cars with rear drum brakes. Remove the underbody protection, see the relevant chapter.
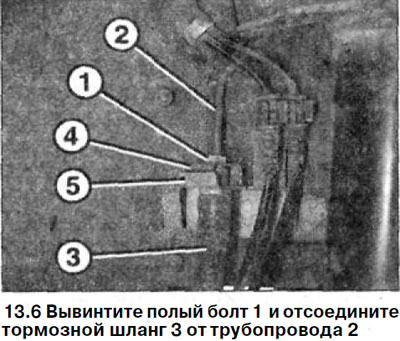
6. Unscrew the hollow bolt 1 and disconnect the brake hose 3 from the pipeline 2 (see illustration).
Attention! Twisting the brake hose when disconnecting it from the pipeline is not allowed.
7. Remove retaining clip 4 and release the brake hose from holder 5 (see illustration 13.6).
[Text republished from the website: MERCEDESMAN.ru]
Attention! After opening the brake system, brake fluid will flow out of it, which must be collected in a container intended for this purpose.
8. Vehicles with rear drum brakes: Disconnect the other end of the brake hose from the pipeline.
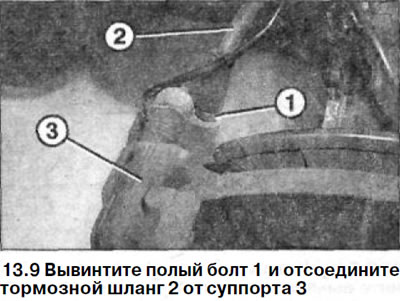
9. Unscrew the hollow bolt 1 and disconnect the brake hose 2 from the caliper 3 (see illustration).
Warning! Brake fluid will leak from the caliper connection hole. Take precautions!
Installation
Caution! Install only those brake hoses that are approved for use by the vehicle manufacturer.
10. Attach the brake hose to the caliper and secure with a hollow screw. Tighten to 20 Nm.
11. Secure the brake hose in the holder so that the pin fits securely into the holder mount.
Caution! Do not twist the brake hose.
12. Fix the retaining bracket, check that it is seated correctly.
13. Fasten the brake hose to the pipe union and tighten with the hollow screw. The tightening torque is 15 Nm
Attention! Twisting the brake hose when attaching it to the pipeline is not allowed.
14. Vehicles with rear drum brakes: Attach the other end of the brake hose to the pipe.
15. Remove air from the brake system, see the relevant chapter.
16. Install the wheels in accordance with the marks made during removal. Before doing this, lubricate the centering seat of the wheel disk on the hub with a thin layer of grease. Do not lubricate the wheel mounting bolts. Replace rusted bolts with new ones.
17. Screw in the wheel mounting bolts and lower the vehicle onto its wheels.
18. Tighten the wheel mounting bolts in a cross pattern to 10 Nm.
Attention! The brake hoses of the front wheel mechanisms must not be pinched or rubbed when turning the steering wheel all the way to one side or the other. The hoses must be located at a sufficient distance from the front suspension parts.
19. Check the brake fluid level in the expansion tank and, if necessary, top it up to the maximum mark.
Attention! Make sure that:
- a) the brake hoses are securely connected;
- b) the brake hose is secured in the holder;
- c) the brake drive bleed nipples are screwed in;
- d) there is a sufficient volume of brake fluid in the expansion tank.
20. Check the brake system for leaks with the engine running. To do this, press the brake pedal with a force of 200-300 N (20-30 kg) for about 10 seconds. The pressure in the system and, accordingly, the resistance of the brake pedal, should not decrease. Check all connections for leaks.
21. Perform several braking tests on a road with light traffic. At least one braking test should be performed so that the ABS engages, which is felt by the pulsation of the brake pedal.
Caution! When checking the brake system in the manner described, take into account the situation on the road and watch the traffic behind you.