
Note: Before starting work, read the warning at the beginning of paragraph 8 about the danger of hydraulic fluid and the warning at the beginning paragraph 4 about the dangers of asbestos dust.
Removing
Note: A new caliper pin bolt will be required for installation.
1. Apply the parking brake, then jack up the front of the vehicle and support it on jack stands (see "Lifting the vehicle and placing it on stands"). Remove the relevant wheel.
2. Reduce fluid loss by first removing the master cylinder reservoir cap and then sealing it tightly with a piece of polyethylene to form an airtight seal. It is possible to pinch the flexible brake hose with a suitable clamp (see fig. 8.2).

Pic. 8.2. Use a clamp to pinch the flexible brake hose
3. Clean the area around the fitting, then loosen the brake hose union nut on the caliper.
4. Remove pads as described in paragraph 4.
5. Loosen and remove the upper guide pin bolt, then unscrew the caliper and remove it from the disc (see fig. 8.5).
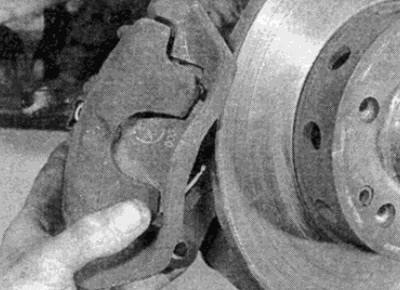
Pic. 8.5. Remove the brake caliper
Repair
6. With the caliper on the workbench, wipe off all traces of dust and dirt, but avoid inhaling the dust as it is harmful to health.
7. Remove the partially protruding piston from the caliper body and remove the dust cover.
Advice. If the piston cannot be pulled out by hand, it can be pushed out by air pressure by feeding it into the hole in the brake hose fitting. Requires slight pressure, which can be created with a foot pump. Place a block of wood between the end of the piston and the caliper body so as not to damage the piston when it pops out of the hole - also take care of your fingers so that they are not crushed by the piston.
8. Using a soft, blunt tool, such as the end of a pen cap, remove the hydraulic piston seal, being careful not to damage the cylinder surface (see fig. 8.8).
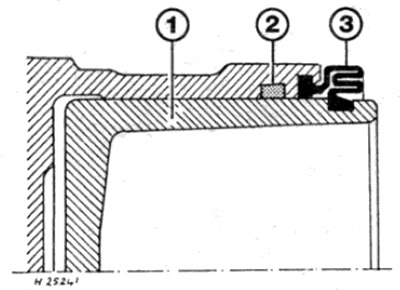
Pic. 8.8. Sectional view of piston, caliper body and seal
1 piston
2 Piston seal
3 Dust cover
9. Thoroughly clean all parts using methyl or isopropyl alcohol or clean brake fluid. Never use petrol or kerosene based solvents as they attack the rubber parts of the hydraulic system parts. Dry parts immediately using compressed air or a clean, lint-free cloth. Use compressed air to blow out the fluid passages.
10. Check the condition of the parts and replace any that are worn or damaged. Especially check the cylinder bores and pistons; they need to be replaced (note that the node changes entirely) if they are scratched, worn or corroded. Similarly, check the condition of the fingers and their bushings; both fingers must be intact, and (when thoroughly cleaned) tight enough to be installed in the bushings. If there is any doubt about the condition of any part, replace it.
11. If the assembly can be further used, purchase an appropriate repair kit from your Mercedes-Benz dealer. It is absolutely necessary to replace all rubber seals; they cannot be reused.
12. When reassembling, keep parts clean and dry.
13. Moisten the piston and new piston seal with clean hydraulic fluid. Lubricate the surface of the cylinder bore with clean fluid.
14. Install a new piston seal using your fingers (without fixture), to fit the seal into the groove in the cylinder.
15. Install a new dust cover on the back of the piston and fit the outer seal lip into the groove on the caliper body. Carefully, rotate the piston without distortion into the cylinder bore. Push the piston in until it stops and fit the inner edge of the dust cover into the groove in the piston.
16. If the caliper guide pins are being replaced, lubricate the pin shafts with the grease supplied in the repair kit and install the boots into the pin grooves. Insert your fingers into the caliper bracket and install the boots into the bracket grooves.
Installation
17. Remove all traces of the old fixing compound from the threaded holes of the guide pins / bolts (depending on what is being used), by threading with an appropriate tap.
Advice. If you do not have the required tap, go through the thread using an old slotted bolt on the thread.
18. Wrap in a support up to the stop the union of a flexible hose.
19. Attach the caliper to the bracket and install a new finger bolt, tightening it with the required force.
20. Tighten the nut of the brake hose fitting with the required force and remove the clamp from the hose or polyethylene from the tank (depending on what you use).
21. Fit the brake pads as described in paragraph 4 and bleed the hydraulic system as described in paragraph 2. Note that if the recommended measures have been taken to reduce fluid loss, only the appropriate front brake should be bled.
22. Install the wheels, then lower the vehicle to the ground and tighten the wheel bolts to specification. Check fluid level as described in section "Weekly check". Thoroughly check the operation of the brakes before leaving on the road.