
Note: Before starting work, read the warning at the beginning paragraph 8 about the danger of hydraulic fluid and a warning at the beginning paragraph 5 about the dangers of asbestos dust.
Removing
Note: A new caliper pin bolt will be required for installation.
1. Place wedges under the front wheels, then jack up the rear of the vehicle and support it on jack stands (see "Lifting the vehicle and placing it on stands"). Remove the corresponding rear wheel.
2. Reduce fluid loss by first removing the master cylinder reservoir cap and then sealing it tightly with a piece of polyethylene to form an airtight seal. It is possible to pinch the flexible brake hose with a suitable clamp. Do not use a vise or other tool with flat jaws to avoid damaging the hoses.
3. Clean the area around the fitting, then loosen the brake hose union nut on the caliper.
4. Remove pads as described in paragraph 5.
5. Loosen and remove the caliper mounting bolts, then unscrew the caliper from the end of the flexible hose and remove it from the vehicle (see fig. 9.5).
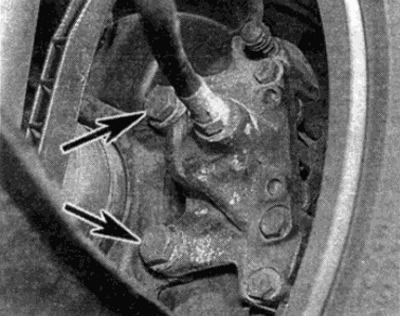
Pic. 9.5. Loosen and remove the caliper mounting bolts (shown by arrows)
Caution: Never loosen the bolts holding the two halves of the caliper together. If the bolts are loosened and the caliper body is disassembled, the assembly may leak after assembly.
6. With the caliper on the workbench, wipe off all traces of dust and dirt, but avoid inhaling the dust as it is harmful to health.
7. Label each piston and corresponding cylinder bore so you don't have to change them during reassembly.
8. Remove the partially protruding pistons from the caliper body and remove the dust covers.
9. Using a small screwdriver, pry out the hydraulic piston seal, being careful not to damage the cylinder bore surface.
Advice. Before finally pulling the pistons out of the cylinders, check that they all move easily. If any piston cannot be pulled out by hand, insert a wooden block into the caliper body (approx. 28 mm thick) press out the pistons by applying air under pressure to the brake hose fitting. Requires slight pressure, which can be created with a foot pump. Make sure that the pistons move forward at the same time until they stop against the bar, then remove the bar from the caliper. This will prevent one of the pistons from getting stuck in the caliper, which will then be very difficult to pull out.
Repair
10. Thoroughly clean all parts using ethyl or isopropyl alcohol or clean brake fluid. Never use gasoline or kerosene based solvents. because they act on the rubber parts of the hydraulic system parts. Dry parts immediately using compressed air or a clean, lint-free cloth. Use compressed air to blow out the fluid passages.
11. Check the condition of parts and replace any that are worn or damaged. Especially check the cylinder bores and pistons; they need to be replaced (note that the assembly is changing) if they have scratches.
12. If the unit can be reused, purchase an appropriate repair kit from your Mercedes-Benz dealer. It is absolutely necessary to replace all rubber seals, they cannot be reused.
13. When reassembling, keep parts clean and dry. Install each piston in the corresponding hole in the caliper.
14. Take the first piston and dip it and the new piston seal in clean hydraulic fluid. Lubricate the surface of the cylinder bore with clean fluid.
15. Install new piston seal using fingers only (without fixture), to fit the seal into the groove in the cylinder (see fig. 9.15).
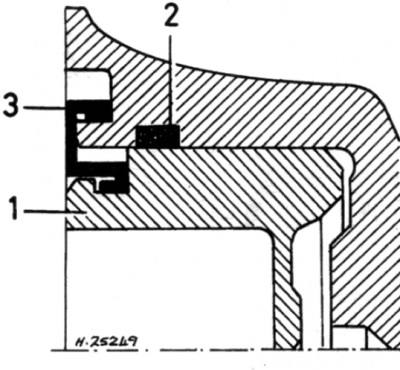
Pic. 9.15. Rear brake caliper piston device and dust seal
1 piston
2 Piston seal
3 Dust cap
16. Install a new dust cover into the groove on the piston. Carefully rotate the piston without distortion into the corresponding hole in the cylinder. Push the piston all the way in and fit the outer edge of the dust cover into the groove on the caliper body.
17. Repeat the above steps for the remaining pistons.
18. Before pressing the pistons into the caliper as far as they will go, position each so that the protrusion is facing up when the caliper is installed on the disc. Mercedes-Benz dealers use a special tool to ensure the correct installation of the pistons (see fig. 9.18). The protruding part of the piston ensures that the pad contacts the disc at a slight angle, which reduces the likelihood of brake squeaking.
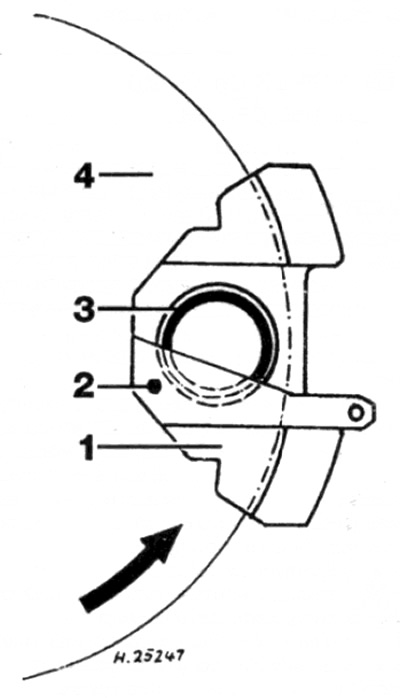
Pic. 9.18. The correct location of the piston in the rear brake caliper
1 Caliper
2 Special installation tool
3 Piston
4 Disc
Installation
19. Remove all traces of the old fixing compound from the threaded holes of the caliper mounting bolts by threading with an appropriate tap.
Advice. If you do not have the required tap, thread using an old slotted bolt on the thread.
20. Screw the caliper all the way onto the flexible hose fitting, using new sealing washers where necessary.
21. Slide the caliper assembly into place, then install new mounting bolts and tighten them to the required torque.
22. Tighten the nut of the brake hose fitting with the required force and remove the clamp from the hose or a piece of polyethylene from the tank (depending on what you use).
23. Install the brake pads as described in paragraph 5 and bleed the hydraulic system as described in paragraph 2. Note that if the recommended measures have been taken to reduce fluid loss, only the appropriate rear brake should be bled.
24. Install the wheel, then lower the vehicle to the ground and tighten the wheel bolts to the correct torque. Check fluid level as described in section "Weekly check". Thoroughly check the operation of the brakes before leaving on the road.