
Warning: Brake fluid is poisonous: if fluid comes into contact with skin, wash it off immediately and thoroughly; If liquid enters the stomach or eyes, consult a doctor immediately.
Some types of hydraulic fluid are flammable and can ignite when in contact with hot parts: when servicing a hydraulic system, it is best to treat any fluid as flammable and take appropriate precautions, just as if it were gasoline. Brake fluid has a discoloring effect, especially on plastics, and should be washed off with plenty of clean water if spilled.
In conclusion, it should be taken into account that the liquid is hygroscopic (it absorbs moisture from the air). The old fluid may be contaminated and unsuitable for further use. When topping up or replacing fluid, always use the recommended type of fluid and keep the fluid fresh and stored in a well stoppered container.
General provisions
1. Proper operation of the hydraulic brake system is possible only if there is no air in it, which is achieved by pumping the system.
2. When bleeding, add only new clean fluid of the specified type to the system, never reuse fluid that has spilled from the system. Make sure you have enough liquid before starting work.
3. If it is suspected that the wrong type of fluid has entered the system, flush and fill the entire system with the correct type of clean fluid and replace all hydraulic system seals.
4. If the brake fluid is draining due to leaks, locate and repair the leak before proceeding.
5. Park the machine on level ground, turn off the ignition and engage first gear or reverse gear. Place wedges under the wheels and release the handbrake.
6. Check that all pipes and hoses are in good condition, connections are well tightened, and bleed nipples are screwed on. Remove the dust caps and clean the area around the air release valves from dirt.
7. Unscrew the cover of the reserve tank of the main cylinder, and add brake fluid to it to the level "MAX". Loosely tighten the cap and remember to keep the liquid level at least above the "MIN" throughout the procedure, otherwise there is a risk of air entering the system.
8. One person brake bleeding kits are available. It is recommended to use one of these kits whenever possible, as they greatly simplify the bleeding procedure and reduce the risk of secondary air entering the system along with the liquid. If you do not have such a kit, you should use the usual method of pumping together. This method is detailed below.
9. If using a one-man bleed kit, prepare the machine as described above and then follow the kit manufacturer's instructions as the bleed procedure may vary slightly depending on the type of kit. The main steps are described in the following sections.
10. Regardless of the method of removing air from the brake system, you should follow a certain sequence of actions described below (pp. 11 and 12). At the end, before leaving on the road, thoroughly check the operation of the brake system.
Pumping sequence
11. If the system is only partially disconnected and appropriate measures are taken to reduce fluid loss, it is sufficient to bleed only that part of the system.
12. If the entire system is being bled, the following order should be followed:
- A) Right rear brake.
- b) Left rear brake.
- V) Right front brake.
- G) Left front brake.
Note: On models equipped with IASR Road Traction Control), if parts of the hydraulic system adjacent to the master cylinder, hydraulic unit, pump and accumulator are touched, then the reservoir of the hydraulic unit must also be pumped when air is released from the main brake system (see par. 32).
Air release - the main method (together)
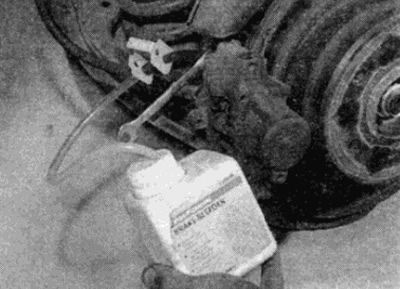
13. Take a clean glass container of a suitable size and a piece of plastic or rubber hose of a suitable length, which is tightly put on the valve to release air, and a ring wrench to unscrew the valves. You will also need the help of an assistant.
14. Remove the protective cap from the air release valve of the wheel that you are going to bleed, put the key and tube on the valve. Dip the other end of the tube into a container and pour enough liquid into it so that the end of the tube is completely immersed in it.
15. Keep the fluid level in the master cylinder reservoir at least above the "MIN" throughout the entire procedure.
16. Have your assistant depress the brake pedal a few times until it stops to build up pressure, then hold the pedal in the down position on the last press.
17. With the pedal depressed, unscrew the valve (about one turn) and allow fluid and pressurized air to flow into the container. The assistant must maintain the force on the pedal, pushing it to the floor if necessary, and must not release it without command. When fluid flow stops, tighten the valve and have an assistant slowly release the pedal. Check fluid level in reserve tank.
18. Repeat the steps in steps 16 and 17 until the fluid flowing from the valve no longer contains air bubbles. If bleeding is started after the master cylinder has been emptied and refilled, wait approximately five seconds between cycles to allow the cylinder cavities to fill with fluid.
19. When air bubbles stop appearing, tighten the valve securely, remove the tube and wrench, and replace the protective cap. Do not over tighten the valve.
20. Repeat this procedure in the above sequence until all air has been purged from the system and the brake pedal is stiff again.
Bleeding air using a valve kit
21. As the name suggests, these kits consist of a piece of pipe with a valve to prevent fluid with air removed from the system from flowing back into the system. Some kits include a translucent container that can be positioned to show air bubbles escaping from the end of the tube (see fig. 2.21).
Pic. 2.21. Bleeding the rear brake cylinder
22. The kit is connected to the valve, which is then turned away. The user sits in the driver's seat, depresses the brake pedal, then slowly releases it. Pumping is repeated until the liquid flowing out of the tube no longer contains air bubbles.
23. Keep in mind that this tool makes the job so easy that it's easy to forget to check the fluid level in the reserve tank. Make sure the fluid level never drops below the mark "MIN".
Bleeding air using a pressure release kit
24. These kits are usually powered by compressed air contained in the spare tire. However, keep in mind that you may need to reduce the tire pressure from normal - carefully read the instructions that came with the kit.
25. A tank with brake fluid under pressure is connected to the reserve tank. The system is pumped by opening the valves one by one in the required sequence until the fluid flowing out of the valve no longer contains air bubbles.
26. This method has the advantage that the large volume of fluid provides additional assurance that no air will enter the system during pumping.
27. Bleeding under pressure is especially effective at removing air from "difficult" systems, as well as when removing air from the entire system after a scheduled fluid change.
All Methods
28. At the end of pumping, when the brake pedal became "tough", wash off spilled liquid. tighten the nipples to the stop and put on their protective caps.
29. Check the fluid level in the master cylinder reservoir and top up if necessary (see "Weekly check").
30. Dispose of the used liquid - it is not suitable for reuse.
31. Check the stiffness of the brake pedal. If the pedal drops further after selecting the free play, creating elastic resistance, this means that the air is not completely removed from the system and re-bleeding is required. Air in the system after a properly bleed can be due to worn master cylinder seals.
Hydraulic Unit Bleeding - Models Equipped with Road Traction Control (ASR)
32. On models equipped with road traction control (ASR), if parts of the hydraulic system adjacent to the master cylinder, hydraulic unit, pump and accumulator are touched, then the reservoir of the hydraulic unit must also be pumped when air is released from the main brake system as follows.
33. Remove the cover from the ASR hydraulic assembly in the engine compartment to gain access to the pressure reservoir air release valve (marked "SP").
34. Install the plastic tube on the valve and place the other end of the tube in the container (see paragraphs 13 and 14).
35. Start the engine and let it idle.
36. After making sure that the fluid level in the master cylinder reservoir is maintained at least above the mark "MIN", unscrew the valve and let the liquid flow out of the reservoir until the liquid stops flowing out with air bubbles.
37. When bubbles stop, tighten air release valve securely. Pump pressure must continue to be maintained for approximately 30 seconds until full working pressure is present in the reservoir; pump operation can be heard. When the pump turns off, stop the engine, disconnect the tube and remove the key from the air view valve.
38. Wipe up any spilled fluid and install the cover on the hydraulic assembly.
39. Check the fluid level in the master cylinder reservoir and top up if necessary (see "Weekly check").