
Warning! The brake fluid used in the hydraulic clutch system is poisonous, so if it comes into contact with the skin, immediately wash the area with plenty of water. If the liquid gets into the eyes or inside the body, you should immediately consult a doctor. Some fluids tend to be highly flammable and can ignite even from contact with hot vehicle components. In addition, the fluid used in the hydraulic clutch system dissolves paint and plastic, so if fluid comes into contact with the car's paintwork, wash it with plenty of water. Also, this liquid is hygroscopic, i.e. it absorbs moisture from the air and, therefore, it is not recommended to use liquid stored for a long time in an open container.
Warning! During the operation of the brake pads, it forms brake dust, which contains asbestos, which is harmful to health. Therefore, when cleaning brake pads, do not use compressed air or inhale dust.
Removing
Attention! When installing the rear brake caliper, new mounting bolts must be used.
1. Raise the rear of the car and secure it on stands. Remove the corresponding rear wheel.
2. To reduce the loss of brake fluid, remove the cap from the reservoir of the brake system, close the neck of the reservoir with polyethylene and screw the cap back on. This is necessary so that the lid hermetically closes the replenishment tank. Alternatively, use a clamp to compress the brake hose leading to the caliper.
3. Clean the area around the brake hose connector and caliper. Loosen the coupling that secures the brake hose to the caliper.
4. Remove the brake pads.
5. Unscrew the caliper mounting bolts, then unscrew the caliper from the brake hose and remove it from under the car.
Caliper repair
The location of the piston in the rear brake caliper
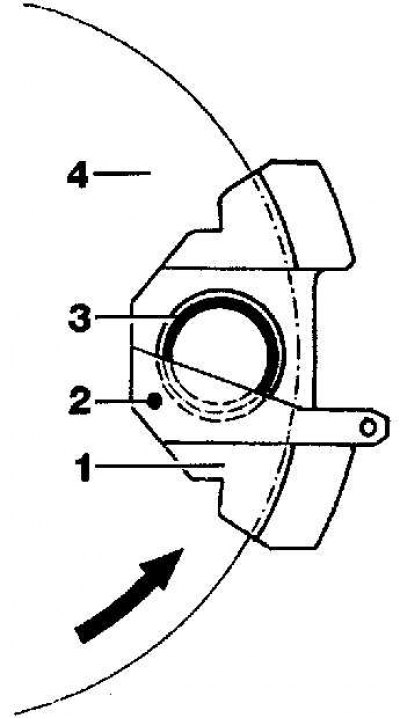
1 - support;
2 – measuring template;
3 - piston;
4 - brake disc
1. Be careful to clean the brake caliper of brake dust and dirt.
2. Mark the location of the pistons in the caliper so that they can be correctly installed in their places.
3. Remove the pistons from the caliper by using low pressure air supplied to the brake cylinder through the brake hose port. At the same time, instead of brake pads, install a wooden block. Remove the dust covers from the pistons.
4. Using a small screwdriver, pry the o-rings out of the grooves in the caliper holes.
5. Wash all parts in methanol or clean brake fluid and wipe dry. Use compressed air to clean pipes and holes.
6. Check the condition of all caliper parts and replace worn or damaged parts.
7. Pay special attention to the cylinder and piston. If there are scratches, scratches, wear or pitting, the piston and cylinder need to be replaced, which means the caliper assembly needs to be replaced.
8. Regardless of condition, replace all rubber seals.
9. When installing, check that all parts are clean and dry and that each piston is seated in its bore.
10. Dip the pistons and new piston o-rings in brake fluid and apply a thin film of brake fluid to the piston holes in the caliper.
11. Install the o-rings in the caliper holes.
12. Before installing the piston in the caliper, rotate it so that the protrusion on the piston flange is on top. To check the correct installation of the piston in the caliper, Mercedes-Benz recommends using a special template (see picture). This arrangement of the piston eliminates squealing when the brakes are applied.
Installation
1. Using an appropriate tap, clean the caliper bolt holes.
2. Screw the caliper onto the brake hose coupling.
3. Install the caliper in place and secure with bolts, tightening them to the required torque.
4. Tighten the coupling of fastening of a brake hose to a support the demanded moment.
5. Install the brake pads and bleed the hydraulic brake system. If all precautions have been taken when working with the hydraulic brake system, it is sufficient to bleed only the corresponding rear brake.
6. Install the wheel, then lower the vehicle to the ground and tighten the wheel bolts to the correct torque. Check the brake fluid level.