
The location of the parts when installing the piston in the caliper
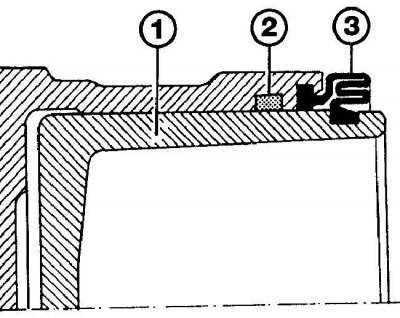
1 - piston;
2 - piston sealing ring;
3 – a dustproof cover of the piston
1. Be careful to clean the brake caliper of brake dust and dirt.
2. Remove the piston from the caliper by using low pressure air supplied to the brake cylinder through the brake hose connection hole. At the same time, instead of brake pads, install a wooden block.
3. Using a small screwdriver, pry the o-ring out of the groove in the caliper bore.
4. Wash all parts in methanol or clean brake fluid and wipe dry. Use compressed air to clean pipes and holes.
5. Check the condition of all caliper parts and replace worn or damaged parts. Check the condition of the guide pins.
6. Pay special attention to the cylinder and piston. If there are scratches, scratches, wear or pitting, the piston and cylinder need to be replaced, which means the caliper assembly needs to be replaced.
7. Regardless of condition, replace all rubber seals.
8. When repairing a caliper, make sure all parts are clean and dry.
9. Dip the piston and new piston o-ring in the brake fluid and apply a thin layer of brake fluid to the piston hole in the caliper.
10. Install the O-ring into the groove in the caliper bore.
11. Install the dust cover on the piston so that the inner diameter of the cover fits into the piston groove. Carefully, and at the same time turning, insert the piston into the caliper and at the same time insert the outer edge of the dust cover into the caliper until it locks into place (see picture).
12. When installing new guide pins, lubricate their surface with special grease and install the protective covers of the guide pins into the grooves of the pins. Insert the guide pins into the caliper holder and at the same time insert the protective covers into the grooves of the caliper holder.
Fixed caliper models with two pistons
Attention! Do not unscrew the bolts holding both parts of the caliper to each other. In this case, there may be a loss of tightness, and the caliper will leak.
1. Be careful to clean the brake caliper of brake dust and dirt.
2. Mark the location of the pistons in the caliper so that they can be correctly installed in their places.
3. Remove the pistons from the caliper by using low pressure air supplied to the brake cylinder through the brake hose port. At the same time, instead of brake pads, install a wooden block. Remove the dust covers from the pistons.
4. Using a small screwdriver, pry the o-rings out of the grooves in the caliper holes.
5. Wash all parts in methanol or clean brake fluid and wipe dry. Use compressed air to clean pipes and holes.
6. Check the condition of all caliper parts and replace worn or damaged parts.
7. Pay special attention to the cylinder and piston. If there are scratches, scratches, wear or pitting, the piston and cylinder need to be replaced, which means the caliper assembly needs to be replaced.
8. Regardless of condition, replace all rubber seals.
9. When installing, check that all parts are clean and dry and that each piston is seated in its bore.
10. Dip the pistons and new piston o-rings in brake fluid and apply a thin film of brake fluid to the piston holes in the caliper.
11. Install the o-rings in the caliper holes.
12. Install the dust boots on the pistons so that the inside diameter of the boot fits into the piston groove.
13. Install the dust cover on the piston so that the inner diameter of the cover fits into the piston groove. Being careful and turning, insert the piston into the caliper and at the same time insert the outer edge of the dust cover into the caliper until it locks into place.
14. Install the second piston into the caliper in the same way.
Installation
1. Using an appropriate tap, clean the threads in the guide pin hole.
2. Screw the caliper onto the brake hose connector.
3. On single piston moving caliper models, install the caliper onto the caliper holder and screw in the new top bolt securing the guide pin. Tighten the guide pin bolt to the required torque. At the same time, using a thin wrench, keep the guide pin from turning. Do not damage the protective cover of the guide pin.
4. On fixed caliper models with two pistons, reinstall the caliper and tighten it with new bolts to the correct torque.
5. On all models, tighten the brake hose connector to the caliper. Remove the clamp clamping the brake pipe.
6. Install the brake pads and bleed the hydraulic brake system. If all precautions have been taken when working with the hydraulic brake system, then only the appropriate front brake needs to be bled.
7. Install the wheel, then lower the vehicle to the ground and tighten the wheel bolts to the correct torque. Check the brake fluid level.