



Contents: Pumping sequence ↡ Pumping is the main method (two…↡ Bleeding - Using a One-Way Valve Kit ↡ Bleeding - Using a Pressure Bleeding…↡ All methods ↡
Warning! The brake fluid used in the hydraulic clutch system is poisonous, so if it gets on your skin, immediately rinse the area with plenty of water. If the fluid gets into your eyes or inside your body, you should immediately consult a doctor. Some fluids are highly flammable and can catch fire even from contact with hot vehicle components. In addition, the fluid used in the hydraulic clutch system dissolves paint and plastic, so if the fluid gets on your vehicle's paintwork, rinse it with plenty of water. This fluid is also hygroscopic, i.e. it absorbs moisture from the air, and therefore it is not recommended to use the fluid if it has been stored in an open container for a long time.
Bleeding the rear brake caliper
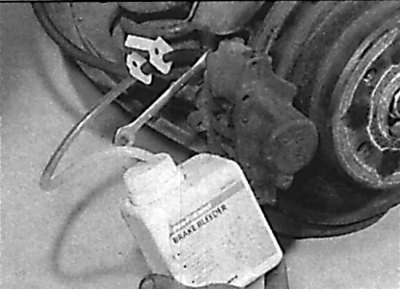
Bleeding the hydraulic brake system is necessary to remove air, which significantly reduces braking efficiency. Air can enter the hydraulic system due to depressurization of the system during repairs, replacement of individual units or brake fluid. The presence of air in the drive is indicated by an increased brake pedal travel and its softness. Before removing air, check the tightness of all brake drive units and their connections.
Never reuse brake fluid.
When bleeding the brake system, do not allow the brake fluid level to drop below the middle of the reservoir.
If brake fluid has been lost due to a leak in the system, find the cause and repair the leak before proceeding.
If the hydraulic system has been partially disconnected and proper precautions have been taken to prevent further fluid loss, it may be possible to bleed only part of the system.
Bleeding can be done with an assistant or independently, using a brake system bleeding kit. Always follow the instructions. It is recommended to use a kit wherever possible, as it greatly simplifies the bleeding procedure. If there is no bleeding kit, you need to stock up on a clean container and a transparent plastic tube of the appropriate length, which should fit tightly onto the bleeding nipple. This will require the help of another person.
Pumping sequence
If only a partial connection of the hydraulic brake system was made and the appropriate precautions were taken, then it is sufficient to bleed only that part of the system.
Bleed the entire brake drive system in the following sequence:
- right rear wheel;
- left rear wheel;
- right front wheel;
- left front wheel.
Caution: On models with Automatic Speed Regulator (ASR), if the hydraulic system, master cylinder, hydraulic unit, hydraulic pump and accumulator have been repaired, the hydraulic reservoir must also be bled.
Pumping is the main method (two people)
Remove the dust cap from the wheel cylinder bleeder nipple, clean it and put a clean transparent hose on it, lowering the other end into a container partially filled with brake fluid. The container should be at least 300 mm above the bleeder nipple. This prevents air from entering the cylinder through the bleeder nipple thread. Press the brake pedal sharply 3-5 times at intervals of 2-3 seconds, unscrew the bleeder nipple by half a turn with the pedal pressed. Continuing to press the pedal, force the fluid in the system together with the air through the hose into the container. After the pedal reaches the extreme forward position and the fluid stops flowing out through the hose, screw the bleeder nipple all the way in. Repeat these operations until air stops coming out of the hose.
While holding the pedal down, tighten the bleed screw until it stops and remove the hose.
Wipe the bleed nipple clean and install the protective cap.
Repeat these operations for the other wheels.
Caution! When removing air, constantly monitor the presence of brake fluid in the reservoir, not allowing its bottom to become exposed, as this will allow air to enter the system again.
If there is no air in the brake system, the pedal should travel about half of its travel. To eliminate the influence of the brake booster on the brake bleeding, bleed the air with the engine off.
Bleeding - Using a One-Way Valve Kit
The kit consists of a tube with a one-way valve installed on it, which eliminates the possibility of returning the removed brake fluid with air bubbles to the brake system. Some kits are equipped with a transparent container, in which air bubbles in the brake fluid are clearly visible (see Fig. Bleeding air from the rear brake caliper).
Remove the dust cap from the wheel cylinder bleeder nipple, clean it and put the hose from the kit on it. Unscrew the bleeder nipple by half a turn. Smoothly press the brake pedal until it stops and slowly release it to its original position. Repeat this operation until brake fluid without air bubbles comes out of the bleeder nipple.
Tighten the bleed nipple until it stops, remove the tube from it and put on the dust cap.
Caution! When removing air, constantly monitor the presence of brake fluid in the reservoir, not allowing its bottom to become exposed, as this will allow air to enter the system again.
Bleeding - Using a Pressure Bleeding Kit
Using a pressure bleeding kit requires a supply of compressed air, which can be done using an inflated spare tire. Reduce the tire pressure to the value specified in the kit's operating instructions.
Please note! Mercedes-Benz recommends using compressed air supplied at a pressure of no more than 2 bar.
Connect a container filled with brake fluid to the master cylinder reservoir. The bleeding process begins after unscrewing the bleed nipple by half a turn. After the brake fluid with air bubbles stops flowing out and only clean brake fluid flows out, screw the bleed nipple all the way in.
When bleeding using this method, a large amount of hydraulic fluid is required to prevent air from entering the master cylinder during the bleeding process, which often occurs if the fluid level in the reservoir is not maintained.
Pressure bleeding is especially effective when the system is difficult to bleed or when a complete system bleeding is performed during a routine brake fluid change.
All methods
Once the bleeding process is complete, press the brake pedal hard until it travels about halfway. Rinse off any traces of spilled brake fluid and tighten the bleeder nipples to the specified torque, then install the dust caps on them.
Check the brake fluid level in the brake system reservoir and top up with brake fluid if necessary.
The removed brake fluid should not be used again. Clean brake fluid should be stored in a sealed container, as it is very hygroscopic, which lowers the boiling point and worsens the technical characteristics of the brake fluid.