
Warning: Brake fluid is poisonous: if fluid comes into contact with skin, wash it off immediately and thoroughly; If liquid enters the stomach or eyes, consult a doctor immediately. Some types of hydraulic fluid are flammable and may ignite on contact with hot parts; when servicing a hydraulic system, it is best to treat any fluid as flammable and take appropriate precautions as if it were gasoline. Brake fluid has a discoloring effect, especially on plastics, and should be washed off with plenty of clean water if spilled. In conclusion, it should be taken into account that the liquid is hygroscopic (it absorbs moisture from the air). The old fluid may be contaminated and unsuitable for further use. When adding or replacing fluid, always use the recommended type of fluid, and keep the fluid fresh and stored in a well stoppered container.
Note: Mercedes-Benz recommends the use of a hydraulic bleed kit.
1. Proper operation of the hydraulic brake system is possible only if there is no air in it, which is achieved by pumping the system.
2. When bleeding, add only new clean fluid of the specified type to the system, never reuse fluid that has spilled from the system. Make sure you have enough liquid before starting work.
3. If it is suspected that the wrong type of fluid has entered the system, flush and fill the entire system with the correct type of clean fluid and replace all hydraulic system seals.
4. If brake fluid is lost due to leaks, locate and repair the leak before proceeding.
5. To improve access, set the parking brake, then jack up the front of the vehicle and support it on jack stands (see "Vehicle lifting and jacking up").
6. Where provided, remove the bottom guard to improve access to the gearbox bell housing.
7. Make sure the hydraulic pipe/clutch hose is intact, that the fitting is tight, and that the bleed valve is at the rear of the slave cylinder (attached to the bottom of the car on the right side of the gearbox) closed.
8. Remove the dust cap and remove any dirt from around the air release valve.
9. The use of a pressure bleed kit is recommended. These kits are usually powered by compressed air contained in the spare tire. However, keep in mind that you may need to reduce the tire pressure from normal - carefully read the instructions that came with the kit.
10. A tank with brake fluid under pressure is connected to the reserve tank. The system is pumped by opening the valves one by one in the required sequence until the fluid flowing out of the valve no longer contains air bubbles.
11. This method has the advantage that the large volume of fluid provides additional assurance that no air enters the system during pumping.
12. Prepare a clean glass beaker, an appropriate length of plastic or rubber tube that fits snugly over the bleed screw and a wrench that fits the bleed valve.
13. Install the wrench and tube on the slave cylinder valve by placing the other end of the tube in a beaker and place the beaker to close the end of the tube (see fig. 6.13).
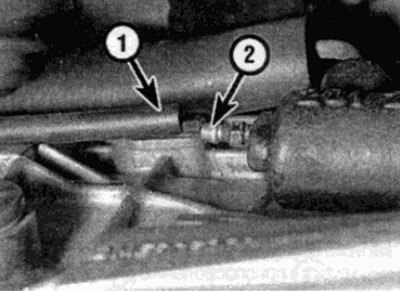
Pic. 6.13. Install the handset (1) on the air outlet screw (2) working cylinder
14. Connect a pressurized air bleeder to the reserve tank according to the manufacturer's instructions.
15. Unscrew the air release valve and allow the liquid to drain into the beaker until the liquid stops flowing with air bubbles.
16. When bleeding is complete, close the air release valve and disconnect the hose and tool.
17. Wash up all traces of spilled liquid, recheck that the valve is securely tightened and install the dust cap.
18. Dispose of the used liquid - it is not suitable for reuse.
19. Check the brake fluid level in the reservoir and top up if necessary (see "Weekly check").
20. Check the stiffness of the brake pedal. If the pedal drops further after freeplay has been selected, creating little resistance, this means that the air is not completely removed from the system and re-bleeding is required. The presence of air in the system after a properly performed pumping may be due to wear on the seals of the main or working cylinders.
21. When finished, where provided, install the bottom guard and lower the vehicle to the ground.