
Warning! The brake fluid used in the hydraulic clutch system is poisonous, so if it comes into contact with the skin, immediately wash the area with plenty of water. If the liquid gets into the eyes or inside the body, you should immediately consult a doctor. Some fluids tend to be highly flammable and can ignite even from contact with hot vehicle components. In addition, the fluid used in the hydraulic clutch system dissolves paint and plastic, so if fluid comes into contact with the car's paintwork, wash it with plenty of water. Also, this liquid is hygroscopic, i.e. it absorbs moisture from the air and, therefore, it is not recommended to use liquid stored for a long time in an open container.
Removing
1. Remove the ground wire from the battery.
2. Disconnect the electrical connector from the brake fluid level sensor.
3. Depress the brake pedal several times to fill the brake booster with air or relieve pressure in the servomotor hydraulic unit.
4. Remove the brake reservoir cap and use a syringe to draw out the brake fluid. Alternatively, unscrew any bleed screw and, while depressing the brake pedal, drain the brake fluid through a plastic pipe into a suitable vessel.
5. Disconnect the fluid supply hose to the hydraulic clutch system from the reservoir of the brake system and close it with a stopper.
6. Pull up and remove the reservoir from the brake master cylinder. Remove the reservoir reservoir rubber seal from the brake master cylinder and plug the holes.
7. Clear places of connection of brake tubes to the main brake cylinder. Mark the brake pipes suitable for the main brake cylinder. Place a clean rag under the brake master cylinder, unscrew the brake pipe nuts and move the brake pipes away from the brake master cylinder. Close the ends of the tubes with appropriate plugs.
8. Unscrew the two nuts securing the brake master cylinder to the vacuum brake booster and remove the brake master cylinder. Remove the O-ring from the back of the brake master cylinder.
Attention! Remove the master brake cylinder only after disconnecting it from the pusher of the vacuum brake booster, otherwise the vacuum brake booster will be damaged.
Repair
Attention! There are two types of brake cylinders installed on vehicles, so consider the type of brake cylinder when purchasing brake cylinder parts.
Teves brake master cylinder
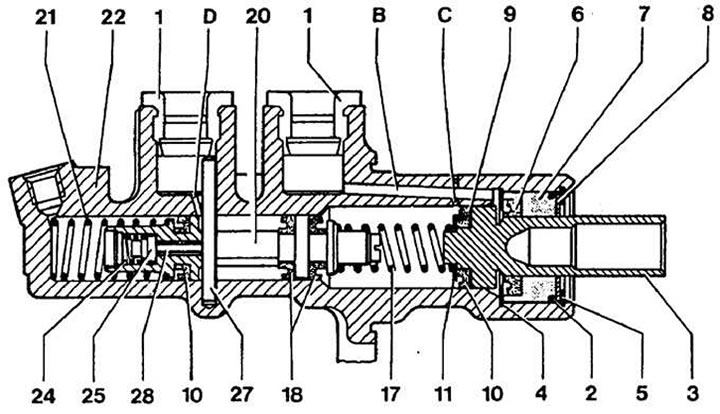
1 - sealing bushings for fastening the replenishment tank; 2 - sealing ring; 3 - primary piston; 4 - thrust washer; 5 - retaining ring; 6 - sealing ring; 7 - bushing; 8 - washer; 9 - sealing ring; 10 - sealing ring; 11 - spring seat; 17 - spring; 20 - secondary piston; 21 - spring; 22 - the body of the main brake cylinder; 24 - valve spring; 25 - valve seal; 27 - pin for fastening the secondary piston; 28 - valve pin; B - opening for liquid supply; C - compensation holes; D - holes for fluid supply and compensation
1. Clean all debris from the brake master cylinder housing.
2. Mark the location and remove the sealing sleeves of the replenishment tank from the main brake cylinder (see picture).
3. Using caution, secure the brake master cylinder housing in a soft jaw vise. Using a steel rod, press the piston into the brake master cylinder and remove the secondary piston pin.
4. Re-press the piston into the master cylinder and remove the circlip, washer and O-ring from the back of the master cylinder.
5. Noting the location of the parts, remove the primary piston assembly and spring from the brake master cylinder.
6. Tap the back of the brake master cylinder housing on a board and remove the secondary piston assembly and spring from it.
7. Using methanol, clean all parts of the brake master cylinder. Do not use gasoline, which dissolves the rubber parts of the brake system. Using compressed air or a clean rag, dry or wipe dry the brake master cylinder parts.
8. Check the condition of the brake master cylinder parts and replace if necessary. Pay special attention to the condition of the channels of the main brake cylinder and pistons. If there are scratches, scratches, wear, or pitting, replace the brake master cylinder assembly.
9. Regardless of condition, replace all rubber o-rings.
10. Dip the primary and secondary pistons and new o-rings in brake fluid and apply a thin film of brake fluid to the piston holes in the master cylinder.
11. Install the spring on the secondary piston assembly and, using care and rotation, install the secondary piston into the bore of the master cylinder.
12. Check that the groove of the secondary piston is properly aligned with the master cylinder body, then press the piston and secure it with the pin.
13. Install the spring onto the primary piston assembly and, using care and rotation, install the primary piston into the master cylinder bore.
14. Using a steel rod, press down on the primary piston and install a new o-ring, washer, and circlip. Check that the circlip is securely seated in the groove of the master cylinder.
15. Insert new seals for the replenishment tank.
Installation
1. Clean the mating surfaces of the brake master cylinder and brake booster, and install a new O-ring on the back of the brake master cylinder.
2. Install the master brake cylinder to the vacuum brake booster. In this case, the pusher of the vacuum brake booster must be installed in the hole of the primary piston. Screw on nuts of fastening of the main brake cylinder and tighten them the demanded moment.
3. Wipe the brake pipes, install them in their places in the main brake cylinder and secure with connecting nuts, tightening them to the required torque.
4. Install the brake reservoir to the brake master cylinder and connect the hydraulic clutch fluid supply hose to it.
5. Pour brake fluid into the brake system reservoir and bleed air from the brake system.