Cars BMW Cars Volkswagen Cars Chevrolet Cars Land Rover Cars Lada Cars Honda Cars Peugeot
English Русский
Български
Беларускі
Український
Српски
Hrvatski
Română
Polski
Slovenský
Magyar
Bookmark News and articles Sitemap Feedback Site search
MercedesMan.ru


A-Class C-Class E-Class G-Class M-Class S-Class Others
Sprinter (1995-2000, diesel) Vito 1 (1996-2003) Vito 2 (2003-2014, diesel) Vario 814D (1996-2003, diesel)
  • Main
  • Mercedes-Benz
  • Sprinter (1995-2000)
  • Chassis
  • Brake system
  • Replacing rear brake pads

Replacing rear brake pads (Mercedes-Benz Sprinter 903)

0
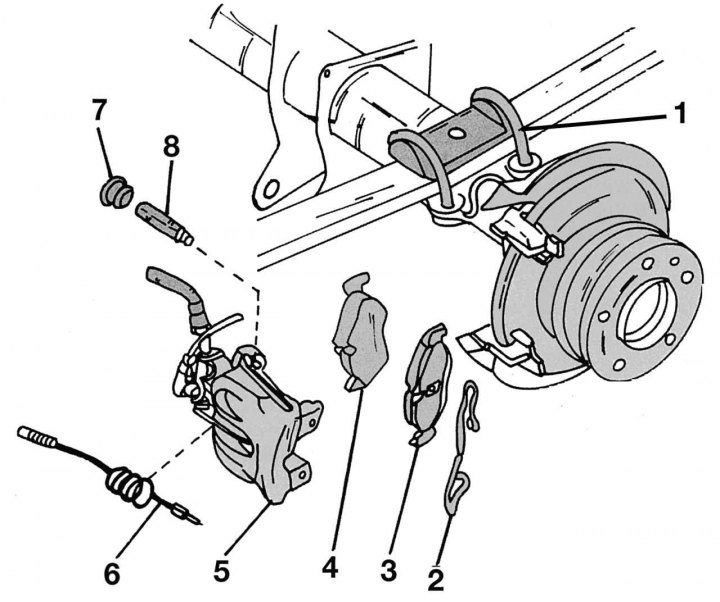
Figure 279. Removing and installing rear brake pads: 1 - rear axle; 2 - retaining spring; 3 - outer…

Figure 279. Removing and installing rear brake pads: 1 - rear axle; 2 - retaining spring; 3 - outer brake shoe; 4 - inner brake shoe; 5 - brake cylinder; 6 — brake pad wear sensor wire; 7 — plug; 8 - guide pin


The pads should be replaced if the linings are worn to a thickness of less than 2 mm. This can be checked by removing the wheel with the caliper installed, as described in subsection 12.3.1when replacing, please refer to the drawing 279. Model 412D is equipped with two-piston calipers. The brake pads must be replaced in the following sequence:
  • unscrew the brake fluid reservoir cap;
  • press the brake pedal several times to relieve the vacuum in the system. Place the rear of the vehicle on supports and remove the rear wheels;

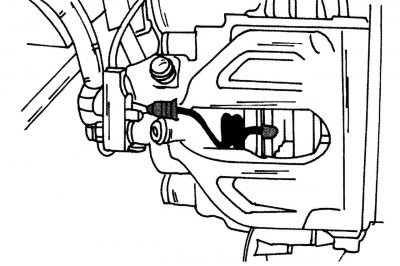
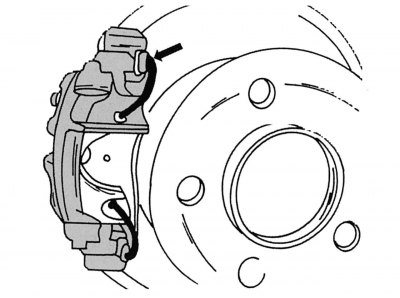
Figure 280. Disconnecting the wear sensor wire

Figure 280. Disconnecting the wear sensor wire


  • disconnect the brake pad wear sensor wire as shown in the figure 280;
  • using a screwdriver and pliers, remove both retaining clips from the brake shoe pins 4 (see figure 279);
  • use a screwdriver to pry up the ends of spring 2 and remove it;

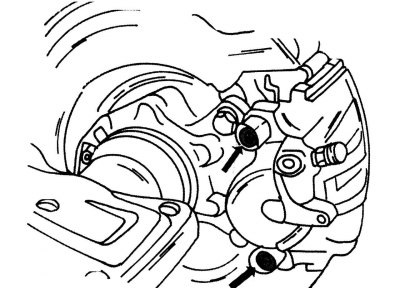
Figure 281. Unscrewing the brake caliper mounting bolts

Figure 281. Unscrewing the brake caliper mounting bolts

  • from the back of the caliper, use a screwdriver to pry up both caps of the mounting bolts shown in Fig. 281 and unscrew the bolts with a hex key. After unscrewing the bolts, remove the caliper cylinder. Hang the cylinder on a wire from the front axle so that it does not hang on the brake hose. Remove the shoe from the removed cylinder;
  • remove the second pad from the caliper bracket;
  • thoroughly clean the caliper receiving splines and check that the mudguards and cylinder are not damaged;
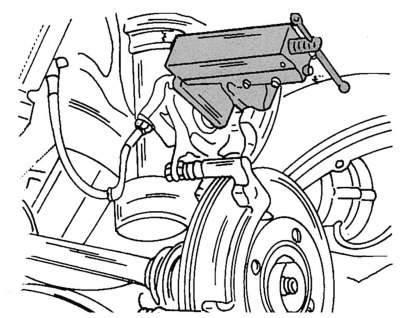
Figure 275. Recessing the brake caliper piston before installing the pads

Figure 275. Recessing the brake caliper piston before installing the pads


  • if the pads are very worn, you will need to push the piston into the brake cylinder as shown in the picture 275. To do this, you can also install the inner shoe on the piston and slowly press it inward. At the same time, make sure that the brake fluid does not leak from the reservoir. If necessary, pump out some liquid.

When installing the pads, the following operations must be performed:
  • clean the contact surface under the brake pads in the caliper;
  • pump out some brake fluid from the master cylinder reservoir as described above;
  • push the piston into the cylinder. For this purpose, the clamp shown in the figure is used 275;

Figure 276. Inner shoe

Figure 276. Inner shoe

  • install the shoe with the spring into the caliper cylinder as shown in the figure 276, and press in the direction of the arrow;
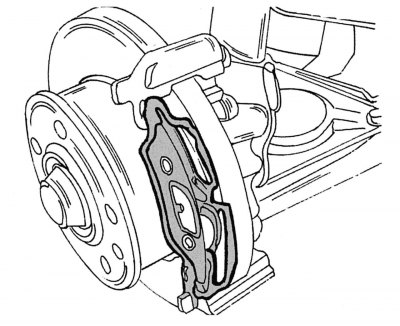
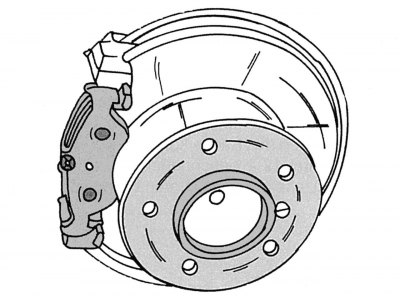
Figure 273. External shoe

Figure 273. External shoe


  • insert the outer shoe into the mounting locations of the caliper bracket so that it occupies the position shown in the figure 273;

Figure 282. Installing the outer shoe on the bracket

Figure 282. Installing the outer shoe on the bracket

  • insert the second pad into the caliper bracket. In this case, position its outer side as shown in the figure 282;

Figure 277. Tightening the caliper mounting bolts

Figure 277. Tightening the caliper mounting bolts

  • carefully position the cylinder body over the pads and screw the mounting bolts through the pads into the caliper bracket. Wrap them with a hexagon as shown in the picture 277, torque 25–28 Nm;
  • after tightening the bolts, put the caps on them;

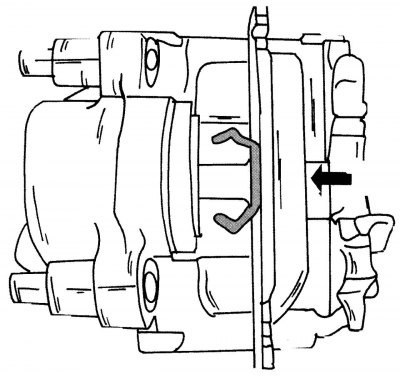
Figure 283. Installing the retaining spring

Figure 283. Installing the retaining spring


  • install the spring into the caliper and bracket. Check that the spring is installed correctly (figure 283);
  • twist the wear sensor wire into a spiral and connect it to the caliper contact;
  • press the brake pedal hard several times to get the pads to fit onto the disc;
  • if necessary, add brake fluid to the reservoir;
  • install the wheels, lower the vehicle and tighten the wheel bolts to 160–180 N·m;
  • after installation, press the brake pedal several times until its normal travel is established. If this is not done, the brakes may not work when the vehicle is first tested while moving. If the pedal "fails", check the tightness of the system. During the first trips after installing new pads, do not brake too sharply. To ensure that the brakes are properly adjusted, brake from 80 km/h to 40 km/h several times while pressing the pedal smoothly. Wait after each braking to ensure that the brakes do not overheat.

Recommendations for the use of brake pads


If the pads are too worn, you should make sure that the pistons of both brake calipers move normally. Otherwise, it is recommended to check the operation of the clamps at a service station. The pads should be replaced when their linings are worn to a thickness of 2.0 mm or less. You should also replace any brake pads that are oily or contaminated with grease. Only genuine Mercedes-Benz brake pads should be used and replaced only as a set. If the pads are worn down to the metal, the brake disc may be damaged. This, of course, must be avoided under all circumstances.

Brake discs containing traces of friction material from the linings should be thoroughly cleaned before installing new pads. New pads need to be broken in. To do this, smoothly press the brake pedal and brake several times from 80 km/h to 40 km/h. After each braking, it is necessary to pause so that the brakes do not overheat. Until the brake pads have been run in, it is important to avoid emergency braking.
This article is available at: russian, bulgarian, belarusian, ukrainian, serbian, croatian, romanian, polish, slovak, hungarian
The article has been verified: Levin Kirill Glebovich
Share with friends:
◀ Previous
Mercedes Sprinter / Brake system
Next ▶

Front Brake Caliper Repair
Removal and installation the front brake caliper
Replacing the front brake pads
Front disc brakes with floating caliper — general information
Checking brake pads
Installing and removing the rear caliper
Rear Brake Caliper Repair
Removal and installation the front brake disc
Removal the rear brake disc
Installing the rear brake disc
More similar articles for repairing other models

☛ Disc brake pads — removal, inspection and installation Mercedes W168 (1997-2004)
☛ Replacing rear brake pads Mercedes W203 (2000-2007)
☛ Replacing rear brake pads Mercedes W124 (1984-1995)
☛ Checking the condition and replacing brake pads Mercedes W463 (1999-2019)
☛ Assessing the degree of wear and replacing brake pads Mercedes W163 (1997-2005)
☛ Replacing rear brake pads Mercedes W116 (1972-1980, petrol)
Link in different formats to this article
Comments and feedback from visitors
No comments yet


How much will 21 + 28 ?


Vario 814D (1996-2003, diesel) 
  • General information
  • Maintenance
  • Power unit
  • Engines 602.984/985
  • Engines 904.908/914/923/936
  • Transmission
  • Clutch
  • Manual gearbox 711.613
  • Manual gearbox 710.64/66
  • Manual gearbox 715.051
  • Automatic gearbox 723.345
  • Power take-off box
  • Chassis
  • Front suspension
  • Rear suspension
  • Steering
  • Brake system
  • Body and electrical equipment
  • Interior (internal elements)
  • Exterior (external elements)
  • Heater and air conditioner
  • Electrical diagrams
Vito 2 (2003-2014, diesel) 
  • General information
  • User manual
  • Maintenance
  • Diesel engine OM646
  • Engine repair
  • Cooling and lubrication system
  • Power and exhaust system
  • Transmission
  • Clutch
  • Car gearbox
  • Chassis
  • Front suspension
  • Rear suspension
  • Steering
  • Brake system
  • Body
  • Body elements
  • Electrical equipment
  • Equipment and devices
  • Security systems
  • Electrical circuits
Vito 1 (1996-2003) 
  • General information
  • User manual
  • Maintenance
  • Petrol engines 2.0 l
  • Engine repair
  • Lubrication system
  • Cooling system
  • Power and control system
  • Petrol engines 2.8 l
  • Engine repair
  • Lubrication system
  • Cooling system
  • Power and control system
  • Diesel engines 2.3 l
  • Engine repair
  • Cooling system
  • Lubrication system
  • Turbocharging and recycling
  • Power and control system
  • Diesel engines 2.2 l
  • Engine repair
  • Cooling system
  • Lubrication system
  • Turbocharging and recycling
  • Power and control system
  • Transmission
  • Clutch
  • Mechanical gearbox
  • Automatic gearbox
  • Chassis
  • Front suspension and wheels
  • Rear suspension
  • Steering
  • Brake system
  • Body
  • Exterior (external elements)
  • Interior (internal elements)
  • Electrical equipment
  • Equipment and devices
  • Heater and air conditioner
  • Electrical circuits
Sprinter (1995-2000, diesel) 
  • General information
  • Introduction to the guide
  • Maintenance
  • Power unit
  • Engine repair
  • Lubrication system
  • Cooling system
  • Power and exhaust system
  • Transmission
  • Clutch
  • Mechanical gearbox
  • Automatic gearbox
  • Front axle
  • Rear axle and cardan
  • Chassis
  • Car suspension
  • Steering
  • Brake system
  • Tires and wheels
  • Electrical equipment
  • Equipment and devices
  • Headlights and lighting
  • Power devices
  • Electrical circuits
 
MercedesMan.ru © 2017–2026 · Mobile version · Read about Mercedes · Sitemap: EN BG BY UA RS HR RO PL SK HU · Feedback · Site search · Bookmark A-Class (W168) · C-Class (W201) · C-Class (W202) · C-Class (W203) · E-Class (W123) · E-Class (W124) · E-Class (W210) · G-Class (W463) · M-Class (W163) · S-Class (W116, petrol) · S-Class (W126, petrol) · S-Class (W140) · S-Class (W220) · Sprinter · Vito 1 · Vito 2 · Vario 814D ·
 
We only use cookies without which some of the site's features may not be available.