
Examination
Visual inspection of the condition of the brake pads
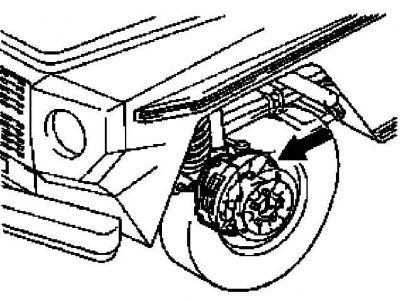
Arrow - Direction of View
1. A visual assessment of the state of the pads can be made through the opening in the rim and the viewing window in the remove the brake mechanism (arrow). In parallel, it makes sense to assess the condition of the brake disc.
2. Prepare replacement parts if necessary.
Removal and installation
Attention! Brake pads must be changed as a set at the same time for both wheels of the same axle!
Brakes with fixed calipers
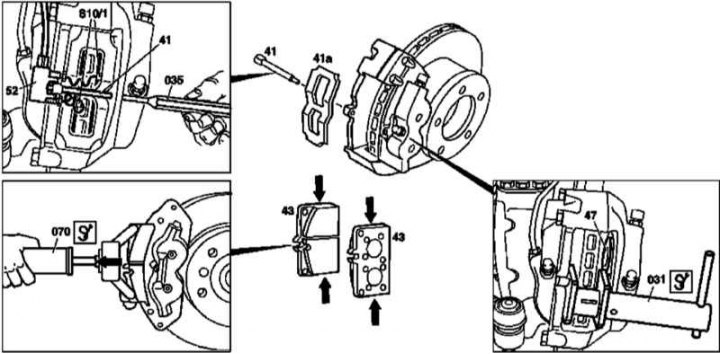
Details of installing brake pads in fixed calipers (1 of 2)
41 - Mounting pin; 41a - Spring plate; 43 - Pads; 47 - Piston wheel cylinder; 52 - Contact block; 031 - Squeezing device; 035 - Drift; 070 - Puller; S10 / 1 - Left front pad wear sensor
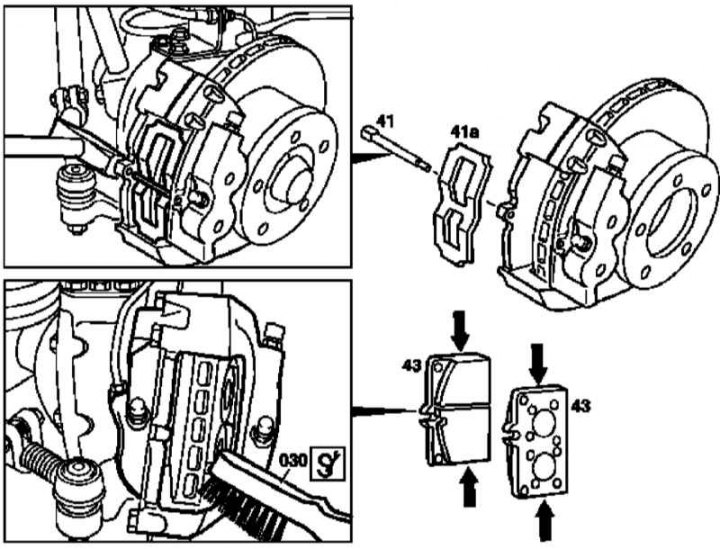
Details of installing brake pads in fixed calipers (2 of 2)
030 - Brush for cleaning the caliper
1. Release from the terminal block (52) pad wear sensor (S10/1 or S10/2).
2. With a punch (035) remove the pin (41).
3. Remove the steel spring plate (41a).
4. Using a puller (070) remove the brake pads (43).
5. Separate the friction lining wear sensor from the pad (S10/1 or S10/2).
Note. Failed sensors should be replaced.
6. Using a special tool (031) press the piston (47) wheel cylinder, - first pump out a little liquid from the tank, providing a certain reserve of volume to raise the level.
Note. The opposite pair of pistons should be blocked from being pushed out with wooden spacers.
7. In the same manner, depress the opposite pistons, being careful not to bend the heat shield.
8. Clean the guide surfaces of the caliper with a special brush (030).
9. Installation is carried out in the reverse order - before planting the pads, lightly lubricate their side surfaces (arrows) special paste. Make sure that the mounting pin is seated in the caliper until it stops - use the punch again.
10. Finally, check the level of the brake fluid in the tank, if necessary, make the appropriate adjustment.
Brakes with floating calipers
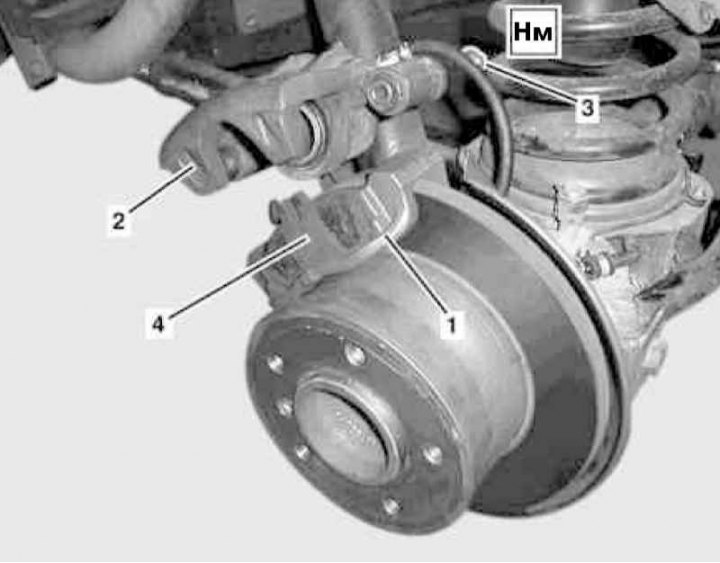
Details of installing brake pads in floating calipers (rear axle)
1 - Anchor bracket; 2 - Caliper; 3 - Bolts; 4 - Pads
1. Unscrew from the anchor bracket (1) bolts (3).
2. Without disconnecting the brake hose, remove the caliper (2).
3. Remove the brake pads (4).
4. Squeeze the pistons into the cylinders, - make sure that the liquid does not squeeze out over the edge of the GTZ reservoir, pump out the excess if necessary.
5. Clean the caliper with a special brush.
6. Installation is carried out in the reverse order. Do not forget to check and, if necessary, correct the liquid level in the GTZ tank.