
Cars BMW Cars Volkswagen Cars Chevrolet Cars Land Rover Cars Lada Cars Honda Cars Peugeot
English Русский
Български
Беларускі
Український
Српски
Hrvatski
Română
Polski
Slovenský
Magyar
Bookmark News and articles Sitemap Feedback Site search
MercedesMan.ru


A-Class C-Class E-Class G-Class M-Class S-Class Others
190 (W201) (1982-1993) W202 (1993-2000) W203 (2000-2007)
  • Main
  • C-Class
  • W203 (2000-2007)
  • Chassis
  • Brake system
  • Removal and installation the brake hose

Removal and installation the brake hose (Mercedes-Benz C-Class W203)

0
Contents: Removal ↡ Installation ↡
Caution! Follow the rules for handling brake fluid described in Section Bleeding the brake system.


The brake system pipes connect the main brake cylinder with the four wheel cylinders. The connection between the rigid and moving parts of the brake system, for example, between the calipers, is carried out by flexible high-pressure hoses. If there is visible damage, the latter must be replaced.

Caution: Do not allow brake hoses to come into contact with oil or fuel, do not paint them or coat them with underbody corrosion protection.


If one of the chambers of the brake fluid reservoir is completely empty (for example, if there is a leak in the brake system or if you forgot to add fluid to the reservoir when removing air), air is sucked into the system, which enters the ABS pump. In this case, air from the brake system must be removed at a service station using a special device.

Removal


1. Use a syringe to suck out the brake fluid from the reservoir.

2. Mark the position of the wheels relative to the hubs with paint. This will allow you to install the balanced wheels in their original position during assembly. Loosen the wheel mounting bolts before jacking up the car. Raise the car, place it on stands and remove the wheels.

Attention! The operation of lifting and installing the car on stands is associated with danger! Therefore, before carrying out the operation, read the Section Jacking and towing Introduction to the manual.


First operation: Disconnect the brake hose from the pipeline.
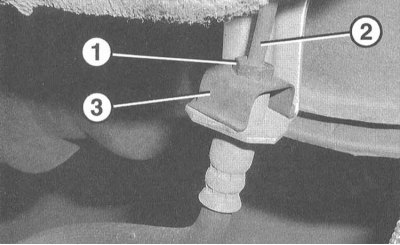


3. Unscrew the hollow bolt (1) and disconnect the brake line (2) from the hose.


3. Unscrew the hollow bolt (1) and disconnect the brake line (2) from the hose.

Caution! The brake hose must not be twisted.


4. Remove the clamp (3) and take the hose out of the holder.

Read more on the website mercedesman.ru

5. Immediately close the brake line and hose with plugs.

Attention! When opening the brake circuit, brake fluid will leak out. Drain it into a bottle that should be designed exclusively for this purpose. You can first suck the fluid out of the reservoir using a special device.


6. Front wheel brake: Remove the brake hose from the holder on the shock absorber strut.

Second operation: Unscrew the brake hose from the caliper.
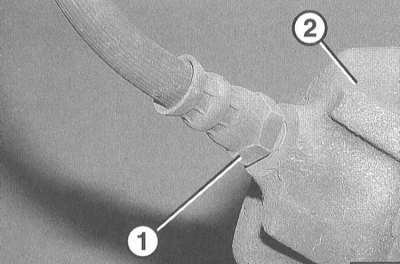
7. Unscrew the brake hose (1) from the caliper (2).


7. Unscrew the brake hose (1) from the caliper (2).

Warning! Brake fluid leaks from the caliper connection hole. Take precautions.


Installation


Caution: Install hoses recommended by the manufacturer.


1. Tighten the brake hose to the caliper with a torque of 18 Nm.

2. Front wheel brake: Route the hose through the holder on the shock absorber strut.

3. Secure the hose in the holders and insert it into the retaining clip. Screw the hollow bolt of the brake pipe into the hose connecting element and secure it with a torque of 14 Nm.

Caution: Do not allow the brake hose to twist.


4. To bleed the brake system, refer to the relevant section.

5. After bleeding the brake system, fill the reservoir with fluid to the MAX mark and screw on the cap.

6. Install the wheels so that the marks made during removal match. Pre-lubricate the centering belt of the wheel disk on the hub with a thin layer of bearing grease. Do not lubricate the wheel mounting bolts. Replace rusty bolts. Tighten the bolts. Lower the car onto the wheels and tighten the bolts crosswise to 110 Nm.

Attention! The brake hose must not touch any suspension elements when the steering wheel is fully turned to the right and left, as well as when the car is raised and lowered on shock absorbers. In any road situation, the hose must be at a sufficient distance from adjacent structures.


Conduct a reliability check:
  • Are the brake hoses secured?
  • Is the brake hose secured in the holder?
  • Are the air bleed nipples tightened?
  • Is there enough brake fluid?
  • With the engine running, check for leaks. To do this, press the brake pedal with a force of 200-300 N (20-30 kg) for 10 s. The pedal should not weaken. Check all connections for leaks.

7. Check the operation of the brake system on a road with light traffic. To do this, it is necessary to perform at least one strong braking using the ABS action (can be felt by the pulsation of the brake pedal).

Attention! Watch closely for the transport following you.
This article is available at: russian, bulgarian, belarusian, ukrainian, serbian, croatian, romanian, polish, slovak, hungarian
The article has been verified: Rodionov Artyom Semyonovich
Share with friends:
◀ Previous
C-Class W203 / Brake system
Next ▶

Bleeding the brake system
Removal and installation the brake light switch
Removal and installation the parking brake cable
Replacing the parking brake pads
Dual master cylinder
Checking the brake booster
More similar articles for repairing other models

☛ Brake fluid — checking the level Mercedes W168 (1997-2004)
☛ Removal the brake hose Mercedes W210 (1996-2002)
☛ Emergency Brake Booster (BAS) Mercedes W463 (1999-2019)
☛ Emergency Brake Booster (BAS) Mercedes W163 (1997-2005)
☛ Emergency Brake Booster (BAS) Mercedes W140 (1991-1998)
☛ Checking the brake fluid level Mercedes Sprinter (1995-2000, diesel)
Link in different formats to this article
Comments and feedback from visitors
No comments yet


How much will 39 + 32 ?


W203 (2000-2007) 
  • General information
  • Introduction to guide
  • User manual
  • Maintenance
  • Power unit
  • Gasoline engines
  • Diesel engines
  • Cooling system
  • Ventilation and heating
  • Supply system
  • Injection system (gasoline)
  • Injection system (diesel)
  • Exhaust system
  • Ignition and control system
  • Charge and launch systems
  • Transmission
  • Mechanical gearbox
  • Automatic gearbox
  • Clutch and drive shafts
  • Differential
  • Chassis
  • Brake system
  • Car suspension
  • Steering
  • Body
  • Exterior (external elements)
  • Interior (internal elements)
  • Electrical equipment
  • Equipment and devices
  • Lighting system
  • Electrical diagrams (2000)
  • Electrical diagrams (since 2001)
W202 (1993-2000) 
  • General information
  • User manual
  • Driving a car
  • Car care
  • Maintenance
  • Power unit
  • Gasoline engines
  • Diesel engines
  • Lubrication system
  • Cooling system
  • Heating and ventilation
  • Ignition system
  • Fuel system
  • Injection system (gasoline)
  • Injection system (diesel)
  • Exhaust system
  • Transmission
  • Clutch
  • Car gearbox
  • Chassis
  • Suspension, wheels and tires
  • Steering
  • Brake system
  • Body
  • Exterior (external elements)
  • Interior (internal elements)
  • Doors and windows
  • Electrical equipment
  • Equipment and devices
  • Power devices
  • Lighting system
  • Electrical circuits
190 (W201) (1982-1993) 
  • General information
  • Introduction to the guide
  • Operation and care
  • Maintenance (gasoline)
  • Maintenance (diesel)
  • Troubleshooting
  • Power unit
  • Petrol engine I4
  • Petrol engine V6
  • Diesel engines
  • Engine overhaul
  • Cooling and heating
  • Power system (carburetor)
  • Injection system (gasoline)
  • Injection system (diesel)
  • Exhaust system
  • Charge and start system
  • Ignition system (I4)
  • Ignition system (V6)
  • Diesel heating system
  • Transmission
  • Clutch
  • Mechanical gearbox
  • Automatic gearbox
  • Cardan shaft and axle shafts
  • Chassis
  • Brake system
  • Car suspension
  • Steering
  • Body
  • Exterior (external elements)
  • Interior (internal elements)
  • Doors, locks and windows
  • Electrical equipment
  • Equipment and devices
  • Electrical circuits
 
MercedesMan.ru © 2017–2026 · Mobile version · Read about Mercedes · Sitemap: EN BG BY UA RS HR RO PL SK HU · Feedback · Site search · Bookmark A-Class (W168) · C-Class (W201) · C-Class (W202) · C-Class (W203) · E-Class (W123) · E-Class (W124) · E-Class (W210) · G-Class (W463) · M-Class (W163) · S-Class (W116, petrol) · S-Class (W126, petrol) · S-Class (W140) · S-Class (W220) · Sprinter · Vito 1 · Vito 2 · Vario 814D ·
 
We only use cookies without which some of the site's features may not be available.