
Note: Models in question may be fitted with BENDIX, GIRLING and TEVES brake calipers. They differ slightly from each other in the brake pad mounting system.
Removing
Loosen wheel bolts.
Jack up the car and support it.
Remove front or rear wheels.
Note: Outer and inner chocks or chocks for right and left wheels are not interchangeable. If the pads are mixed up during installation, this can lead to malfunctioning of the brakes. Always replace all brake pads on the same axle at the same time.
Pull out the plug (3) brake pad wear indicator (if installed) from the corresponding connector (4). The figure shows the BENDIX/GIRLING brake caliper.
Pull pin out of finger (2) and drive the fingers out with the help of a beard (5).
Remove springs (1), fixing the brake pads.
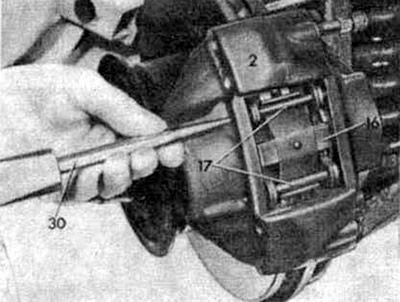
Remove fingers from caliper (17) with the help of a beard (30). The figure shows the brake caliper of the TEVES system.
Remove transverse spring (16).
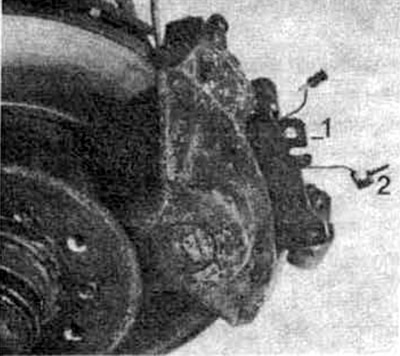
Remove brake pad wear sensor (2) (if installed).
Attention: If the insulation of the contact pin is worn through or the insulation of the sensor or the wire leading to it is damaged, the sensor must be replaced.
Pull out the brake lining (1) using pliers or a screwdriver. If the lining is rusted to the block, you will have to use a special puller.
Press the brake shoe so that the pistons enter their cylinders and pull it out. Repeat the above steps for the second block.
Installation
Attention: Do not press the brake pedal with the brake pads removed, as this will push the pistons out of their cylinders.
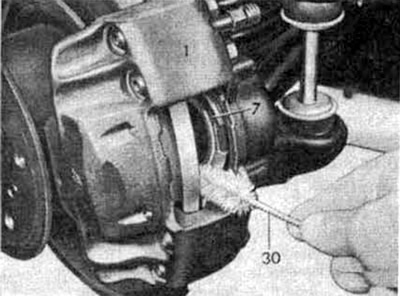
Clean the contact surfaces of the pads with the caliper with a soft metal brush and a vacuum cleaner or wipe them with alcohol. Do not use mineral oil based solvents or sharp tools.
Before installing the pads, run your hand over the brake disc and check that there is no "combs". The defective disk must be replaced. Discs with gray or blue spots must be cleaned before installing new brake pads.
Measure the thickness of the brake discs.
Check the anthers for cracks. Defective anthers must be replaced, as dirt entering the caliper causes brake fluid to leak. In case of leaks, the caliper must be removed and disassembled for repair (carried out in a specialized workshop).
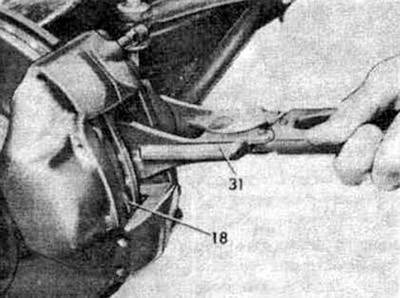
Press both pistons into place using special tongs (31). This operation can be done with a hard wooden tool (e.g. hammer handles), however, care must be taken not to damage the pistons or anthers.
Attention: When pushing one piston into place, hold the second one with a brake shoe (18). because otherwise it will be pushed out. If necessary, you can use the old brake pad.
Attention: When pushing the pistons into the cylinders, the brake fluid from them flows back into the reservoir. Monitor the level of liquid in the tank, if necessary, sucking off its excess with a pear.
Remember that brake fluid is poisonous and should never be sucked out by mouth through a tube. It is necessary to use only a pear or syringe specially allocated for this purpose. After installing the pads, check that the fluid in the tank does not exceed the maximum mark, as it tends to expand when heated. Spilled brake fluid flows down the brake master cylinder and can cause damage and corrosion.
Note: When redundant.» If the brake pads are worn, the pistons should be checked for freedom of movement If the pistons are sticking, the brake caliper needs to be repaired (produced in the workshop).
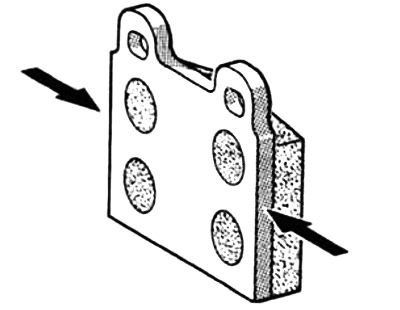
To prevent "screech" brakes should be applied to the rear surfaces of the brake pads, as well as the side surfaces of the brake discs (see arrows) special grease (e.g. Plastitube, Tunap VC 582/S, Chevron SRJ/ 2, Liqui Moly LM-36 or LM-508-ASC). In no case should grease get on the working surfaces of the pads. If it accidentally gets on the working surfaces of the pads, immediately remove it with alcohol.
Install the brake pads into the caliper.
Install the springs that secure the pads, being careful not to damage the anthers. Be careful not to pinch the spring between the anther and the caliper.
Drive the fingers into place from the inside out, placing them so that they can be pushed through the brake pads. When driving your fingers into place, make sure that they do not turn.
Push your fingers into the caliper cylinders and check the security of the springs.
Install the transverse spring and pin retainers.
Caution: When replacing the shoes, always also replace the shoes return spring.
Install the brake pad wear indicator sensor (if available) and connect it to the connector on the caliper.
Replace the wheel, lower the machine and tighten the wheel bolts in a diagonal sequence.
Attention: After finishing work, depress the brake pedal several times with the engine off, until a pronounced resistance of the pedal is felt.
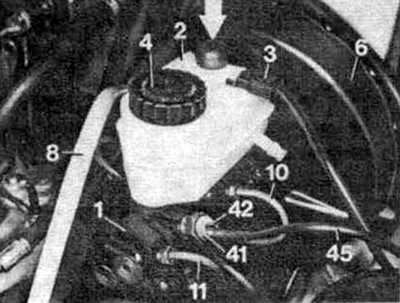
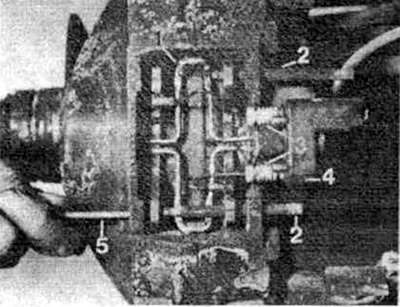
1. Brake master cylinder, 3. Low brake fluid level warning plug, 4. Cap, 6. Brake servo cylinder, 8. Vacuum tube, 10, 11. Brake pipes, 45. SPD switch wire. The arrow shows the switch for the low brake fluid level indicator.
Check fluid level in reservoir (2) and, if necessary, top up to the maximum mark.
Note: On models equipped with a differential pressure switch (SPD), the indicator lamp.may light up after changing the pads. This» case, it is necessary to press the pin inward (42) at the switch (41).
Run in new pads by braking slowly from 80 to 40 km/h several times. Allow the brakes to cool down between braking.
Attention: After changing the pads, sudden braking should be avoided for the first 200 km.