



Vehicle fuel system Mercedes S-Class (W126)

Carburetor Solex 4A-1 — design description
The Solex carburetor is a two-chamber carburetor, which consists of 4 main parts connected with screws to each other: the carburetor cover, the carburetor body, the...
The Solex carburetor is a two-chamber carburetor, which consists of 4 main parts connected with screws to each other: the carburetor cover, the carburetor body, the...

Adjusting idle speed and CO content
Warm up the engine, then turn it off, oil temperature 75-85°C. Turn off the air conditioning system, on an automatic transmission, set the lever to position "P". Turn...
Warm up the engine, then turn it off, oil temperature 75-85°C. Turn off the air conditioning system, on an automatic transmission, set the lever to position "P". Turn...

Checking the idle shut-off valves
Two idle shut-off valves close the idle channels when the ignition is switched off, thus preventing further engine operation. The valves remain closed until voltage is...
Two idle shut-off valves close the idle channels when the ignition is switched off, thus preventing further engine operation. The valves remain closed until voltage is...

Air filter — removal and installation
Removal Remove the rubber tube (2) from the carburetor inlet fitting, having first loosened the clamp. Remove the 3 fastening nuts for the air filter cover (10). Remove...
Removal Remove the rubber tube (2) from the carburetor inlet fitting, having first loosened the clamp. Remove the 3 fastening nuts for the air filter cover (10). Remove...

Changing the air filter element
The air filter element should be replaced every 60,000 km. When operating in dusty areas, replacement should be done more often. Remove the air filter cover. Remove the...
The air filter element should be replaced every 60,000 km. When operating in dusty areas, replacement should be done more often. Remove the air filter cover. Remove the...

Checking the vacuum regulator
Whenever the engine is loaded more heavily at idle and the speed drops, for example when a gear is engaged or the air conditioning system is switched on, the vacuum...
Whenever the engine is loaded more heavily at idle and the speed drops, for example when a gear is engaged or the air conditioning system is switched on, the vacuum...

Checking the air piston damper oil level
Warm up the engine to operating temperature. Oil temperature -70-80°C. Unscrew the cap bolt and remove it together with the air piston damper. The oil level should reach...
Warm up the engine to operating temperature. Oil temperature -70-80°C. Unscrew the cap bolt and remove it together with the air piston damper. The oil level should reach...

Adjusting the tempomat
Start the engine and let it idle. Unhook the adjusting rod (21) of the actuator lever, then press the lever clockwise to the idle position. Adjust the adjusting rod so...
Start the engine and let it idle. Unhook the adjusting rod (21) of the actuator lever, then press the lever clockwise to the idle position. Adjust the adjusting rod so...

Checking the idle air cut-off valve
Note: Depending on the carburetor version, 2 idle shut-off valves with different functions are installed. The idle cut-off valve closes the fuel supply to the fuel jet...
Note: Depending on the carburetor version, 2 idle shut-off valves with different functions are installed. The idle cut-off valve closes the fuel supply to the fuel jet...

Checking the ground connection on the carburetor
Connect a test lamp between the carburetor and the positive terminal of the battery. If the lamp lights up and the idle speed cut-off valve does not turn off despite the...
Connect a test lamp between the carburetor and the positive terminal of the battery. If the lamp lights up and the idle speed cut-off valve does not turn off despite the...

Checking the idle speed cut-off valve relay
Start the engine and let it idle. Connect a voltmeter between the removed idle air control valve plug and ground. Turn off the ignition. The device should now show the...
Start the engine and let it idle. Connect a voltmeter between the removed idle air control valve plug and ground. Turn off the ignition. The device should now show the...

Idle Speed Control Valve — Removal and Installation
Note: Depending on the carburetor version, 2 different idle code shut-off valves are installed. While the CDT carburetor from 07.80 has the shut-off valve screwed into...
Note: Depending on the carburetor version, 2 different idle code shut-off valves are installed. While the CDT carburetor from 07.80 has the shut-off valve screwed into...

Adjusting warm engine speed and CO content in exhaust gases
Connect the tachometer and CO meter according to the operating instructions. Warm up the engine to operating temperature. Oil temperature 70-80°C. Remove the temperature...
Connect the tachometer and CO meter according to the operating instructions. Warm up the engine to operating temperature. Oil temperature 70-80°C. Remove the temperature...

Checking the Thermal Delay Valve / Pull-down Valve
A cold engine receives a particularly rich hot mixture when starting, making it easier to start. When the engine is running, the Pull-down device closes the enrichment...
A cold engine receives a particularly rich hot mixture when starting, making it easier to start. When the engine is running, the Pull-down device closes the enrichment...

Automatic start device — removal and installation
Removal When the engine is warm, reduce excess pressure in the cooling system. Loosen the coolant hose on the starter cover, loosen the clamp and slide it back, then...
Removal When the engine is warm, reduce excess pressure in the cooling system. Loosen the coolant hose on the starter cover, loosen the clamp and slide it back, then...

Fuel tank — general information
Fuel leaves the tank through a filter, which is connected with a drain bolt. Air is admitted and released into the fuel tank through tubes and a filler neck in the fuel...
Fuel leaves the tank through a filter, which is connected with a drain bolt. Air is admitted and released into the fuel tank through tubes and a filler neck in the fuel...

Fuel pump — check
1. Round gasket. 2. Filter. 3. Cover. 4. Sealing ring. Carburetor engines The fuel pump is driven by a pushrod via a cam on the oil pump drive shaft. The individual...
1. Round gasket. 2. Filter. 3. Cover. 4. Sealing ring. Carburetor engines The fuel pump is driven by a pushrod via a cam on the oil pump drive shaft. The individual...

Fuel pump — removal and installation
Removal Warning: Avoid open flames, fire hazard! Clamp the inlet and outlet hoses (1) and (2). If there are no suitable clamps, then after removing the hoses, insert a...
Removal Warning: Avoid open flames, fire hazard! Clamp the inlet and outlet hoses (1) and (2). If there are no suitable clamps, then after removing the hoses, insert a...
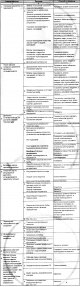
Carburetor fault diagnostics
If there are problems with the fuel supply, the system must be checked in the following sequence: Check if there is fuel in the tank. Remove the fuel hose between the...
If there are problems with the fuel supply, the system must be checked in the following sequence: Check if there is fuel in the tank. Remove the fuel hose between the...

Engine Fuel System Specifications
Engine Fuel System Specifications Note: A removed pressure plate must never be subjected to a press or similar action, as once the pressure ring travels more than 11 mm,...
Engine Fuel System Specifications Note: A removed pressure plate must never be subjected to a press or similar action, as once the pressure ring travels more than 11 mm,...
This section is available on: russian, bulgarian, belarusian, ukrainian, serbian, croatian, romanian, polish, slovak, hungarian
More similar sections for repairing other models
☛ Power unit: Fuel system car Mercedes W168 (1997-2004)
☛ Power unit: Fuel system car Mercedes W202 (1993-2000)
☛ Power unit: Diesel fuel system car Mercedes W124 (1984-1995)
☛ Power unit: Power system (gasoline) car Mercedes W463 (1999-2019)
☛ Power unit: Power system (gasoline) car Mercedes W163 (1997-2005)
☛ Diesel engine OM646: Power and exhaust system car Mercedes Vito 2 (2003-2014, diesel)
Link in different formats to this section
TEXTHTMLBB Code
- General information
- Introduction to guide
- User manual
- Maintenance
- Power unit
- Engine repair
- Cooling and heating systems
- Power and exhaust systems
- Ignition and control system
- Charge and launch systems
- Transmission
- Automatic gearbox
- Drive shafts
- Chassis
- Brake system
- Front suspension
- Rear suspension
- Steering
- Body
- Body elements
- Electrical equipment
- Equipment and devices
- Electrical circuits
- User manual
- Controls and instruments
- Driving and operation
- Maintenance
- Power unit
- Petrol engine V6
- Petrol engine V8
- Petrol engine V12
- Diesel engine OM603
- Diesel engine OM606
- Cooling system
- Power supply and injection system
- Control system HFM-SFI
- Control system LH-SFI
- Control systems ME-SFI
- Diesel control system
- Ignition system
- Charge and launch system
- Transmission
- Mechanical gearbox 717.438
- Mechanical gearbox 717.454
- Automatic gearbox 722.5
- Automatic gearbox 722.6
- Clutch and drive shafts
- Differential
- Chassis
- Brake system
- Steering
- Front suspension
- Rear suspension
- Body
- Exterior (external elements)
- Interior (internal elements)
- Electrical equipment
- Equipment and devices
- Electrical circuits
- General information
- Introduction to guide
- Power unit
- 8-cylinder V8 engine
- 6-cylinder I6 engine
- Cooling and lubrication system
- Power system (carburetor)
- Fuel injection system
- Ignition system
- Transmission
- Clutch and cardan
- Car gearbox
- Chassis
- Front suspension
- Rear suspension
- Steering
- Brake system
- Electrical equipment
- Power devices
- Electrical circuits