
Cars BMW Cars Volkswagen Cars Chevrolet Cars Land Rover Cars Lada Cars Honda Cars Peugeot
English Русский
Български
Беларускі
Український
Српски
Hrvatski
Română
Polski
Slovenský
Magyar
Bookmark News and articles Sitemap Feedback Site search
MercedesMan.ru


A-Class C-Class E-Class G-Class M-Class S-Class Others
W116 (1972-1980, petrol) W126 (1979-1991, petrol) W140 (1991-1998) W220 (1998-2005)
  • Main
  • S-Class
  • W126 (1979-1991)
  • Power unit
  • Fuel system
  • Checking the Thermal Delay Valve / Pull-down Valve

Checking the Thermal Delay Valve / Pull-down Valve (Mercedes-Benz S-Class W126)

0
Contents: Checking the work ↡ Checking the delay time ↡
A cold engine receives a particularly rich hot mixture when starting, making it easier to start. When the engine is running, the Pull-down device closes the enrichment valve under vacuum to prevent the mixture from becoming too rich. The thermal delay valve determines when the Pull-down device is activated after the engine has started. While the Pull-down device is already active when the engine is warm, at low temperatures the valve "delays" the activation moment.

Warm up the engine to operating temperature. The oil temperature should be 70-80°C.

Checking the work


Checking the work


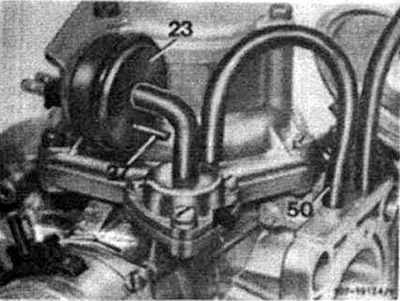
Remove the vacuum hose (50) from the carburetor.

Draw air from the vacuum hose with your mouth, making sure no air passes through. Otherwise, the sealing ring in the thermal delay valve (23) is defective or the bimetallic plate of the valve does not turn on. In this case, replace the valve. Other parts: 27 - air tube for the thermal delay valve.

Remove the thermal delay valve.

Cool the valve, for example, under a stream of water, while sucking air through the vacuum hose located in the middle of the valve. As soon as the valve temperature drops below +20°C, the air flow should turn on. Otherwise, the bimetallic plate of the valve is defective, replace the valve.


Checking the electric heating

Reinstall the thermal delay valve. Attach the test hose to the middle connection pipe of the valve.

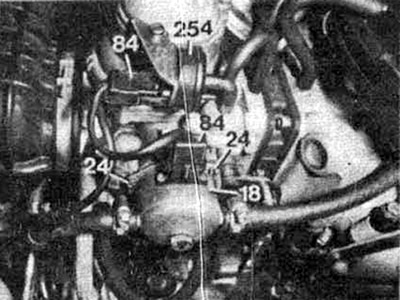
Start the engine (assistant) and simultaneously suck air through the test hose. After a few seconds the valve should click and there should be no more air flow.
Start the engine (assistant) and simultaneously suck air through the test hose. After a few seconds…


If the valve does not turn on, remove the plug (84) and, with the engine running, connect the test lamp between its contacts. If the lamp lights up, replace the thermal delay valve, otherwise check the 8 A fuse in the additional fuse box and the wires with connectors according to the wiring diagram. The additional fuse box is located either on or near the relay board at the left pillar. It includes 2 fuses (second fuse 25A). Other details!: (254) - thermal delay valve; (25) - tension screws for the starter cover (18).

Checking the delay time


Test condition: Temperature of thermal delay valve is less than +20°C, engine is cold.

Remove the hose (50) from the carburetor and draw air through it. There should be air flow.

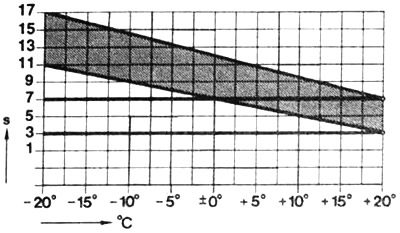
At the same time, start the engine (assistant) and measure the stop time until the valve switches, when there is no more air flow.


At the same time, start the engine (assistant) and measure the stop time until the valve switches,…


The measured time is the delay time. Compare this time with the reference time shown in the diagram. For example: Ambient temperature +15°C, the measured time is about 6 seconds, therefore within the permissible range. The valve is OK in terms of delay time. The permissible range of times at -15°C is between 10 and 16 seconds.

If the valve does not turn on or the turn-on time is outside the permissible range, then with the engine running, remove the thermal delay valve plug and check the voltage and ground connections on the plug with a voltmeter. To do this, connect the voltmeter to the red-black wire and ground, then connect the voltmeter to the brown wire (-) and to the positive pole of the battery. If both times the battery voltage is shown (about 12 V), then replace the thermal delay valve. Otherwise, check the 8 A fuse in the additional fuse box and the electrical connections according to the diagram.
This article is available at: russian, bulgarian, belarusian, ukrainian, serbian, croatian, romanian, polish, slovak, hungarian
The article has been verified: Burova Vera Semenovna
Share with friends:
◀ Previous
S-Class W126 / Fuel system
Next ▶

Adjusting warm engine speed and CO content in exhaust gases
Idle Speed Control Valve — Removal and Installation
Checking the idle speed cut-off valve relay
Checking the ground connection on the carburetor
Checking the idle air cut-off valve
Automatic start device — removal and installation
Fuel tank — general information
Fuel pump — check
Fuel pump — removal and installation
Carburetor fault diagnostics
More similar articles for repairing other models

☛ Fuel Shut-Off Solenoid Valve — Removal and Installation Mercedes W168 (1997-2004)
☛ Checking the valve of an air tube or tire Mercedes W202 (1993-2000)
☛ Checking the thermal valve Mercedes W123 (1976-1985)
☛ Removal and installation the EVAP canister purge valve Mercedes W463 (1999-2019)
☛ Checking the non-return valve Mercedes W163 (1997-2005)
☛ Checking hydraulic valve clearance compensators Mercedes Vito 2 (2003-2014, diesel)
Link in different formats to this article
Comments and feedback from visitors
No comments yet


How much will 13 + 43 ?


W220 (1998-2005) 
  • General information
  • Introduction to guide
  • User manual
  • Maintenance
  • Power unit
  • Engine repair
  • Cooling and heating systems
  • Power and exhaust systems
  • Ignition and control system
  • Charge and launch systems
  • Transmission
  • Automatic gearbox
  • Drive shafts
  • Chassis
  • Brake system
  • Front suspension
  • Rear suspension
  • Steering
  • Body
  • Body elements
  • Electrical equipment
  • Equipment and devices
  • Electrical circuits
W140 (1991-1998) 
  • User manual
  • Controls and instruments
  • Driving and operation
  • Maintenance
  • Power unit
  • Petrol engine V6
  • Petrol engine V8
  • Petrol engine V12
  • Diesel engine OM603
  • Diesel engine OM606
  • Cooling system
  • Power supply and injection system
  • Control system HFM-SFI
  • Control system LH-SFI
  • Control systems ME-SFI
  • Diesel control system
  • Ignition system
  • Charge and launch system
  • Transmission
  • Mechanical gearbox 717.438
  • Mechanical gearbox 717.454
  • Automatic gearbox 722.5
  • Automatic gearbox 722.6
  • Clutch and drive shafts
  • Differential
  • Chassis
  • Brake system
  • Steering
  • Front suspension
  • Rear suspension
  • Body
  • Exterior (external elements)
  • Interior (internal elements)
  • Electrical equipment
  • Equipment and devices
  • Electrical circuits
W126 (1979-1991, petrol) 
  • Power unit
  • Engine repair
  • Ignition system
  • Lubrication system
  • Cooling system
  • Fuel system
  • Fuel injection system
  • Transmission
  • Clutch and cardan
  • Mechanical gearbox
  • Automatic gearbox
  • Chassis
  • Front suspension
  • Rear suspension
  • Steering
  • Brake system
  • Electrical equipment
  • Power devices
  • Electrical circuits
W116 (1972-1980, petrol) 
  • General information
  • Introduction to guide
  • Power unit
  • 8-cylinder V8 engine
  • 6-cylinder I6 engine
  • Cooling and lubrication system
  • Power system (carburetor)
  • Fuel injection system
  • Ignition system
  • Transmission
  • Clutch and cardan
  • Car gearbox
  • Chassis
  • Front suspension
  • Rear suspension
  • Steering
  • Brake system
  • Electrical equipment
  • Power devices
  • Electrical circuits
 
MercedesMan.ru © 2017–2026 · Mobile version · Read about Mercedes · Sitemap: EN BG BY UA RS HR RO PL SK HU · Feedback · Site search · Bookmark A-Class (W168) · C-Class (W201) · C-Class (W202) · C-Class (W203) · E-Class (W123) · E-Class (W124) · E-Class (W210) · G-Class (W463) · M-Class (W163) · S-Class (W116, petrol) · S-Class (W126, petrol) · S-Class (W140) · S-Class (W220) · Sprinter · Vito 1 · Vito 2 · Vario 814D ·
 
We only use cookies without which some of the site's features may not be available.