

Pic. 8.11. Front wheel brakes with ventilated discs: 1 - bracket; 2 - caliper bracket; 3 – fitting for pumping with a protective cover; 4 - inner block; 5 - connection of the pad wear sensor
For this operation it is necessary to remove the wheels. The front wheels are equipped with ventilated brake discs, which, thanks to this design, well remove heat from friction (pic. 8.11). Solid discs on the rear wheels (without ventilation holes). When checking the pads, you should always inspect the brake discs, at least when replacing the pads. Discs with scratches, wear grooves, in addition to deteriorating braking performance, lead to increased pad wear.
Sequence of work
1. A blue disk is not a malfunction.
2. Pay attention to the marks and signs of wear on the disc. They appear from dirt or too worn pads. If the depth of the scratches is more than 0.5 mm, the disc needs to be replaced. Ventilated discs with thread-like scratches up to 25 mm long may not be replaced. However, when they increase, replacement is required.
3. Check the runout of the disc - it should not touch the pads when they are lightly reduced.
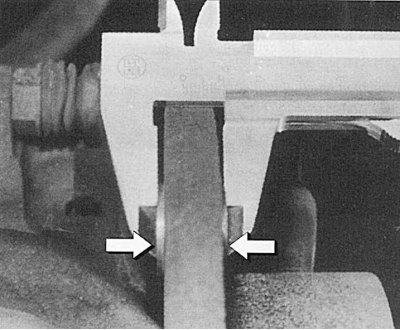
Pic. 8.12. Measuring disc thickness with two coins (arrows)
4. Check the disc thickness in several places. It is best to measure with a caliper, after placing two coins on the disk under its jaws (pic. 8.12) - with a worn disc, measurements will be more accurate. Don't forget to subtract the thickness of the coins from the result.
5. Brake discs cannot be machined.
6. Worn discs should always be replaced in pairs.
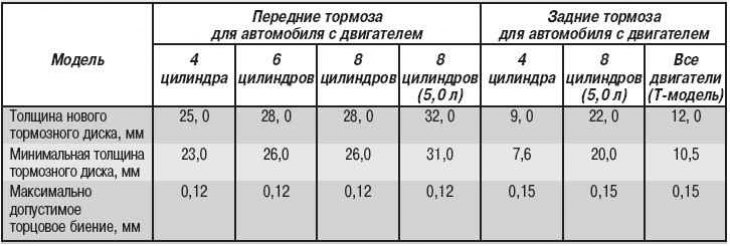
Brake disc dimensions
The sizes of brake disks for cars with diesel engines are presented in tab. 8.1.
Table 8.1. Dimensions of brake discs for vehicles with diesel engines

The sizes of brake disks for cars with petrol engines are presented in tab. 8.2.
Table 8.2. Sizes of brake discs for vehicles with petrol engines
Recommendations for the maintenance and repair of the brake system
1. If you open a closed hydraulic brake system anywhere, working fluid will leak out. This interferes with work, and then topping up the brake fluid will be required. This can be avoided as follows: before starting work, first open the brake bleed valve for the corresponding wheel. Press the brake pedal and hold it. To do this, you can use a wooden stick of the appropriate length, which should be clamped between the pedal and the driver's seat. The pistons in the master cylinder in this position block the brake fluid supply holes, so it does not flow out.
2. When repairing calipers or pistons of brake cylinders, in no case should oil or other substance be used for lubrication. Brake fluid must not come into contact with them. In addition, the lubricant will become more liquid when heated and can get on the working surfaces of the brake mechanism. Special lubricants are required, which are usually included with spare parts. When installing a piston in a brake cylinder, for example, a special brake cylinder paste is used (by ATE). This substance is also applied to the inside of the new protective boot.
3. A brake caliper that was completely emptied of brake fluid during disassembly can cause some difficulty when bleeding the system. Even if you repeatedly press the brake pedal, fluid may not flow into it. In this case, proceed as follows: after installing the caliper, do not attach the upper end of the brake hose to the brake system pipeline. Suck in brake fluid through the open bleeder valve until fluid flows out of the upper end of the brake hose. After that fix a brake hose and wrap the union for prorolling. After that, pump the system. To pump in brake fluid, use a new plastic container filled with brake fluid and connected through a transparent hose with a bleeder fitting. In this case, it is necessary to lift the container and pump brake fluid without air bubbles into the brake mechanism.
4. Be careful when handling brake fluid. It is aggressive towards paintwork and is very toxic. Avoid getting it in your mouth or on open wounds.
5. Brake fluid drained from the system cannot be reused. Do not use liquid from a container that has been left open for a long time. Used brake fluid must be disposed of properly.
6. After working on the hydraulic brakes, check the pressure: to do this, press the brake pedal strongly several times. Then, with the engine running, firmly press the pedal again (200–300 N). The pressure in the system must be maintained, i.e. pedal resistance should not decrease.
7. Rubber parts of the brake system that have been exposed to oil must be replaced.
Attention! After completing the work, press the brake pedal several times to set the shoes to the normal position. If this is not done, the brakes will not work on the first braking. The new brake pads need to be carefully run in. To do this, by gently pressing the pedal several times, brake the car from a speed of 80–40 km/h.