
Cars BMW Cars Volkswagen Cars Chevrolet Cars Land Rover Cars Lada Cars Honda Cars Peugeot
English Русский
Български
Беларускі
Український
Српски
Hrvatski
Română
Polski
Slovenský
Magyar
Bookmark News and articles Sitemap Feedback Site search
MercedesMan.ru


A-Class C-Class E-Class G-Class M-Class S-Class Others
190 (W201) (1982-1993) W202 (1993-2000) W203 (2000-2007)
  • Main
  • C-Class
  • W202 (1993-2000)
  • Chassis
  • Brake system
  • Checking the thickness of brake discs and their lateral runout

Checking the thickness of brake discs and their lateral runout (Mercedes-Benz C-Class W202)

0
1. Mark the position of the wheels relative to the hub with paint. This will allow the balanced wheel to be put back in place after removal so that the balance is not disturbed. Loosen the wheel bolts without lifting the car, then lift the car and remove the wheels.

1. Mark the position of the wheels relative to the hub with paint. This will allow the balanced…


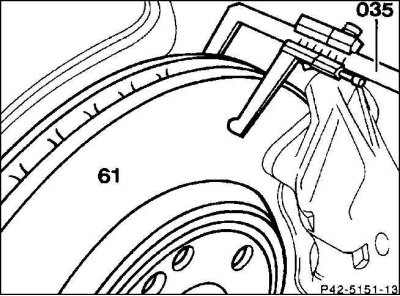
2. Measure the thickness of the brake discs. In workshops, a micrometer or a special caliper (035) is used for this, since a ridge forms on the edge of the disc when worn. You can also measure the thickness of the discs with a regular caliper, but in this case, a rigid lining should be used on each side of the brake disc (for example, 2 coins). To find out the thickness of the disc, the thickness of the gaskets should be subtracted from the readings.

Note! For more precise measurements using a micrometer, measurements must be taken at least at eight points on the disc. The thickness must remain constant within a tolerance of 0.02 mm.


3. Once the minimum thickness is reached, the brake pads can be changed again. If the wear limit is reached, replace the brake discs.

4. Cooled brake discs with thin cracks up to 25 mm in length, which may occur due to high loads, do not need to be replaced. In case of large cracks or unevenness deeper than 0.5 mm, replace the discs.


5. Repair of brake discs is not allowed. Both discs on the axle must be replaced.
5. Repair of brake discs is not allowed. Both discs on the axle must be replaced.


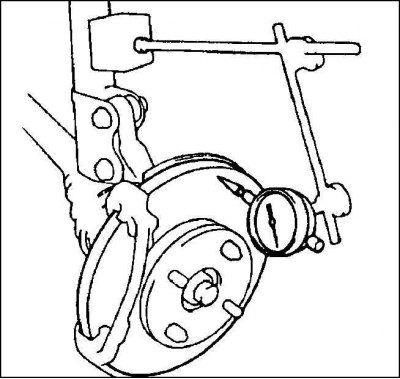
6. If a dial indicator is available, measure the lateral runout of the brake disc in the assembled state. Place the small movement dial indicator in the center of the braking surface.

Caution! Excessive lateral runout may be due to increased clearance in the wheel bearings, so first of all, you should adjust this clearance. If this does not help, replace the brake disc.


7. Position the wheels so that the markings applied before removing them match. Screw the wheels on. Remove the car from the stands and tighten the wheel bolts in a cross pattern to a torque of 110 N·m.
This article is available at: russian, bulgarian, belarusian, ukrainian, serbian, croatian, romanian, polish, slovak, hungarian
The article has been verified: Khromov Roman Mikhailovich
Share with friends:
◀ Previous
C-Class W202 / Brake system
Next ▶

Rear Disc Brake Pads — Removal and Installation
Front Brake Pads — Removal and Installation
Technical data of the brake system
Additional equipment — ASR system
Anti-lock braking system — ABS
Support — removal and installation
Front brake disc — removal and installation
Rear brake disc — removal and installation
Brake fluid
Bleeding the brake system
More similar articles for repairing other models

☛ Drum brake shoes — checking the remaining thickness Mercedes W168 (1997-2004)
☛ Checking the condition of the brake discs Mercedes W210 (1996-2002)
☛ Checking, removing and installing brake discs Mercedes W463 (1999-2019)
☛ Checking the brake system Mercedes W163 (1997-2005)
☛ Checking the thickness of brake discs Mercedes W126 (1979-1991, petrol)
☛ Checking the thickness of the friction linings of the brake pads and… Mercedes Vito 2 (2003-2014, diesel)
Link in different formats to this article
Comments and feedback from visitors
No comments yet


How much will 32 + 25 ?


W203 (2000-2007) 
  • General information
  • Introduction to guide
  • User manual
  • Maintenance
  • Power unit
  • Gasoline engines
  • Diesel engines
  • Cooling system
  • Ventilation and heating
  • Supply system
  • Injection system (gasoline)
  • Injection system (diesel)
  • Exhaust system
  • Ignition and control system
  • Charge and launch systems
  • Transmission
  • Mechanical gearbox
  • Automatic gearbox
  • Clutch and drive shafts
  • Differential
  • Chassis
  • Brake system
  • Car suspension
  • Steering
  • Body
  • Exterior (external elements)
  • Interior (internal elements)
  • Electrical equipment
  • Equipment and devices
  • Lighting system
  • Electrical diagrams (2000)
  • Electrical diagrams (since 2001)
W202 (1993-2000) 
  • General information
  • User manual
  • Driving a car
  • Car care
  • Maintenance
  • Power unit
  • Gasoline engines
  • Diesel engines
  • Lubrication system
  • Cooling system
  • Heating and ventilation
  • Ignition system
  • Fuel system
  • Injection system (gasoline)
  • Injection system (diesel)
  • Exhaust system
  • Transmission
  • Clutch
  • Car gearbox
  • Chassis
  • Suspension, wheels and tires
  • Steering
  • Brake system
  • Body
  • Exterior (external elements)
  • Interior (internal elements)
  • Doors and windows
  • Electrical equipment
  • Equipment and devices
  • Power devices
  • Lighting system
  • Electrical circuits
190 (W201) (1982-1993) 
  • General information
  • Introduction to the guide
  • Operation and care
  • Maintenance (gasoline)
  • Maintenance (diesel)
  • Troubleshooting
  • Power unit
  • Petrol engine I4
  • Petrol engine V6
  • Diesel engines
  • Engine overhaul
  • Cooling and heating
  • Power system (carburetor)
  • Injection system (gasoline)
  • Injection system (diesel)
  • Exhaust system
  • Charge and start system
  • Ignition system (I4)
  • Ignition system (V6)
  • Diesel heating system
  • Transmission
  • Clutch
  • Mechanical gearbox
  • Automatic gearbox
  • Cardan shaft and axle shafts
  • Chassis
  • Brake system
  • Car suspension
  • Steering
  • Body
  • Exterior (external elements)
  • Interior (internal elements)
  • Doors, locks and windows
  • Electrical equipment
  • Equipment and devices
  • Electrical circuits
 
MercedesMan.ru © 2017–2026 · Mobile version · Read about Mercedes · Sitemap: EN BG BY UA RS HR RO PL SK HU · Feedback · Site search · Bookmark A-Class (W168) · C-Class (W201) · C-Class (W202) · C-Class (W203) · E-Class (W123) · E-Class (W124) · E-Class (W210) · G-Class (W463) · M-Class (W163) · S-Class (W116, petrol) · S-Class (W126, petrol) · S-Class (W140) · S-Class (W220) · Sprinter · Vito 1 · Vito 2 · Vario 814D ·
 
We only use cookies without which some of the site's features may not be available.