
Vehicles without ASR traction control
Attention! To bleed air from the brake system of a vehicle with ASR, a control electronic device from Mercedes is required. The device is connected to the diagnostic plug on the right in the engine compartment. When you press the key, air is automatically removed from the ASR system.
After each repair of the brakes, in which the brake system is opened, air can enter the pressure pipes, which must be expelled from there. A sign of the presence of air in the pipelines of the system is the lowering of the brake pedal when you press it with your foot without tangible resistance. In this case, it is necessary to eliminate the leakage and remove air from the system.
Air is given by pressing the brake pedal, while still needing an assistant. If it is necessary to remove air from the entire brake system, then it should be removed from each brake cylinder individually. If the brake fluid is replaced regularly as part of maintenance, air must be bled from all four brake cylinders to prevent air from entering the brake system.
Air removal sequence:
- 1. Right rear caliper.
- 2. Left rear caliper.
- 3. Front right caliper.
- 4. Front left caliper.
If the caliper has been replaced or repaired, it is usually sufficient to bleed the corresponding cylinder. If the repair was carried out with an empty reservoir for the brake fluid, then it is necessary to remove air from the entire brake system.
Before bleeding, unscrew the cap of the brake fluid reservoir and fill in the brake fluid up to the mark "max".
Attention! Keep an eye on the brake fluid reservoir while bleeding. The brake fluid level must not drop too low, otherwise air will be sucked through the reservoir. Always top up with fresh brake fluid!
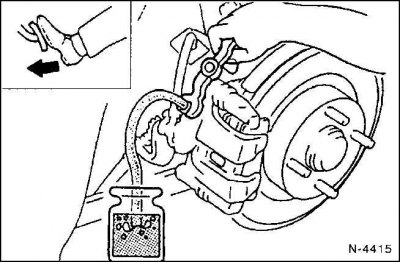
1. Remove the dust cap from the caliper breather valve. Clean the valve, put on a clean hose, and lower the other end of the hose into a container half filled with brake fluid.
2. Have an assistant depress the brake pedal ("sway"), until there is pressure in the brake system, which is felt by increasing resistance when you press the pedal.
3. When sufficient pressure is built up, fully depress the brake pedal and hold it in that position.
4. Open the breather valve on the caliper by turning the wrench about half a turn. Collect the spilled liquid in a vessel, make sure that the end of the hose is constantly below the liquid level in the vessel.
5. Close the breather valve as soon as fluid pressure decreases.
6. Repeat the inflation process until the pressure builds up. Press the brake pedal all the way down, keep your foot on the pedal, open the breather valve screw until the pressure is relieved, and tighten the valve screw.
7. Repeat this operation on one brake cylinder until the appearance of air bubbles in the brake fluid flowing into the vessel stops. Approximately 80 ml of brake fluid should flow out of one brake cylinder.
8. After priming, remove the hose from the breather air valve, put on the dust cap. Tighten the valve screw easily with a torque of 7 Nm.
9. Also bleed the other brake cylinders.
Attention! Keep an eye on the surge tank while bleeding. The brake fluid level must not drop too low, otherwise air will be sucked through the reservoir. Add only fresh brake fluid.
10. After bleeding is complete, add to the brake fluid reservoir up to the mark "max". Screw on the cover.
Attention! Carry out a security check:
- Are the bleed screws tight?
- Is the brake fluid level correct?
- with the engine running, check the tightness. To do this, press the brake pedal with a force of 200 to 300 N (20–30 kg) for approximately 10 seconds. The pedal must not move. Check the tightness of all connections.
11. Finally, make a few stops on a quiet street.