
Cars BMW Cars Volkswagen Cars Chevrolet Cars Land Rover Cars Lada Cars Honda Cars Peugeot
English Русский
Български
Беларускі
Український
Српски
Hrvatski
Română
Polski
Slovenský
Magyar
Bookmark News and articles Sitemap Feedback Site search
MercedesMan.ru


A-Class C-Class E-Class G-Class M-Class S-Class Others
190 (W201) (1982-1993) W202 (1993-2000) W203 (2000-2007)
  • Main
  • C-Class
  • W202 (1993-2000)
  • Chassis
  • Brake system
  • Front brake disc — removal and installation

Front brake disc — removal and installation (Mercedes-Benz C-Class W202)

0
Contents: Removal ↡ Installation ↡

Removal


1. Unscrew the front wheel caliper and hang it on a homemade wire hook to prevent the brake hose from interfering with traction.

Caution! Do not disconnect the brake hose, otherwise you will have to bleed the brake system.

Caution! Do not disconnect the brake hose, otherwise you will have to bleed the brake system.


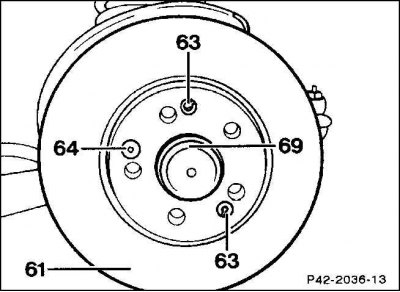
2. Unscrew the mounting bolt (64) using a socket wrench and remove the brake disc (61) from the wheel hub (69) and clamping sleeves (63).

Installation


1. To ensure equal braking on both sides, both brake discs must have the same ground surface and the same surface roughness height. Check the thickness of the brake discs/lateral runout.

Article borrowed from the web portal (www.mercedesman.ru)

2. Check the tightness of the brake shield seat on the wheel support. Tighten the bolts if necessary.

3. If there is rust on the brake disc flange and front wheel hub, remove it with a wire brush or sandpaper. Coat the wheel hub seat with a thin layer of high-temperature grease, such as Molykote-Paste "U", Molykote-Paste G Rapid, Liqui-Moly-Paste 36, so that the brake disc can be easily removed during subsequent dismantling.

4. Clean new brake discs with nitro solvent to remove protective varnish. Brake discs can also be cleaned and degreased with a high-pressure steam jet.


5. Place the brake disc on the front wheel hub, paying attention to the tightness of the protective bushings. Tighten the new mounting bolt with a tightening torque of 10 N·m.

6. Install the caliper.
This article is available at: russian, bulgarian, belarusian, ukrainian, serbian, croatian, romanian, polish, slovak, hungarian
The article has been verified: Khromov Roman Mikhailovich
Share with friends:
◀ Previous
C-Class W202 / Brake system
Next ▶

Support — removal and installation
Checking the thickness of brake discs and their lateral runout
Rear Disc Brake Pads — Removal and Installation
Front Brake Pads — Removal and Installation
Technical data of the brake system
Rear brake disc — removal and installation
Brake fluid
Bleeding the brake system
Brake lines / hoses
Replacing brake lines
More similar articles for repairing other models

☛ Front Brake Disc — Removal and Installation Mercedes W168 (1997-2004)
☛ Front brake disc — removal, inspection and installation Mercedes W124 (1984-1995)
☛ Emergency Brake Booster (BAS) Mercedes W463 (1999-2019)
☛ Removal and installation the brake disc Mercedes W163 (1997-2005)
☛ Removal and installation the front brake disc Mercedes W116 (1972-1980, petrol)
☛ Removal and installation the front brake disc Mercedes Sprinter (1995-2000, diesel)
Link in different formats to this article
Comments and feedback from visitors
No comments yet


How much will 34 + 35 ?


W203 (2000-2007) 
  • General information
  • Introduction to guide
  • User manual
  • Maintenance
  • Power unit
  • Gasoline engines
  • Diesel engines
  • Cooling system
  • Ventilation and heating
  • Supply system
  • Injection system (gasoline)
  • Injection system (diesel)
  • Exhaust system
  • Ignition and control system
  • Charge and launch systems
  • Transmission
  • Mechanical gearbox
  • Automatic gearbox
  • Clutch and drive shafts
  • Differential
  • Chassis
  • Brake system
  • Car suspension
  • Steering
  • Body
  • Exterior (external elements)
  • Interior (internal elements)
  • Electrical equipment
  • Equipment and devices
  • Lighting system
  • Electrical diagrams (2000)
  • Electrical diagrams (since 2001)
W202 (1993-2000) 
  • General information
  • User manual
  • Driving a car
  • Car care
  • Maintenance
  • Power unit
  • Gasoline engines
  • Diesel engines
  • Lubrication system
  • Cooling system
  • Heating and ventilation
  • Ignition system
  • Fuel system
  • Injection system (gasoline)
  • Injection system (diesel)
  • Exhaust system
  • Transmission
  • Clutch
  • Car gearbox
  • Chassis
  • Suspension, wheels and tires
  • Steering
  • Brake system
  • Body
  • Exterior (external elements)
  • Interior (internal elements)
  • Doors and windows
  • Electrical equipment
  • Equipment and devices
  • Power devices
  • Lighting system
  • Electrical circuits
190 (W201) (1982-1993) 
  • General information
  • Introduction to the guide
  • Operation and care
  • Maintenance (gasoline)
  • Maintenance (diesel)
  • Troubleshooting
  • Power unit
  • Petrol engine I4
  • Petrol engine V6
  • Diesel engines
  • Engine overhaul
  • Cooling and heating
  • Power system (carburetor)
  • Injection system (gasoline)
  • Injection system (diesel)
  • Exhaust system
  • Charge and start system
  • Ignition system (I4)
  • Ignition system (V6)
  • Diesel heating system
  • Transmission
  • Clutch
  • Mechanical gearbox
  • Automatic gearbox
  • Cardan shaft and axle shafts
  • Chassis
  • Brake system
  • Car suspension
  • Steering
  • Body
  • Exterior (external elements)
  • Interior (internal elements)
  • Doors, locks and windows
  • Electrical equipment
  • Equipment and devices
  • Electrical circuits
 
MercedesMan.ru © 2017–2026 · Mobile version · Read about Mercedes · Sitemap: EN BG BY UA RS HR RO PL SK HU · Feedback · Site search · Bookmark A-Class (W168) · C-Class (W201) · C-Class (W202) · C-Class (W203) · E-Class (W123) · E-Class (W124) · E-Class (W210) · G-Class (W463) · M-Class (W163) · S-Class (W116, petrol) · S-Class (W126, petrol) · S-Class (W140) · S-Class (W220) · Sprinter · Vito 1 · Vito 2 · Vario 814D ·
 
We only use cookies without which some of the site's features may not be available.