Cars BMW Cars Volkswagen Cars Chevrolet Cars Land Rover Cars Lada Cars Honda Cars Peugeot
English Русский
Български
Беларускі
Український
Српски
Hrvatski
Română
Polski
Slovenský
Magyar
Bookmark News and articles Sitemap Feedback Site search
MercedesMan.ru


A-Class C-Class E-Class G-Class M-Class S-Class Others
190 (W201) (1982-1993) W202 (1993-2000) W203 (2000-2007)
  • Main
  • C-Class
  • W202 (1993-2000)
  • Chassis
  • Brake system
  • Support — removal and installation

Support — removal and installation (Mercedes-Benz C-Class W202)

0
Contents: Removal ↡ Installation ↡
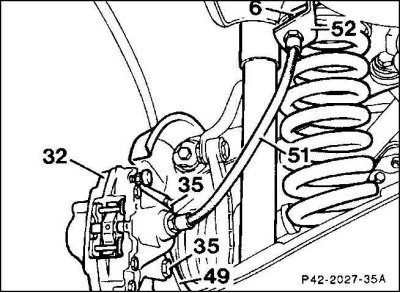
Front wheel support

Front wheel support
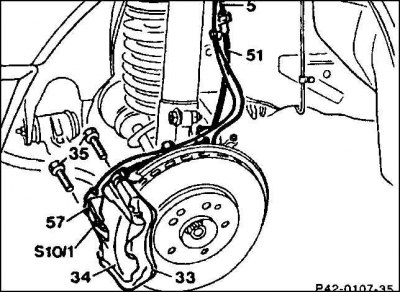
Rear wheel support

Rear wheel support

Removal


1. Mark the position of the wheels relative to the hub with paint. This will allow the balanced wheel to be put back in place after removal so that the balance is not disturbed. Loosen the wheel bolts without lifting the car, then place the car on stands and remove the wheels.
1. Mark the position of the wheels relative to the hub with paint. This will allow the balanced…


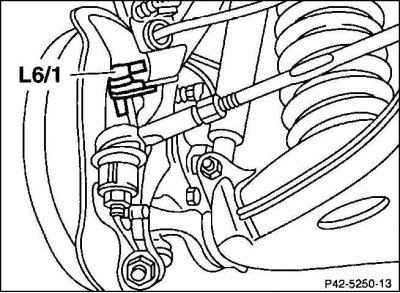
2. Turn off the ignition. Unscrew and remove the ABS speed sensor (L6/1).


3. Unscrew the 2 bolts securing the rear wheel brake caliper (35) to the wheel bearing housing and remove it outward.

4. Hang the caliper with a homemade hook to the body so that the brake hose and brake pad wear sensor wire do not get twisted or pulled.

5. If the caliper is to be removed completely, first unscrew the brake hose (51) from the hydraulic line using a 9x11 mm open-end double-ended spanner. Then unscrew the brake hose from the caliper.

Warning! Brake fluid will leak. Close the holes with plugs immediately to prevent the reservoir from emptying. After installation, the brake system must be bled. In vehicles with the ASR anti-slip system, a special device used in specialized workshops is required to bleed the brakes. Collect the leaking brake fluid in a specially designed container. Follow the instructions for handling brake fluid (see subsection 11.10.).


6. Disconnect the pad wear sensor at the caliper connector. Unscrew the connector from the caliper.

Installation


1. When replacing, keep in mind: the brake mechanism on both wheels of the same axle must have the same pistons from the same manufacturer.

2. Front brakes: Install the caliper and tighten it to the hub with two new self-locking bolts to a torque of 115 Nm.

Attention! If the bolts go in with difficulty, clean the threads from the remains of the fastener using a tap M 12x1.5.


3. Rear brakes: fit the caliper and secure with two new self-locking bolts to the hub with a torque of 50 Nm, in cars with the ASR system - 70 Nm.


Caution! If the bolts are difficult to insert, clean the threads from any remaining fasteners using an M 10 tap.

Caution! If the bolts are difficult to insert, clean the threads from any remaining fasteners using…


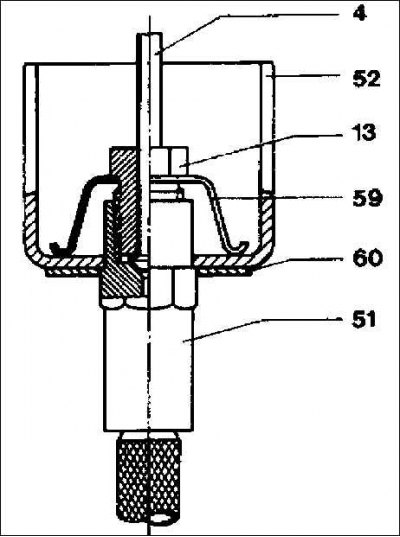
4. If the brake hose was removed, screw it to the hydraulic line with a torque of 15 N·m. Do not twist the hose when installing. A locking plate (60) with a twelve-sided socket is attached to the bracket (52). Insert the brake hose (51) into the locking plate so that it moves freely when the wheel is fully turned left and right, when the suspension spring is compressed and stretched. 4 - hydraulic line, 13 - union screw, 59 - brake hose bracket.

5. Lubricate the hole for the ABS speed sensor with Molykote Longtherm 2. Check the O-ring and replace if necessary. Install the speed sensor, tightening it with a new Allen bolt to 20 Nm,

6. Connect the brake pad wear sensor wire to the connector on the caliper.

7. If the brake system has been opened, bleed the brakes.

8. Position the wheels so that the markings applied before removing them match. Screw the wheels on. Remove the car from the stands and tighten the wheel bolts in a cross pattern to a torque of 110 N·m.

Caution! Press the brake pedal vigorously and repeatedly until you feel strong resistance. This adjusts the brake pads.


9. Check the brake fluid level in the reservoir and top up to the maximum mark if necessary.

Attention! Conduct a safety check:

  • are the brake hoses tight?;
  • is the brake hose in the bracket;
  • are the bleed screws tightened?;
  • is the brake fluid level ok?.

Caution! With the engine running, check for leaks. To do this, press the brake pedal with a force of 200 to 300 N (20–30 kg) for about 10 seconds. The pedal should not move. Check the tightness of all connections.


10. Finally, make a few braking attempts on a quiet street.
This article is available at: russian, bulgarian, belarusian, ukrainian, serbian, croatian, romanian, polish, slovak, hungarian
The article has been verified: Khromov Roman Mikhailovich
Share with friends:
◀ Previous
C-Class W202 / Brake system
Next ▶

Checking the thickness of brake discs and their lateral runout
Rear Disc Brake Pads — Removal and Installation
Front Brake Pads — Removal and Installation
Technical data of the brake system
Additional equipment — ASR system
Front brake disc — removal and installation
Rear brake disc — removal and installation
Brake fluid
Bleeding the brake system
Brake lines / hoses
More similar articles for repairing other models

☛ Rear Suspension Trailing Arm Support Play — Check Mercedes W168 (1997-2004)
☛ Replacing the intermediate support of the drive shaft Mercedes W123 (1976-1985)
☛ Removal and installation the knee support Mercedes W463 (1999-2019)
☛ Removal and installation the intermediate support bearing of the… Mercedes W116 (1972-1980, petrol)
☛ Removal and installation the front panel support crossmember Mercedes Vito 2 (2003-2014, diesel)
Link in different formats to this article
Comments and feedback from visitors
No comments yet


How much will 28 + 28 ?


W203 (2000-2007) 
  • General information
  • Introduction to guide
  • User manual
  • Maintenance
  • Power unit
  • Gasoline engines
  • Diesel engines
  • Cooling system
  • Ventilation and heating
  • Supply system
  • Injection system (gasoline)
  • Injection system (diesel)
  • Exhaust system
  • Ignition and control system
  • Charge and launch systems
  • Transmission
  • Mechanical gearbox
  • Automatic gearbox
  • Clutch and drive shafts
  • Differential
  • Chassis
  • Brake system
  • Car suspension
  • Steering
  • Body
  • Exterior (external elements)
  • Interior (internal elements)
  • Electrical equipment
  • Equipment and devices
  • Lighting system
  • Electrical diagrams (2000)
  • Electrical diagrams (since 2001)
W202 (1993-2000) 
  • General information
  • User manual
  • Driving a car
  • Car care
  • Maintenance
  • Power unit
  • Gasoline engines
  • Diesel engines
  • Lubrication system
  • Cooling system
  • Heating and ventilation
  • Ignition system
  • Fuel system
  • Injection system (gasoline)
  • Injection system (diesel)
  • Exhaust system
  • Transmission
  • Clutch
  • Car gearbox
  • Chassis
  • Suspension, wheels and tires
  • Steering
  • Brake system
  • Body
  • Exterior (external elements)
  • Interior (internal elements)
  • Doors and windows
  • Electrical equipment
  • Equipment and devices
  • Power devices
  • Lighting system
  • Electrical circuits
190 (W201) (1982-1993) 
  • General information
  • Introduction to the guide
  • Operation and care
  • Maintenance (gasoline)
  • Maintenance (diesel)
  • Troubleshooting
  • Power unit
  • Petrol engine I4
  • Petrol engine V6
  • Diesel engines
  • Engine overhaul
  • Cooling and heating
  • Power system (carburetor)
  • Injection system (gasoline)
  • Injection system (diesel)
  • Exhaust system
  • Charge and start system
  • Ignition system (I4)
  • Ignition system (V6)
  • Diesel heating system
  • Transmission
  • Clutch
  • Mechanical gearbox
  • Automatic gearbox
  • Cardan shaft and axle shafts
  • Chassis
  • Brake system
  • Car suspension
  • Steering
  • Body
  • Exterior (external elements)
  • Interior (internal elements)
  • Doors, locks and windows
  • Electrical equipment
  • Equipment and devices
  • Electrical circuits
 
MercedesMan.ru © 2017–2026 · Mobile version · Read about Mercedes · Sitemap: EN BG BY UA RS HR RO PL SK HU · Feedback · Site search · Bookmark A-Class (W168) · C-Class (W201) · C-Class (W202) · C-Class (W203) · E-Class (W123) · E-Class (W124) · E-Class (W210) · G-Class (W463) · M-Class (W163) · S-Class (W116, petrol) · S-Class (W126, petrol) · S-Class (W140) · S-Class (W220) · Sprinter · Vito 1 · Vito 2 · Vario 814D ·
 
We only use cookies without which some of the site's features may not be available.