
Removing
1. Mark with paint the position of the front wheels relative to the hub. Thanks to this, the balanced wheel after removal can be put in its place so that the balance is not disturbed. Loosen the wheel bolts without lifting the vehicle, then place the front of the vehicle on stands and remove the front wheels.
2. Pull the brake caliper outward by hand, as a result of which the brake pistons will be squeezed out a little.
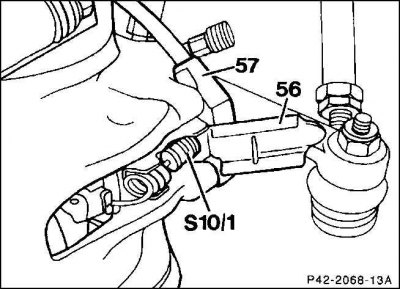
3. Open the lid (56) plug connection, for which slightly lift the retaining lateral projections with a screwdriver. Don't overdo it with this.
4. Disconnect the plug (57) lining wear sensor wires (S10/1). Do not pull on the wire while doing this.
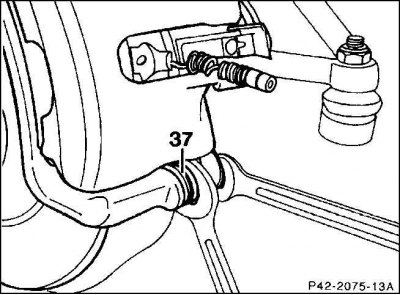
5. Unscrew the lower mounting bolt of the brake piston housing while holding the guide bolt (37) wrench.
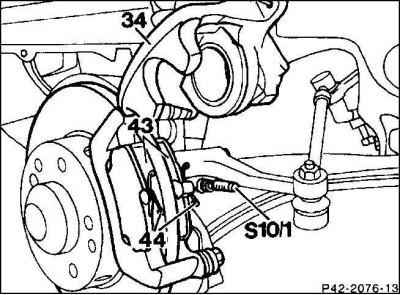
6. Swing out the piston housing (34) up and wire it to the suspension spring. When tilting, make sure that the guide bolts do not bend. Never use the piston housing to change the steering angle.
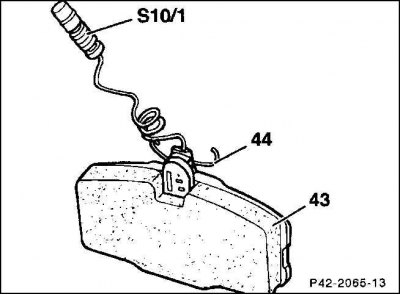
7. Remove pad linings (43) from the brake caliper. Additional components: 44 - spring clip; S10 / 1 - wear sensor wire.
8. Remove the wear sensor from the pad base. The sensor is usually located on the outer lining. In modification "Taxi" The sensor is on all pads.
9. If the wire insulation is frayed, replace the sensor.
Attention! Swapping internal and external pads, as well as the pads of the left wheel for the pads of the right one, is unacceptable. It can cause uneven brake action. All overlays of one axis change at the same time. Different wear of the pads cannot be the cause of claims. If the difference between the thickness of the inner and outer lining exceeds 2 mm, you should still check the caliper guide bolts for ease of movement and replace them if necessary.
Installation
Attention! Do not depress the brake pedal with the pads removed, otherwise the brake pistons will pop out of the housing. If this happened due to an oversight, remove the caliper and assemble it in a specialized workshop.
1. Clean the guide surfaces, the seat of the pad in the housing shaft with a suitable soft metal brush and a vacuum cleaner, or wipe with a cloth with alcohol. Do not use products containing mineral oil or sharp-edged tools for this. Before installing the pads, feel the brake disc with your fingers for irregularities, measure the thickness of the disc.
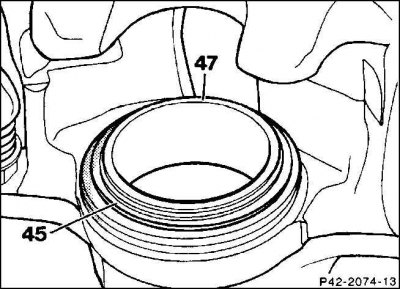
2. Check the boot (45) for cracks. Replace a damaged boot immediately, as penetrating dirt quickly disables the caliper. The floating caliper brake must be removed and disassembled by a specialist workshop.
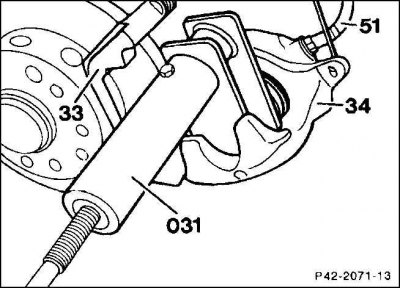
3. Set off the brake pistons with the special tool (031). A piece of wood will also come down (hammer handle), however, be especially careful not to warp the piston or damage the piston surfaces and dust boots.
Attention! When the pistons are pushed down, the brake fluid is squeezed out of the brake cylinders into the expansion tank. Watch the fluid level in the tank. It is advisable to suck off the brake fluid with a siphon.
4. For suction, use a plastic bottle used to store brake fluid only. Do not use drinking bottles. Brake fluid is poisonous and must not be sucked out by mouth. Use a suction siphon. After changing the pads, the brake fluid level must not exceed the maximum mark, because due to thermal expansion, the fluid may splash out of the reservoir. The leaked fluid, dripping from the master cylinder, corrodes the paintwork, which leads to corrosion.
Attention! If the linings are worn, check the ease of movement of the pistons. To do this, insert a suitable wooden block into the caliper and ask an assistant to slowly depress the brake pedal. Brake pistons should easily come out and settle back. When checking, the second caliper must be assembled. If, due to an oversight, the pistons popped out or go with difficulty, you need to remove the caliper and assemble it in a specialized workshop.
5. The next stage of work is not necessary: to prevent brake squeaking, lightly lubricate the back side and ends of the lining base (arrows) lubricants such as Plastilube, Tunap VC 582/S, Chevron SRJ/2, Liqui Moly LM-36 or LM-508-ASC. Grease must never get on the lining or brake disc. If necessary, immediately wipe off the lubricating paste and clean the lining with alcohol.
6. Insert both pads into the caliper. At the same time, make sure that the spring clip is parallel to the upper edge of the lining.
7. Install the wear sensor on the outer cover.
8. Return the piston housing to its original position and screw it to the shield with a new self-locking bolt with a torque of 35 Nm. At the same time, hold the guide bolt with an open-end wrench.
Attention! The self-locking fixing bolt can only be used once.
9. Twist the spiral wire of the sensor and connect it to the plug connector on the caliper. Close the plug cover.
10. Position the front wheels so that the markings made before removing them match. Grab the wheels. Lower the vehicle, tighten the wheel bolts in a cross pattern to 110 Nm.
Attention! Vigorously depress the brake pedal repeatedly until you feel strong resistance.
11. Check the brake fluid level in the reservoir, top up if necessary.
12. Gently lap in the new brake pads. To do this, repeatedly, after accelerating the car to 80 km / h, brake it to a speed of 40 km / h with slight pressure on the pedal. Allow the brakes to cool slightly between braking.
Attention! Before driving 200 km, avoid emergency braking.
13. Brake pads are a special waste and in each case, before throwing them away, you should find out if this is allowed.