
Front axle brake hose | 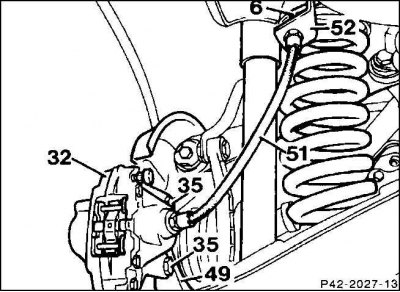
Rear axle brake hose |
Removing
1. Raise the vehicle.
2. Remove the union nut from the brake pipe.
Attention! This causes brake fluid to leak out. Close the brake wire connection in the direction of the brake master cylinder with a suitable plug so that the brake fluid does not completely leak out of the reservoir. After reassembly, the brake system must be bled of air. Vehicles with ASR require a special tool to bleed the brakes, so take it to a repair shop. Collect brake fluid in containers designed exclusively for it.
3. If possible, lay the new brake fluid line in the same place.
4. When connecting the pipeline, moisten the conical contact surface with a few drops of brake fluid and tighten with a torque of 15 Nm.
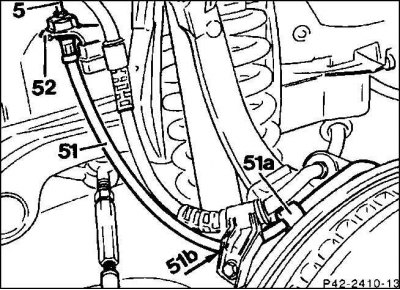
5. brake pipeline (5) or (6) unscrew from the brake hose (51). Use a 9x11 open end spanner while holding the brake hose with an open end wrench. Close the connection element with a stopper.
6. Disconnect the brake hose holder (51a).
7. Unscrew the brake hose (51) from the support.
Installation
1. Install only approved brake hoses.
2. Tighten the brake hose on the caliper with a torque of 20 Nm.
3. Screw the brake hose to the brake pipe with a torque of 15 Nm. The brake hose must not be twisted during installation. Secure the lock washer to the holder with a dodecahedron. So insert the brake hose into the lock washer so that it does not hit anything when the steered wheels are fully turned to the left or right. 4 - brake pipeline, 13 - union bolt, 59 - brake hose holder.
Attention! After repair holder (52) may be bent. Carefully straighten it, as even a slight change in the position of the holder on the base of the frame can change the path of the brake hose, causing it to rub against other parts of the car.
4. Pump the brakes.
Attention! Carry out a security check:
- Are all brake lines/hoses tightened?
- Are the bleed screws tight?
- Is the brake fluid level correct?
- with the engine running, check the tightness. To do this, press the brake pedal with a force of 200 to 300 N (20–30 kg) for approximately 10 seconds. The pedal must not move. Check the tightness of all connections.
5. Finally, make a few stops on a quiet street.
Brake booster control
The brake booster control is carried out if too much force on the brake pedals is necessary to achieve a sufficient braking effect.
1. With the engine stopped, firmly depress the brake pedal at least 5 times, then start the engine with the brake pedal loaded. In this case, the brake pedal should move noticeably under the foot.
2. Otherwise, unscrew the vacuum hose from the brake booster, start the engine. Place your fingers on the end of the vacuum hose and check for vacuum.
3. If there is no vacuum, check the hose for leaks and damage, replace it if necessary. Tighten all hose clamps firmly.
4. If there is a vacuum, measure it, if necessary, replace the brake booster (work in a repair shop).
Parking brake
Pedal/front cable drive
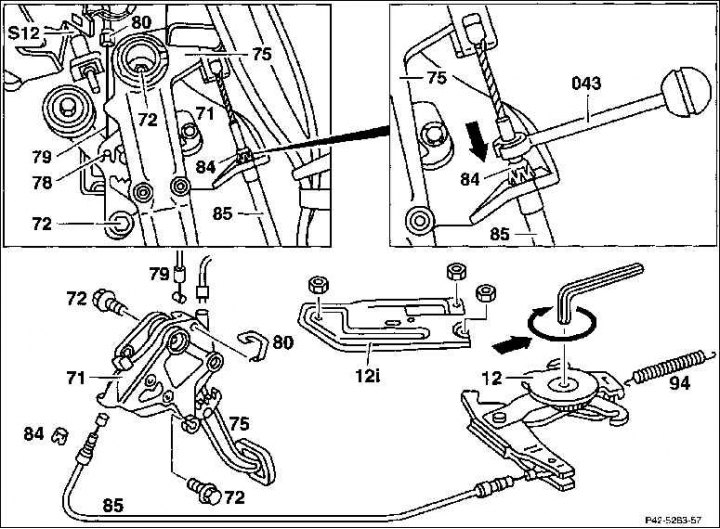
12i. Protective cover; 12. Automatic cable length equalizer; 94. Retractable spring; 85. Front brake cable; 75. Movable bar; 84c. Coupling ring; 043. Expanding device; 71. Hull; 73. Hex bolts; S12. Parking brake switch plug; 80. Spring clip; 79. Thrust; 71. Pedal; 94. Return spring
Removing the brake cable
1. Remove the back seat.
2. Remove the protective cover (12i).
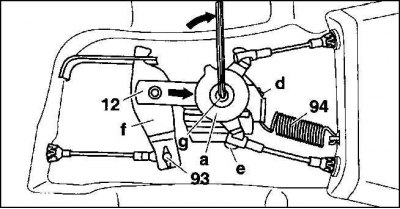
3. Tighten the automatic cable length equalizer (12). To do this, use a wrench with an Allen key to turn the crank (g) about 1/2 turn to the right and at the same time push it back in the slot until it locks into the spring housing (A) in spring clamp (g). (e - equalizer lever, f - intermediate lever, 93 - safety pin.)
4. Detach the release spring (94).
5. Disconnect the brake cable (85) from the sliding bar on the pedal, squeeze the turnbuckle together (85v) with expander (043) and pull out the rope. If there is no expander available (special tool), the cable can be removed by removing the clamping ring. When installing, insert the clamping ring into the groove of the cable.
Removing the pedal device
1. Remove the housing from the pedal assembly and unscrew the hex bolts (72).
2. Disconnect the plug of the parking brake control switch (S12). To do this, slightly raise the pedal device.
3. Remove the spring clip.
4. Disconnect the manual adjustment cable (79) and remove the pedal assembly.
Installation
1. Installation is carried out in the reverse order of disassembly of the pedal device.
2. Before installing the protective cover, loosen the cable length equalizer. To do this, lift the spring clip with a screwdriver. After that, the cable length equalizer is set automatically.
3. Apply the parking brake several times, and it will automatically adjust itself.