



Warning! Do not reuse used brake fluid! Old brake fluid is significantly darker than fresh. This makes it easy to distinguish between them.
Brake fluid should not be disposed of with household waste or elsewhere. Local authorities should provide information on brake fluid collection points.
General information
The tools required to perform the described procedure include the following:
- Open-end wrench for unscrewing the air bleed nipple;
- Transparent plastic hose with an internal diameter of 6 mm and a container for collecting brake fluid;
- The required amount of brake fluid corresponding to the specification.
Brake fluid absorbs atmospheric moisture through the pores of the brake hoses and the ventilation hole of the brake master cylinder reservoir. As a result, the boiling point of the fluid decreases during operation. Under heavy load on the brakes, this can even lead to vaporization, which reduces the effectiveness of the brakes.
Brake fluid should be replaced every 2 years, preferably in spring. If you frequently drive in mountainous areas, the fluid should be replaced more often.
At the service station, air is usually removed from the brake system using a special device. However, this can be done without using the specified device. In this case, the brake system is bled using the brake pedal. This requires the participation of an assistant.
If the fluid level drops sharply during the process of removing air from the brake system, air is sucked in and enters the ABS pump. In this case, air must be removed at a service station using a special device. When replacing any brake hose, air must also be removed from the system at a service station. Until this is done, the car cannot be used.
Bleeding of brake mechanisms is carried out in the following order:
- 1. Rear right support
- 2. Rear left support
- 3. Front right support
- 4. Front left support
Caution! Observe special precautions when working with brake fluid (see Chapter Brake and auxiliary systems).
Procedure execution order
1. Using a suction device, remove the brake fluid from the brake master cylinder reservoir, leaving a liquid layer of approximately 10 mm thick at the bottom of the reservoir. Do not remove all the liquid from the reservoir, otherwise air will enter the brake system.
2. Fill the expansion tank with fresh brake fluid up to the "MAX" mark.
3. Open the air bleed nipple carefully so as not to twist it. It is recommended to treat the nipple with a rust remover 2 hours before bleeding. If the nipple does not open, the operation of bleeding the air from the brake system should be entrusted to a workshop.
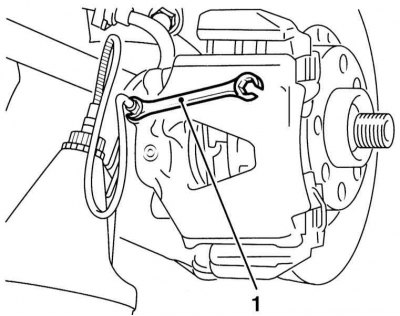
To unscrew the nipple, use a socket wrench with a slotted head
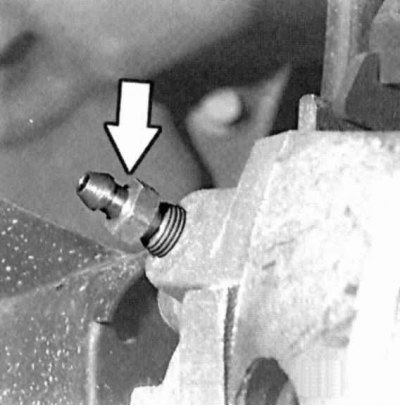
Air bleed nipple
4. On the right rear disc brake caliper, attach a clean transparent hose to the air bleed nipple and insert it into a suitable container.
5. Ask an assistant to repeatedly press the brake pedal until the counterpressure to pressing the pedal becomes noticeable. Press the pedal and open the air bleed nipple. Close the nipple after the brake pedal rests on the floor of the car body. Remove your foot from the pedal. Repeat this process, pump out approximately 400-500 ml of old brake fluid.
6. Close the air bleed nipple and fill the expansion reservoir with new brake fluid.
7. In the same way, pump out the old brake fluid from the other calipers or wheel brake cylinders, following the sequence indicated above.
Attention! The drained brake fluid must be clean and without air bubbles in any case! Approximately 400-500 cm³ of old brake fluid must be pumped out of each brake caliper.
8. Dispose of old brake fluid at a special collection point for used fuels and lubricants.
9. Press the brake pedal and check its free travel, which should not exceed 1/3 of the pedal travel.
10. Fill the brake fluid reservoir to the previously existing level.
11. Screw the cap onto the tank.
12. Make sure that the brake pipes and hoses are securely fastened in all the provided clamps. Check that the nipple connections and bleeder valves are securely tightened. Check the fluid level in the master cylinder reservoir.
13. With the engine running, check the tightness of the system. To do this, press the brake pedal about 10 times with a force of 200 - 300 N (corresponds to 20 - 30 kg). The brake pedal should not go back. Check all connections for leaks.
14. Finally, check the brakes on a road with light traffic. To do this, you need to make at least one strong braking, checking the ABS operation (a sign of ABS operation is pulsation of the brake pedal when braking).
Note: Watch out for traffic behind you. The ABS effect is best seen on unpaved roads.