



Contents: Signs of a problem with the brake…↡ Brake lines and hoses ↡ Checking the thickness of brake pads ↡ Disc brakes on the front wheels ↡ Rear wheel disc brakes ↡ Parking brake ↡
Warning! Dust from lining wear that accumulates on brake components may contain hazardous asbestos. Do not blow out this dust with compressed air or inhale it! Do not use gasoline-based solvents to remove dust. Dust should be washed off with a special brake system cleaner or methylated spirits into a drain container. After wiping the brake components with a damp cloth, keep the cloth and the contents of the drain container in a closed and labeled container. In the future, try to use asbestos-free components whenever possible.
Note: In addition to checking at specified intervals, the brakes should be checked whenever the wheels are removed or when the system shows signs of malfunction. The following brake system checks are the most important of all the vehicle maintenance procedures you can perform to ensure safe driving.
Signs of a problem with the brake system
1. Disc brake mechanisms can be equipped with built-in wear indicators for friction linings, signaling the need for immediate replacement of the pads to avoid failure of the brake discs.
2. Any of the following symptoms may indicate a potential defect in the brake system:
- a) When you press the brake pedal, the car "pulls" to one side;
- b) The brakes make scraping or squealing sounds when braking;
- c) The brake pedal travel is too long;
- d) Pressing the foot brake pedal is accompanied by pulsations not associated with the operation of the ABS;
- e) There are brake fluid leaks (usually on the inside of a tire or wheel).
3. If any of the above symptoms are detected, you should immediately check the condition of the brake system components.
Brake lines and hoses
Note: The hydraulic circuit of the brake system mainly uses steel tubes, the only exception being flexible reinforced hoses used to connect the tubes to the wheel cylinders. The condition of the flexible brake hoses should be checked regularly.
1. Park the car on a level surface and turn off the engine. Remove the wheel caps. Loosen, but do not remove, the lug nuts on all four wheels.
2. Jack up the car and place it on supports.
3. Remove the wheels.
4. Check all hydraulic lines and hoses of the brake system for cracks, abrasions, swelling, deformations and signs of developing leaks. Make sure that there are no signs of friction of the brake lines against the suspension and steering components. Carefully inspect all union connections of the hydraulic brake system for signs of developing leaks, check the reliability of fastening of union bolts and nuts.
5. By bending the flexible brake hoses in different directions, make sure there are no signs of mechanical damage. Make sure that the installed hoses are not twisted - a longitudinal colored stripe applied to the surface of the hose can be used as a tie.
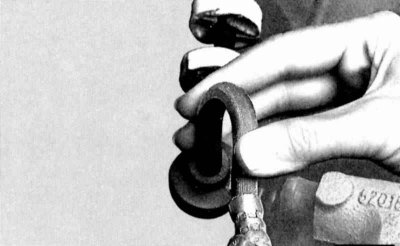
Cracks and cuts are most easily detected by kinking the brake hose
6. Turn the steering wheel to ensure that the flexible brake hoses of the front brake mechanisms do not come into contact with the steering gear components.
7. If signs of leak development are detected, the causes of the latter must be immediately eliminated (if necessary, see Chapter Brake and auxiliary systems).
Checking the thickness of brake pads
The residual thickness of the friction linings of the outer brake shoes can be assessed visually through the opening in the wheel disk using a pocket flashlight. To inspect the inner shoe, you will also need a mirror. A more accurate check of the condition of the brake shoes is made after their removal - to measure the thickness of the friction linings, you will need a caliper.
Disc brakes on the front wheels
Note. Experience shows that brake pad wear on the front passenger side is often higher than on the driver's side, which is why inspection should always begin with the right side of the car. According to statistics, pad wear is about 1 mm per 1,000 kilometers under unfavorable conditions. Under normal conditions, pad wear is significantly less. In reality, with a residual pad thickness of 10.0 mm (taking into account the metal substrate) the pad can be used for at least another 3000 km.
1. Mark the position of the front wheel in relation to the hub with paint. This will allow the balanced wheel to be set in its working position. Loosen the wheel bolts, then jack up the front of the car and place it on stands. Remove the right front wheel.
2. Using a caliper, measure the combined thickness of the friction lining with the metal backing on both brake shoes.
3. The wear limit of the front brake pads, when replacement must be made immediately, is 7 mm. A description of the procedure for replacing the pads is given in Chapter Brake and auxiliary systems.
4. After making sure that the marks made during dismantling are aligned, install the wheel in place. Without lubricating it, screw in the wheel bolts.
5. Lower the vehicle onto its wheels and, moving in a diagonal order, tighten the bolts to the required torque.
Rear wheel disc brakes
1. If installed, remove the decorative cap and visually assess the remaining thickness of the outer brake shoe lining through the opening in the wheel disk - use a flashlight if necessary.
2. Use a mirror to inspect the inner shoe.
3. As for the front brake mechanisms, the minimum permissible thickness of the rear pads is 7 mm (lining + backing).
Parking brake
The simplest, and perhaps most obvious, way to check that the parking brake is functioning properly is to hold the car on a steep downhill slope with the transmission in neutral, with the driver in the car. If the parking brake is unable to hold the car, it should be adjusted (see Chapter Brake and auxiliary systems).