
Warning! Gasoline is highly flammable, so special precautions must be taken when working on any component of the fuel system! Do not smoke, and do not approach the work area with an open flame or an uncovered carrier. Do not carry out such work in garages equipped with natural gas heaters (such as water heaters, dryers, etc.)! The work area must be well ventilated. If gasoline comes in contact with your skin, wash it off immediately with soap and water. Wear safety goggles and have a fire extinguisher handy when doing any work on the fuel system. If gasoline spills, immediately wipe up the puddle, but do not keep gasoline-soaked rags in places where there is a risk of ignition!
System check
1. If you smell gasoline while driving or after the car has stood in the sun, you should immediately check the condition of the entire fuel system.
2. Remove the fuel tank cap and check it for damage and corrosion. The sealing insert on the cover must be intact. Replace cap if damaged or corroded.
3. Inspect the intake and return lines of the fuel system for cracks. Check that the connections between the fuel system lines and the fuel injection system and between the fuel system lines and the integrated fuel filter are not loose.
Attention! On vehicles equipped with a fuel injection system, the pressure in the system must be relieved before servicing the fuel hoses (see chapter Relieving pressure in the fuel system of a gasoline engine)!
4. Since some fuel system components - such as the fuel tank and some fuel system lines - are located at the bottom of the vehicle, they are easier to inspect when the vehicle is winched up. If this is not possible, jack up the vehicle and place it on jack stands.
5. With the vehicle raised, inspect the fuel tank and filler neck for holes, cracks, or other damage. Pay special attention to the condition of the connection between the filler neck and the tank. Sometimes fuel leaks occur due to loosening of the clamps securing the rubber neck or due to deterioration of the neck material. Inspect all brackets and straps for securing the fuel tank to make sure it is securely attached to the vehicle.
Warning! Never, under any circumstances, attempt to repair the fuel tank (excluding the replacement of its rubber components). The flame of a welding machine or any other open fire can easily lead to an explosion of gasoline vapors inside the tank.
6. Carefully inspect all fuel hoses and metal lines from the tank for loose connections, kinks, signs of wear on hose materials, or other damage. Repair or replace damaged sections as necessary.
Filter replacement
Petrol models
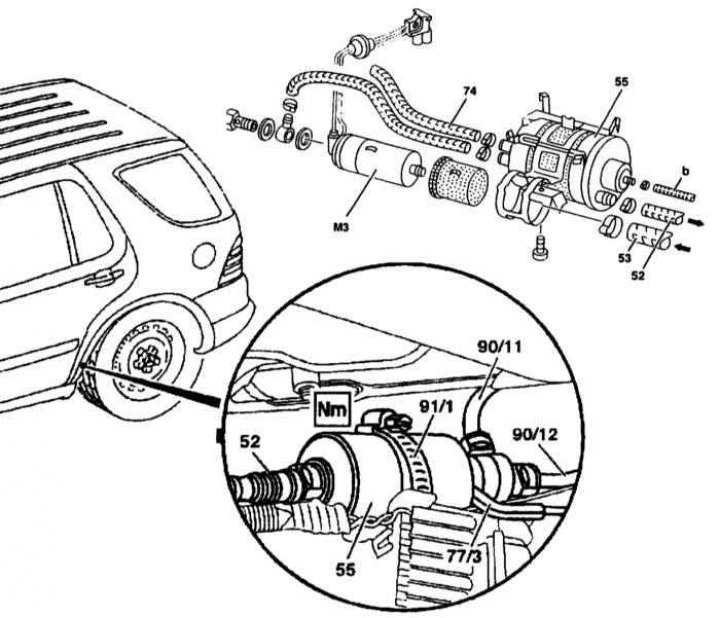
Fuel filter installation details on petrol models
52 - Fuel line going to the engine; 53 - Suction hose coming from the fuel tank; 55 - Fuel filter with built-in pressure regulator; 74 - Hose of the fuel return line to the fuel tank; 77/3 - Connector for connecting the spring chamber breather; 90/11 - Return line; 90/12 - Pressure line; 91/1 - Mounting collar; b - Air supply hose to diaphragm pressure regulator; M3 - Fuel pump
1. Details of installing the fuel filter on gasoline models are shown in the illustration.
2. Open the fuel tank cap to equalize the pressure in it with atmospheric pressure.
3. Remove the left rear wheel.
4. Remove the wheel arch protection locker.
5. Disconnect from assembly of the fuel filter pressure head (90/12) and return (90/11) lines, - squeeze the locking tabs on both sides of the lock, try not to twist the tubes.
6. Disconnect the spring chamber breather tube (77/3).
7. Release the clamp (91/1) and remove the fuel filter assembly with the pressure regulator attached to the front of it.
8. Assess the condition of the mounting collar, if necessary, replace it.
9. Installation is carried out in the reverse order. Tighten the fuel filter clamp with a force of 3 Nm.
10. Start the engine and check the relevant elements of the fuel path for signs of leak development, if necessary, tighten the mounting clamps / connectors.
Diesel models
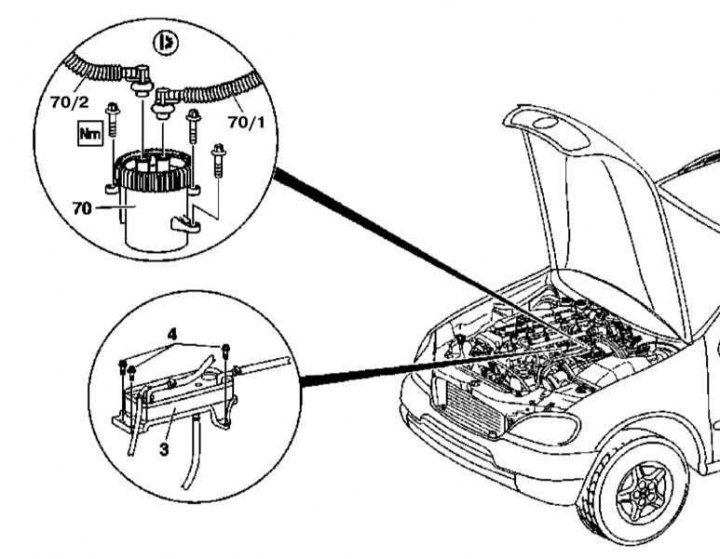
Fuel filter installation details on models 163.113 (ML 270 CDI) (1 of 2)
3 - Fuel cooler; 4 - Cooler mounting bolts; 70 - Fuel filter; 70/1 - Fuel supply line from the fuel tank; 70/2 - Fuel return line to fuel tank
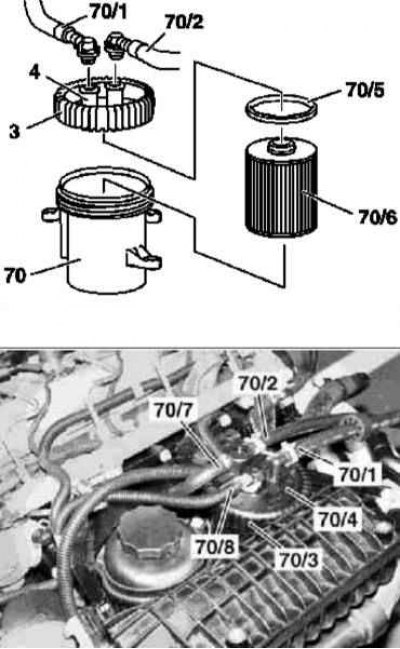
Fuel filter installation details on models 163.113 (ML 270 CDI) (2 of 2)
70 - Fuel filter; 70/1 - Fuel supply line from the fuel tank; 70/2 - Return fuel line to the fuel tank; 70/3 - Threaded ring; 70/4 - Cover; 70/5 - O-ring; 70/6 - Replaceable filter element; 70/7 - Return fuel line from the fuel line; 70/8 - Fuel supply line to the booster pump
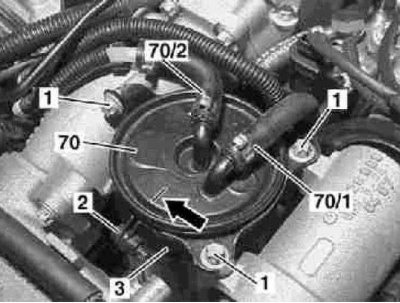
Fuel filter installation details on models 163.128 (ML 400 CDI)
1 - Bolts; 2 - Screw; 3 - Coupling collar; 70 - Fuel filter; 70/1 - Inlet fuel line; 70/2 - Outlet fuel line
The details of installing the fuel filter on diesel models are shown in the illustrations.
Removal of air from the diesel engine power supply system
If the engine has stopped due to the complete emptying of the fuel tank, then after refueling it is necessary to remove air from the fuel system. To do this, start the engine for no more than 60 seconds without interruption until it starts to run stably.