



Contents: Cars with gasoline engines ↡ Diesel engine ↡
Warning! No open flames near the workplace! No smoking! The workplace must be equipped with a fire extinguisher! Ensure good ventilation of the workplace. Fuel vapors are toxic. Wear protective glasses when performing work.
Cars with gasoline engines
The fuel filter in cars with a gasoline engine is located on the bottom of the car under the driver's seat together with the adsorber.
Removal
1. Disconnect the ground (-) cable from the battery with the ignition off.
Caution! This will delete the security code from the radio, if any. In this case, you will need to enter the code after connecting the radio. If it is unknown, the radio can only be used after the code has been entered by a Mercedes workshop or the manufacturer. It is therefore recommended to make sure that the code is known and written down before disconnecting the radio.
2. Relieve the pressure in the fuel system by opening and closing the fuel tank cap.
Warning! Jacking up your vehicle may pose a risk of injury. Read the safety precautions for jacking up your vehicle and placing it on jack stands.
3. Place the vehicle on jack stands.
4. Provide sufficient access to the fuel filter by removing the middle part of the engine protection, see the relevant chapter.
5. Mark the fuel hoses with tape to ensure proper installation.
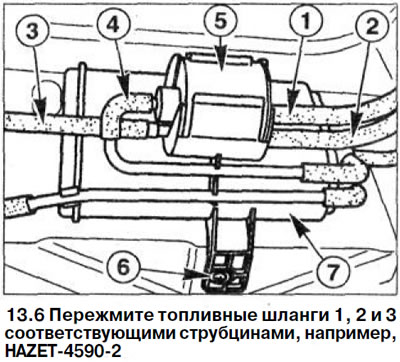
6. Clamp fuel hoses 1,2 and 3 with appropriate clamps, for example, HAZET-4590-2 (see illustration).
7. Disconnect the fuel hoses. Collect the fuel flowing out of the hoses with a rag that absorbs the liquid well enough, or place a suitable container underneath to collect the leaking fuel.
8. Disconnect the ventilation hose 4 from the fuel filter 5 (see illustration 13.6).
9. Unscrew bolt 6 (see illustration 13.6).
10. Disconnect the adsorber 7 from the guides and remove it together with the fuel filter 5 (see illustration 13.6). 11 Disconnect the fuel filter from the adsorber.
Installation
12. Connect the new filter to the adsorber.
13. Install the adsorber on the guides and secure it with bolts.
14. Connect the fuel and ventilation hoses to the filter, following the marks made during removal, and secure the hoses with clamps.
15. Reinstall the removed underbody protection.
16. Lower the car onto its wheels.
17. Connect the ground (-) cable terminal to the negative battery terminal with the ignition off.
18. Enter the security code into the radio and set the electronic clock.
Diesel engine
The fuel filter in vehicles with a diesel engine is located in the engine compartment near the engine.
Removal
19. Disconnect the ground (-) cable from the battery with the ignition off.
Caution! This will delete the security code from the radio, if any. In this case, you will need to enter the code after connecting the radio. If it is unknown, the radio can only be used after the code has been entered by a Mercedes workshop or the manufacturer. It is therefore recommended to make sure that the code is known and written down before disconnecting the radio.
Attention! Collect the fuel that flows out when removing the fuel filter with a rag that absorbs the liquid well enough, or place a suitable container underneath to collect it.
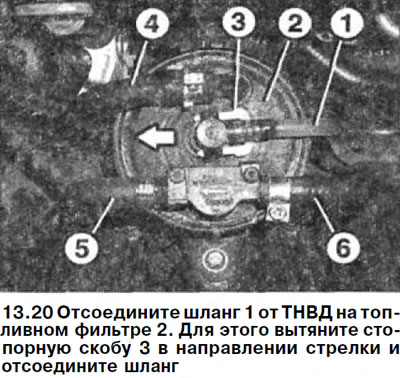
20. Disconnect hose 1 from the high-pressure fuel pump on fuel filter 2. To do this, pull out locking clip 3 until it stops, as shown by the arrow in the illustration, and disconnect the hose (see illustration).
Caution! Immediately after removing the hose, return the locking clamp to its original position, because the clamp cannot be left in the unlocked state for a long time.
21. Mark fuel hoses 4, 5 and 6 with tape, loosen the hose clamps and move them to the hoses. Then disconnect the hoses (see illustration 13.20).
22. Unscrew the three bolts securing the fuel filter to the intake manifold and remove it.
Installation
23. Install the new fuel filter into place on the inlet manifold and tighten the bolts to a tightening torque of 9 Nm.
24. Connect the fuel hoses to the filter, following their markings made before removal, and secure with clamps.
25. Check the condition of the sealing ring on the connecting joint of the transparent fuel hose and make sure that the ring is not damaged or has not become porous. Replace the sealing ring if necessary.
26. Check the position of the locking bracket. If the locking bracket has been unfastened for a long time, then it is necessary to change the fuel line as a set.
27. Place the fuel line onto the filter nipple and ensure that it is seated tightly by moving it on the nipple.
28. Connect the ground (-) cable terminal to the negative battery terminal with the ignition off.
29. Enter the security code into the radio and set the electronic clock.